


Simplified Programming Overview
You can program the multimeter to take measurements from the remote
interface using the following simple seven-step sequence.
1. Place the multimeter in a known state (often the reset state).
2. Change the multimeter’s settings to achieve the desired configuration.
3. Set-up the triggering conditions.
4. Initiate or arm the multimeter for a measurement.
5. Trigger the multimeter to make a measurement.
6. Retrieve the readings from the output buffer or internal memory.
7. Read the measured data into your bus controller.
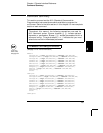
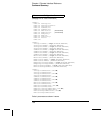
The MEASure? and CONFigure commands provide the most straight-
forward method to program the multimeter for measurements. You can
select the measurement function, range, and resolution all in one
command. The multimeter automatically presets other measurement
parameters (ac filter, autozero, trigger count, etc.) to default values as
shown below.
Command
AC Filter (DET:BAND)
Autozero (ZERO:AUTO)
Input Resistance (INP:IMP:AUTO)
Samples per Trigger (SAMP:COUN)
Trigger Count (TRIG:COUN)
Trigger Delay (TRIG:DEL)
Trigger Source (TRIG:SOUR)
Math Function (CALCulate subsystem)
MEASure? and CONFigure Setting
20 Hz (medium filter)
OFF if resolution setting results in NPLC < 1;
ON if resolution setting results in NPLC
≥ 1
OFF (fixed at 10 M
Ω for all dc voltage ranges)
1 sample
1 trigger
Automatic delay
Immediate
OFF
MEASure? and CONFigure Preset States
First-time
SCPI users,
see page 154.
Chapter 4 Remote Interface Reference
Simplified Programming Overview
112