


Page11
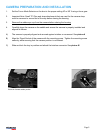
The AQUATICA A30D Housing System features a bayonet mount. To mount the port or extension ring simply:
1. Place the housing on its back on a soft steady surface.
2. Place the port or extension ring inside the main port of the housing. Align one of the four alignment
notches with the opening of the housing.
3. Place your hands on opposite sides of the port or extension ring.
4. Push on one side of the port or extension ring until you feel it snap into place. Then press the other
side until it, snaps into place. Make sure the bayonet is completely inside the housing.
5. Finally turn the Port clockwise approximately 60 degrees until it stops. Do not force it. If there is too
much resistance take the port off, check the O-ring and retry.
6. Check to ensure for the proper seating and sealing of the port on the housing.
Note: It is recommended that you familiarize yourself with this mount by trying it without the camera; this will allow you to
see the inside view of the bayonet mount and of the ports or extension rings in the housing.
MOUNTING AND ATTACHING FLASHES
Depending on which strobe system you are using, you can mount the necessary shoes or brackets or Base Ball onto the
threaded holes on the top of the hand grips. Use of the Aquatica TLC Strobe Arm System is recommended.
There are also two 1/4”-20 threaded holes on the bottom of the housing that can be used for various mounting applica-
tions. For example, Aquatica TLC makes a strobe arm mounting tray that will fit on the bottom of the housing. Two 1/4”-
20 threaded holes on top of the housing will accept an Aquatica bracket or Base Ball that can hold a small dive light or a
strobe arm.
The AQUATICA A5D Digital housing is fitted with a Standard Nikonos type connector (optional double configuration).
- When using the Standard Nikonos sync cord make sure to lubricate the O-ring on the sync cord’s connector
with a light coat of O-ring grease. Also put a light coat of O-ring grease on the threads of this connector.
TAKING A PICTURE
Following are the basic techniques. For more information and advanced photography please study the Canon 30D
instruction manual.
1. Turn the Function dial Knob until the desired exposure mode appears on the LCD window. Exposure
Mode options in sequence are: Depth of Field auto (A-DEP), Manual Exposure (M), Aperture Priority Auto
(Av), Shutter Priority Auto (Tv), and Programmed Auto (P), This dial also access other automatic function
which are of limited uses for underwater photography,
Note: When using a flash, it is recommended that the camera be used only in Single Frame Motor
Drive or there is the possibility that the camera will fire before the flash can recycle.
2. Pull the Shutter Release Lever partially back. This will activate the camera’s meter and autofocus system.
- If using manual focus use the Focus Knob on the housing or the flat port to focus.
(Read the warning in the “Focus Gear installation” section)
- If using the Manual or Shutter mode adjust the Main Command Knob to set the shutter speed.
3. Pull the Shutter Release Lever the rest of the way until the camera fires.