


USING the #780050 SLR CAMERA ADAPTER
for 80mm SPOTTING SCOPES
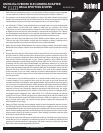
1. With the scope mounted securely on a sturdy tripod, rotate the bayonet mount eyepiece
counter-clockwise until white index dot is about at the position shown in Photo #1.
2. The eyepiece can be easily pulled straight out when it has been rotated to the correct
position for removal. Note the outer threaded area that will be used to attach the 780050
camera adapter (in place of the eyepiece-the adapter has its own internal optics).
3. You will need a “T-Mount” ring, available from most larger retail or internet photographic
or optics dealers. Consult with your dealer to make sure you purchase the correct
T-Mount for your SLR camera brand and model. You will need to specify if you have a lm
or digital camera, and also (for some brands) if it has manual or auto-focus. The T-Mount
has standardized screw threads on one side (for attaching to the 780050 camera adapter)
and the bayonet lugs that t your type of SLR camera body on the other end.
4. Remove the dust caps from both ends of the 780050 camera adapter, then screw your
T-Mount ring onto it (the smaller, straight end of the adapter as shown), making sure to
keep them parallel so you don’t cross-thread them or strip the threads.
5. Attach the connected 780050 adapter and T-Mount ring by carefully screwing the larger,
ared end of the adapter onto the outer threaded part of the scope’s eyepiece mounting
opening.
6. Remove the lens from your SLR camera (check its manual if you have not done this before),
and set it aside in a safe, dust-free place, attaching front and rear protective caps to the
lens if you have them. Attach the camera body onto the T-Mount by lining up the index
mark on the T-Mount with the one on your camera (typically a red or white dot), then
carefully rotating the camera body until it clicks into place on the T-Mount (the direction
of rotation will vary with camera brand/model). An alternative method is to loosen the
large screw on the outside of the adapter near the T-Mount (see arrow, photo #4), allowing
you to hold the camera body still and rotate the back half of the adapter along with the
T-Mount until they click into place on the camera. This screw on the camera adapter
is also provided so you can easily rotate the mounted camera relative to the spotting
scope, so it is in position ready to use or access camera controls while the camera remains
securely mounted.
7. To take photos, use the self-timer feature or a remote shutter release for your camera
to avoid vibration. Focus using the focus knob on the scope as you look through the
camera’s viewnder (or display on some digital models). Some cameras may allow you to
use auto exposure (“aperture priority” mode), but most will require switching to manual
mode and experimenting with shutter speed and/or ISO settings to get the correct
exposure, as there is no connection between the camera’s electronics and the scope,
which gives you the equivalent of a 1000mm (35mm lm or sensor) or 1500mm (APS-C
size digital sensors) telephoto “lens” with a xed f/13.3 eective aperture. An internet
search for the “Sunny 16 Rule” will give you a good starting point-with the camera set to
ISO 200, typical shutter speeds will likely be between 1/200 and 1/400 sec. on a bright
day. If you get dark results, use a slower shutter speed or higher ISO setting (and vice
versa if photos are too light).
8. When you nish using the camera adapter, simply reverse the assembly process: remove
the SLR body from the T-Mount and replace the lens you normally use on it, unscrew the
camera adapter from the scope (you may keep the adapter and T-Mount connected if you
like for faster assembly next time), and nally bayonet the eyepiece back on to the scope,
starting with it lined up as shown in photo #1, then rotating it clockwise until the white
index dot is centered at the top again.
9. Even with an expensive SLR camera and the high quality of your Elite scope, getting good
results like you see in magazines or websites can take a lot of patience, experience and
practice. An internet search for “digiscoping” will yield a variety of useful tips and ideas
from other nature and photography enthusiasts.
1
2
3
4
5
6
©2011 Bushnell Outdoor Products
Lit# 98-2162 / 06-11