


ENG
EF-M LENS Instructions
EF-M11-22mm f/4-5.6 IS STM
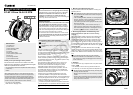
Nomenclature
① Focusing ring
② Hood mount
③ Filter Mounting Thread
④ Lens mount index
⑤ Contacts
⑥ Zoom position index
⑦ Lens retracted position index
⑧ Zoom ring
⑨
Focal length indicator
⑩
Lens-retraction switch
Thank you for purchasing a Canon product.
The Canon EF-M11-22mm f/4-5.6 IS STM is a 2x wide-
angle zoom lens developed for interchangeable-lens digital
cameras compatible with EF-M lenses*.
*
Only the following cameras are compatible with EF-M lenses (as
of June 2013)
:
EOS M
When attaching this lens to a Canon EOS M camera with
firmware earlier than version 2.0.0, there is a slight chance
that the camera will not operate properly during shooting.
Therefore, please be sure to update the EOS M firmware to
version 2.0.0 or later (For information about updating your
camera’s firmware, please check the Canon website).
•
"IS" stands for Image Stabilizer.
•
"STM" stands for stepping motor.
Safety Precautions
•
Do not look at the sun or a bright light source through
the lens. Doing so could result in vision loss or blindness.
•
Whether it is attached to the camera or not, do not
leave the lens under the sun without the lens cap
attached. This is to prevent the lens from concentrating the
sun’s rays, which could cause a fire.
Handling Cautions
•
If the lens is taken from a cold environment into a warm
one, condensation may develop on the lens surface
and internal parts. To prevent condensation in this case,
first put the lens into an airtight plastic bag before taking it
from a cold to warm environment. Then take out the lens
after it has warmed gradually. Do the same when taking the
lens from a warm environment into a cold one.
•
Do not leave the lens in excessive heat such as in a car in direct
sunlight. High temperatures can cause the lens to malfunction.
•
Please also refer to the handling cautions found in your
camera’s instructions.
Conventions used in this instruction
Warning to prevent lens or camera malfunction or
damage.
Supplementary notes on using the lens and taking
pictures.
This device complies with Part 15 of the FCC Rules. Operation
is subject to the following two conditions: (1) This device may
not cause harmful interference, and (2) this device must accept
any interference received, including interference that may
cause undesired operation.
Do not make any changes or modifications to the equipment
unless otherwise specified in the instructions. If such changes
or modifications should be made, you could be required to stop
operation of the equipment.
This equipment has been tested and found to comply with
the limits for a class B digital device, pursuant to part 15
of the FCC Rules. These limits are designed to provide
reasonable protection against harmful interference in a
residential installation. This equipment generates, uses and
can radiate radio frequency energy and, if not installed and
used in accordance with the instructions, may cause harmful
interference to radio communications.
However, there is no guarantee that interference will not occur
in a particular installation. If this equipment does cause harmful
interference to radio or television reception, which can be determined
by turning the equipment off and on, the user is encouraged to try to
correct the interference by one or more of the following measures:
•
Reorient or relocate the receiving antenna.
•
Increase the separation between the equipment and receiver.
•
Consult the dealer or an experienced radio/TV technician for help.
This Class B digital apparatus complies with Canadian ICES-
003.
1. Mounting and Detaching the Lens
See your camera’s instructions for details on mounting and
detaching the lens.
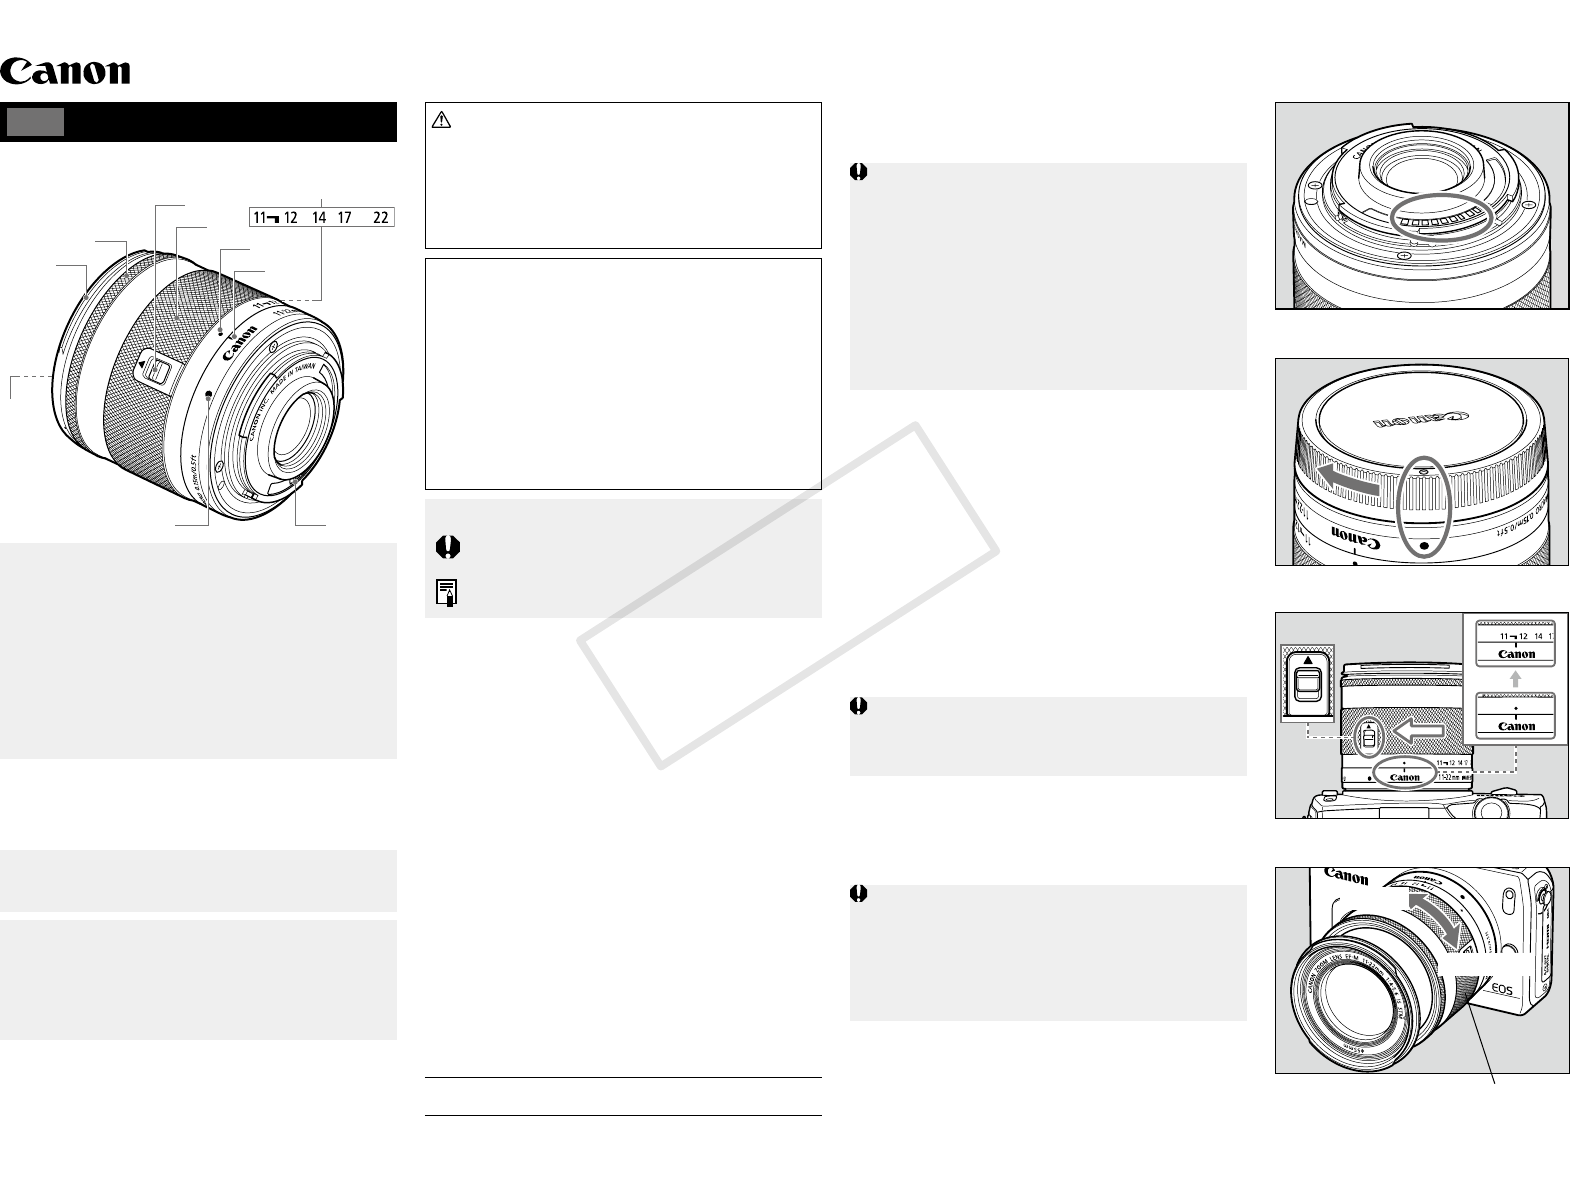
•
After detaching the lens, place the lens with the rear end
up to prevent the lens surface and contacts from getting
scratched. (fig.❶)
•
If the contacts get soiled, scratched, or have fingerprints
on them, corrosion or faulty connections can result. The
camera and lens may not operate properly.
•
If the contacts get soiled or have fingerprints on them, clean
them with a soft cloth.
•
If you remove the lens, cover it with the dust cap. To
attach it properly, align the lens mount index and the
index of the dust cap as shown in the diagram, and turn
clockwise. (fig.❷) To remove it, reverse the order.
2. Shooting Preparations and Retracting Lens
Shooting Preparations: (Set the lens to the shooting
position)
Align the lens retract position index and zoom position index.
Maintain pressure on the lens-retraction switch in the [▲]
direction. Slightly rotate the zoom ring in the direction of the
white arrow to release the lens-retraction switch and rotate
further until it clicks. The lens now ready for shooting. (The no.
11 pointing line in the focal length indicator which shows above
or to the left of the zoom position index extension line.) (fig.
❸
)
Retracting Lens:
Maintain pressure on the lens-retraction switch in the [▲]
direction. Rotate the zoom ring in the opposite direction to the
white arrow. Align the lens retract position index and the zoom
position index. Release the lens-retraction switch to retract the
lens.
Do not forcibly rotate the zoom ring if its movement
becomes constricted at the retractable end or the wide
end, as there is a danger of damaging the lens-retraction
switch mechanism.
3. Zooming
Turn the lens’ zoom ring to adjust the size of the photo field or
subject. (fig.
❹
)
•
For wide shots, turn the zoom ring toward the wide end.
•
For close-ups, turn the zoom ring toward the telephoto end.
•
Be sure to finish zooming before focusing. Zooming after
focusing can affect the focus.
•
Blurring may temporarily occur if the zoom ring is quickly
rotated.
•
Zooming during still image exposure will result in delayed
focus. This causes any streaks of light that are captured
during exposure to be blurred.
Wide end
Telephoto end
Zoom ring
❹
❸
❷
❶
ENG-1
CT1-8587-001
C OPY