


ST-200 User Manual 5
Revision: 2004-11-02/11:23
SETUP
Lamp
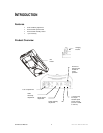
The xenon 200 watt lamp comes pre-installed from the factory.
Warning! When replacing the lamp, please wait 15 minutes after powering down to allow the
unit to cool down! Always disconnect from main power prior to lamp replacement.
Do not touch the envelope (glass area) of the bulb with bare hands. If this happens, clean the lamp
with alcohol and wipe it with a lint free cloth before installation.
LAMP INSTALLATION
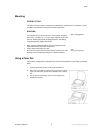
1) Unscrew the three most left and right screws on the back of the ST-200X and lift the front cover
carefully. The segment display can remain attached to the PCB during lamp replacement.
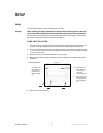
2) Unscrew the three lamp wires from their respective terminals on the PCB as illustrated in Figure
3. You may need to clip the tie-wraps that restrain the loose wires to the screw posts on the PCB
in order to free the lamp.
3) Slide lamp socket out of the thin metal plate one end at a time.
4) Replace strobe with new lamp and re-fasten wires to the terminals. (CHAUVET lamp model #
BL-200ST)
5) Replace front cover and screws.
Lamp side with 2 wires;
1. Wire molded into
ceramic base is
fastened to
terminal labeled J4
2. Wire coiled around
the envelope of the
bulb gets fastened
to terminal labeled
J5.
Lamp side with 1
wire molded into
ceramic base
gets fastened to
terminal labeled
J3.
J3
J4
J5
Top view
ST-200 Lamp Installation