


2-43
Cisco Video Surveillance IP PTZ Dome Camera User Guide, Cisco 2900 Series IP Dome
OL-24281-01
Chapter 2 Operation
Events Tab
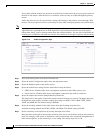
Step 4 Click in the Name box and type a user-friendly name (2 to 23 alphanumeric characters).
Step 5 Select Send Email from the Type drop-down menu.
Step 6 Click in the text boxes (To, From, Subject, and Message), and then type the necessary information in
each text box.
Step 7 Select the JPEG Snapshot box if you want to send a JPEG as an attachment.
Step 8 Select the Attach Raw Event Data box if you want the e-mail to include extra data about the event.
For example, select this box if the event is triggered by an alarm and you want to receive data about the
state, time, or type of alarm.
Step 9 If you do not want the handler activated every time an event occurs, set filters for the handler.
a. Select the day(s) of the week on which you want e-mails to be sent.
b. Type times in the Start and End boxes for the days you have selected. Use time values in 24-hour
notation (for example, use 0800 for 8:00 a.m., 1600 for 4:00 p.m.).
Step 10 Select one or more event sources to send an e-mail when those event sources are activated.
Step 11 Click the Submit button to save the settings, or click the Reset button to clear all of the information you
entered without saving it.
See the following sections for more information:
• System Tab, page 2-7
• Example Handler Filter Setup, page 2-44
Creating an Event Handler: Upload JPEG to FTP Server
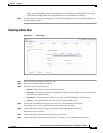
Step 1 Place your mouse pointer over the Events tab.
Step 2 Select Handlers from the drop-down menu.
Step 3 Click in the Name box and type a user-friendly name (2 to 23 alphanumeric characters).
Step 4 Select “Upload JPEG to FTP Server” in the Type drop-down menu.
Step 5 Click in the Server box and type the server address (1 to 32 alphanumeric characters).
Step 6 Click in the Username box and type the user’s name (1 to 32 alphanumeric characters).
Step 7 Click in the Password box and type a password (4 to 16 alphanumeric characters).
Step 8 Click in the Base Path box and type the base path (1 to 32 alphanumeric characters).
Step 9 The JPEG files uploaded to the FTP server will be given file names that correspond to the date and time
of the event. Select a time standard from the “File name” drop-down menu.
Step 10 If you do not want the handler activated every time an event occurs, set filters for the handler.
a. Select the day(s) of the week on which you want JPEGs saved to the FTP server.
b. Type times in the Start and End boxes for the days you have selected. Use time values in 24-hour
notation (for example, 0800 for 8:00 a.m. and 1600 for 4:00 p.m.).
Step 11 Select one or more sources to save a JPEG to the FTP server when those event sources are activated.