2-13
Cisco Catalyst Blade Switch 3120 for HP Hardware Installation Guide
OL-12246-01
Chapter 2 Switch Installation
Planning and Creating a Switch Stack
Step 5 At the prompt, press Return.
Step 6 Enter end.
Step 7 Enter copy running-configuration startup-configuration to save this setting.
Step 8 At the prompt, press Return.
Step 9 To verify that this switch is set as the switch master, enter the show switch user EXEC command.
For more information about creating switch stacks, see the “Planning and Creating a Switch Stack”
section on page 2-13.
Refreshing the PC IP Address
After you complete Express Setup, you should refresh the PC IP address:
• For a dynamically assigned IP address, disconnect the PC from the switch module, and reconnect
the PC to the network. The network DHCP server assigns a new IP address to the PC.
• For a statically assigned IP address, change it to the previously configured IP address.
Planning and Creating a Switch Stack
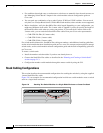
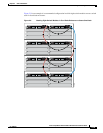
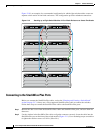
A switch stack is a set of up to nine stacking-capable switch modules that are connected through their
StackWise Plus ports. One of the switches controls the operation of the stack and is called the stack
master. The stack master and the other switches in the stack are stack members. Layer 2 and Layer 3
protocols present the entire switch stack as a single entity to the network. Stacking is optional.
When switch modules are not stacked, each acts as a standalone switch. For general concepts and
procedures to manage switch stacks, see the switch module software configuration guide and command
reference on Cisco.com.
Caution The Cisco Catalyst Blade Switch 3120 for HP does not support switch stacks with other types of blade
switches as members. Combining the Cisco Catalyst Blade Switch 3120 for HP with other types of blade
switches in a switch stack might cause the switch to work improperly or to fail.
Before you connect the switch modules in a stack, keep in mind these stacking guidelines:
• You should install the stack master switch module and run the initial setup program on that switch
module before you connect the StackWise Plus cables to other stack members. We recommend that
you assign the highest priority value to the switch module that you prefer to be the stack master. This
ensures that the switch is re-elected as stack master if a re-election occurs. As you add new switch
modules to the stack, they automatically become stack members.
To assign a priority value through the Onboard Administrator after you have installed and initially
configured the first switch module, see the
“Setting the Installed Switch Module As the Stack
Master” section on page 2-12.
• When you connect the StackWise Plus cables and create a stack, you can communicate with the
master switch internal Ethernet management port (Fa0) port, but not the Fa0 ports of the member
switches. Only one Fa0 interface can be active, and that interface is the one on the active stack
master.


