


3-30
Cisco Video Surveillance 4300 and 4500 High-Definition IP Cameras User Guide
OL-19609-04
Chapter 3 Configuring and Managing the IP Camera
Administration Windows
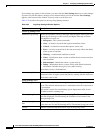
Table 3-19 Maintenance Settings Window Options
Option Description
Factory Default Area
Restore button Click the Restore button to reset all IP camera settings to their factory
default values.
To confirm the restore procedure, click OK in the confirmation pop-up
window. Otherwise, click Cancel.
This action has the same effect as pressing and holding the Reset button on
the IP camera for at least 15 seconds. After you perform this procedure,
follow the steps in the “Performing the Initial Setup of the IP Camera”
section on page 2-5.
Reset button Click the Reset button to reset all IP camera settings except the static IP
address, gateway IP address, and log in credentials (user name and
password) to their factory default values.
To confirm the restore procedure, click OK in the confirmation pop-up
window. Otherwise, click Cancel.
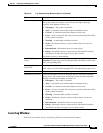
Reboot Area
Reboot button Click the Reboot button to reboot the software on IP camera.
To confirm the reboot procedure, click OK in the confirmation pop-up
window. Otherwise, click Cancel.
This action has the same effect as pressing and immediately releasing the
Reset button on the IP camera, or powering the IP camera down and then
powering it up.
Device Configuration Area
Export Configuration
from Camera
Click the Export button to save the current IP camera configuration
information to a binary file.
When you click this button, the File Download window appears. Use this
window to save the configuration file.
You can then load this configuration information to any same-model IP
camera in the network. This feature is useful for creating a backup of this
configuration and for configuring other IP cameras based on this
configuration.