


3-10
Cisco Video Surveillance 5010/5011 Indoor Fixed HD IP Dome Camera User Guide
OL-22669-02
Chapter 3 Operation
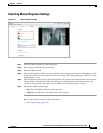
Network Tab
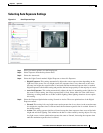
General Network Settings
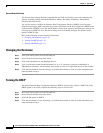
The General Network page includes programmable and read-only fields for network communication
settings. Available settings include the Hardware Address, Hostname, IP Address, Subnet Mask,
Gateway, and DNS Servers.
You can also enable or disable the Dynamic Host Configuration Protocol (DHCP) server from the
General Network page. DHCP automatically assigns an IP address to the device if there is a DHCP server
on the network. If DHCP is set to On, the IP address, subnet mask, gateway, and DNS server settings are
read-only text. If DHCP is set to Off, these settings must be manually changed. The default camera
setting for DHCP is On.
Refer to the following sections for more information:
• Changing the Hostname, page 3-10
• Turning On DHCP, page 3-10
• Turning Off DHCP, page 3-11
Changing the Hostname
Step 1 Place your mouse pointer over the Network tab.
Step 2 Select General from the drop-down menu.
Step 3 Click in the Hostname box and highlight the text.
Step 4 Type a user-friendly name into the Hostname box (1 to 21 characters) using any combination of
alphanumeric characters. A user-friendly name makes it easier to recognize the device on the network.
Step 5 Click the Save button to save the settings, or click the Reset button to clear all of the information you
entered without saving it.
Turning On DHCP
The default Dynamic Host Configuration Protocol (DHCP) setting for the camera is DHCP On. If the
DHCP option is set to Off, complete the following steps to reset it to On.
Step 1 Place your mouse pointer over the Network tab.
Step 2 Select General from the drop-down menu.
Step 3 Select the On option for DHCP.
Step 4 Click the Save button to save the settings, or click the Reset button to clear all of the information you
entered without saving it.