


4-4
Cisco Video Surveillance 6020 IP Camera Installation Guide
OL-28120-02
Chapter 4 Camera Management
Powering the IP Camera On or Off
Powering the IP Camera On or Off
The IP camera does not include an on/off switch. You power it on or off by connecting it to or
disconnecting it from a power source. When you power off the IP camera, configuration settings are
retained.
To power on the IP camera, take either of these actions:
• Use an STP (shielded twisted pair) Category 5 or higher network cable to connect the IP camera to
a network switch that provides 802.3af compliant PoE.
• Use an optional 12 VDC or 24VAC power adapter to connect the IP camera to a wall outlet
To power off the IP camera, take either of these actions:
• If the IP camera is receiving PoE, disconnect the network cable
• If the IP camera is receiving power through the power adapter, unplug the adapter from the wall or
disconnect it from the camera
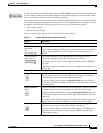
Resetting the IP Camera
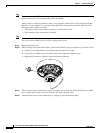
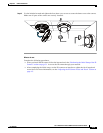
You reset the IP camera by pressing the Reset button on the IP Camera (see Figure 1-1 on page 1-3).
There are various reset types, as described in Table 4-3.
You also can also perform these reset operations from the Maintenance Settings window as described in
the Cisco Video Surveillance 6000 Series IP Camera Configuration Guide.
Viewing Live Video
After you install and set up the Cisco Video Surveillance IP Camera, you can connect to the IP camera
through Internet Explorer and access the Camera Video & Control window to view live video.
The Camera Video & Control window also provides for controlling the video display, configuring preset
positions, and controlling certain IP camera functions. Available controls depend on the privilege level
of the user.
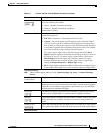
Ta b l e 4-3 Resetting the IP Camera
Reset Type Procedure Remarks
Reboot. Press and immediately release
the Reset button.
This action is equivalent to
powering the IP camera down
and then powering it up. Settings
that are configured for the IP
camera are retained.
Factory reset. Press and hold the button for at
least 15 seconds.
Sets all IP camera options to
their default values. After you
perform this procedure, follow
the steps in the
“Performing the
Initial Setup of the IP Camera”
section on page 3-1.