


2-19
Cisco Video Surveillance 2630 IP Dome User Guide
OL-24130-02
Chapter 2 Getting Started
Powering the IP Camera On or Off
Powering the IP Camera On or Off
The IP camera does not include an on/off switch. You power it on or off by connecting it to or
disconnecting it from a power source. When you power off the IP camera, it retains configuration
information.
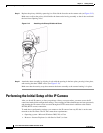
To power on the IP camera, connect the IP camera to a 24 VAC power source.
To power off the IP camera, unplug the power source from the wall or disconnect it from the camera.
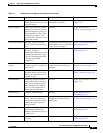
Resetting the IP Camera
You can reset the IP dome by disassembling it and pressing the Reset button on the camera unit (see
Figure 1-2 on page 1-5). There are various reset types, as described in Table 2-1.
You also can perform some reset operations from the Maintenance window as described in the
“Maintenance Window” section on page 3-14.
Cleaning the IP Camera
To clean an IP camera, follow these guidelines:
• To clean external components, use a clean, dry, soft cloth to gently wipe the components. Do not use
liquid cleaners on the dome assembly, except for cleaners that are designed specifically for
optical-grade acrylic.
• To clean the lens, use only tissue paper or solution that is designed for high quality optical lenses.
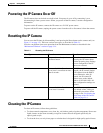
Ta ble 2-1 Resetting the IP Camera
Reset Type Procedure Remarks
Reboot. Press and immediately release
the Reset button.
This action is equivalent to
powering the IP camera down
and then powering it up. Settings
that are configured for the IP
camera are retained.
IP address reset. Press and hold the Reset button
for at least 1 second but no more
than 9 seconds.
If DHCP is enabled in your
network, the IP camera obtains
an IP address from the DHCP
server. Otherwise, after 90
seconds, the IP camera IP
address resets to the default
address of 192.168.0.100. All
other configuration settings are
retained.
Factory reset. Press and hold the Reset button
for at least 10 seconds.
Sets all IP camera options to
their default values. After you
perform this procedure, follow
the steps in the
“Performing the
Initial Setup of the IP Camera”
section on page 2-14.