


3-5
Cisco Video Surveillance 2630 IP Dome User Guide
OL-24130-02
Chapter 3 Configuring and Managing the IP Camera
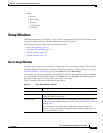
Setup Windows
• Status
–
System
–
Audio/Video
–
Network
–
Syslog & Log
–
Video Log
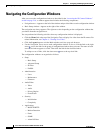
Setup Windows
The Setup windows let you configure a variety of basic and advanced settings for the IP camera, and to
designate IP addresses that are allowed or denied access to the IP camera.
The following sections describe the Setup windows in detail:
• Basic Setup Window, page 3-5
• Advanced Setup Window, page 3-7
• IP Filter Window, page 3-10
• EAPOL Window, page 3-11
Basic Setup Window
The Basic Setup window provides options for configuring device and network settings for the IP camera.
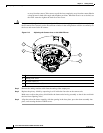
To display the Basic Setup window, access the configuration windows as described in the “Accessing the
IP Camera Windows” section on page 2-16, click Setup, then click Basic Setup.
If you change any options except the Current Date/Time in the Basic Setup window, you must click Save
to save the changes. To discard the changes, click Cancel before clicking Save. These buttons appear at
the bottom of the window. You may need to scroll down to see them.
Table 3-2 describes the options in the Basic Setup window.
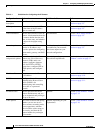
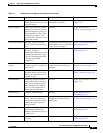
Ta ble 3-2 Basic Setup Window Options
Option Description
Device Settings
Device ID Display only. Unique identifier of the IP camera. The device ID is configured
for the IP camera at the factory.
Camera Name Enter a name for the IP camera. This name appears in the video log if an
event occurs. (For related information, see the
“Video Log Window” section
on page 3-44.)
The camera name can include any combination of up to 15 letters and
numbers. Cisco recommends that you give each IP camera a unique name so
that you can identify it easily.