


24-18
User Guide for Cisco Security Manager 4.4
OL-28826-01
Chapter 24 Managing Site-to-Site VPNs: The Basics
Accessing Site-to-Site VPN Topologies and Policies
open the Site-to-Site VPN Manager to edit the policies for the selected VPN. This device view
policy is essentially a short-cut into the Site-to-Site VPN Manager. For more information about
using this policy, see Configuring VPN Topologies in Device View, page 24-19.
• Site-to-Site VPN folder in Policy view—Policy view is used to create shared policies. Many of the
site-to-site VPN policies are shareable. Thus, you can configure shared policies that you can assign
to more than one VPN topology while configuring the topology in the Site-to-Site VPN Manager.
You can configure shared policies as defaults for the Create VPN wizard, as described in
Understanding and Configuring VPN Default Policies, page 24-12.
You can also create shared policies from the Site-to-Site VPN Manager window in much the same
way you can create them from local policies in Device view, although all sharing commands in the
Site-to-Site VPN Manager window are available only on the right-click context menu (when
right-clicking a shareable policy).
For more information on creating shared policies in Policy view, see Managing Shared Policies in
Policy View, page 5-47.
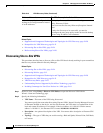
Site-to-Site VPN Manager Window
The Site-to-Site VPN Manager lists all site-to-site VPNs configured in Security Manager. The VPNs
selector, in the upper left pane of the window, lists all existing VPN topologies (see Understanding VPN
Topologies, page 24-2). An icon indicates the type of VPN (hub and spoke, point to point, or full
mesh).To view or edit a topology, select it, and its policies are loaded into the policy selector in the lower
left pane. Select a policy to see its definition in the right pane.
To open the Site-to-Site VPN Manager, click the Site-To-Site VPN Manager button on the toolbar or
select Manage > Site-To-Site VPNs.
Use the Site-to-Site VPN Manager window to:
• Create, edit, and delete VPN topologies.
–
To create a VPN topology, click the Create VPN Topology (+) button above the VPN selector
and select the type of topology you want to create from the options that are displayed. This
action opens the Create VPN Wizard or the Create Extranet VPN wizard. For more information,
see Creating or Editing VPN Topologies, page 24-28 or Creating or Editing Extranet VPNs,
page 24-63.
–
To edit a VPN topology, select it and click the Edit VPN Topology (pencil) button, or
right-click it and select Edit. This opens the Edit VPN or Edit Extranet VPN dialog box, which
contains the most of the same pages as the Create VPN wizard in a tabbed layout.
–
To delete a VPN topology, select it and click the Delete VPN Topology (trash can) icon, or
right-click it and select Delete. You are asked to confirm the deletion. See Deleting a VPN
Topology, page 24-67.
• View detailed information about each VPN topology; select the topology, then select the VPN
Summary policy. See Viewing a Summary of a VPN Topology’s Configuration, page 24-59.
• View and configure the endpoints defined for a VPN topology. You can see endpoints on the
Endpoints tab or when editing a VPN topology, or by selecting the Peers policy. For GET VPN
topologies, there is no Peers policy; instead, use the Key Servers and Group Members policies to
view and configure endpoints. For Extranet VPNs, the endpoints are on the Device Selection tab
when editing the VPN, or also in the Peers policy.
• View and edit the policies assigned to a VPN topology, assign shared policies, or create shared
policies from existing policies. For information on individual policies, see Overview of Site-to-Site
VPN Policies, page 24-8.