


34-21
User Guide for Cisco Security Manager 4.4
OL-28826-01
Chapter 34 Using Map View
Managing VPNs in Map View
Displaying Existing VPNs on the Map
To display an existing VPN on the map, select Map > Show VPNs on Map. You are prompted with a
list of existing VPNs. Select the ones you want from the available VPNs list and click >> to move them
to the selected list.
Tip You can also remove a VPN using this command. Select the VPNs you want to remove from the selected
VPNs list and click <<. When you remove a VPN, only the VPN tunnels are removed. The device nodes
remain on the map.
When you display a VPN, all of the its member devices are added to the map as device nodes, and all of
its tunnels are highlighted. However, devices that you removed from the map previously are not added,
even if they are members of a VPN that you display. You can add such devices to the map manually, and
their VPN connectivity is displayed.
A VPN tunnel is a line on the map that represents a VPN connection between two devices. VPN tunnels
are not added to the map automatically when you add a device node that is a member of a VPN. However,
if the VPN was already selected to be shown on the map, adding a device in the VPN to the map will
also display the tunnel.
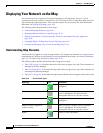
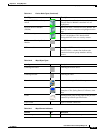
For an explanation of the icons used in the map, see Understanding Map Elements, page 34-14.
Creating VPN Topologies in Map View
You can create VPN connections between VPN-capable managed device nodes that are displayed on the
map. You cannot create Extranet VPNs, however.
To create a VPN, do one of the following:
• Click the New VPN button in the toolbar and select the type of VPN you want to configure:
point-to-point, hub and spoke, or full mesh.
• Select the devices that you want to participate in the VPN (use Ctrl+click to select multiple devices),
and either right click and select the command for the desired type of VPN, or click the New VPN
button and select the VPN type.
Consider the following tips:
–
Select only 2 devices to create a point-to-point VPN.
–
If you create a hub-and-spoke VPN, the device you right-click is initially defined as the hub,
but you can change that in the wizard.
–
While in the wizard, you can add or remove devices. You are not restricted to the devices you
selected on the map.
Using either technique, the Create VPN wizard opens, where you can create the VPN. For more
information, see Creating or Editing VPN Topologies, page 24-28 or click the Help button in the wizard.
The VPN is displayed on the map when you are finished with the wizard.
Related Topics
• Selecting Map Elements, page 34-12