


35-6
User Guide for Cisco Security Manager 4.4
OL-28826-01
Chapter 35 Getting Started with IPS Configuration
Overview of IPS Configuration
• IDSM—Configure the IDSM Settings Catalyst platform policy. For more information, see IDSM
Settings, page 65-44.
• IPS modules on ASA devices—Configure the Platform > Service Policy Rules > IPS, QoS, and
Connection Rules policy on the host ASA to specify the traffic that should be inspected. For more
information, see About IPS Modules on ASA Devices, page 56-14 and IPS, QoS, and Connection
Rules Page, page 56-5.
Step 4 Use the Virtual Sensors policy to assign interfaces to the virtual sensors, including the base vs0 virtual
sensor that exists for all IPS devices. For information about virtual sensor settings and assigning
interfaces to a virtual sensor, see Defining A Virtual Sensor, page 37-5.
If the device supports it, and you have a need for it, you can also create user-defined virtual sensors so
that a single device acts like multiple sensors. Most of the IPS configuration is done on the parent device,
but you can configure unique settings per virtual sensor for signatures, anomaly detection, and event
actions. For more information, see Chapter 37, “Configuring Virtual Sensors”.
Step 5 Configure basic device access platform policies. These policies determine who can log into the device:
• AAA—Configure this policy if you want to use a RADIUS server to control access to the device.
You can use AAA control in conjunction with local user accounts defined in the User Accounts
policy. See Configuring AAA Access Control for IPS Devices, page 35-19.
• Allowed Hosts—The addresses of hosts who are allowed access. Ensure that the Security Manager
server is included as an allowed host, or you cannot configure the device using Security Manager.
See Identifying Allowed Hosts, page 35-7.
• SNMP—Configure this policy if you want to use an SNMP application to manage the device. See
Configuring SNMP, page 35-8.
• Password Requirements—You can define the acceptable characteristics of a user password. See
Configuring User Password Requirements, page 35-18.
• User Accounts—The user accounts defined on the device. See Configuring IPS User Accounts,
page 35-16.
Step 6 Configure basic server access platform policies. These policies identify the servers to which the device
can connect:
• External Product Interface—If you use Management Center for Cisco Security Agents, configure
this policy to allow the sensor to download host postures from the application. See Configuring the
External Product Interface, page 35-23.
• NTP—Configure this policy if you want to use a Network Time Protocol server to control the device
time. See Identifying an NTP Server, page 35-21.
• DNS, HTTP Proxy—The DNS and HTTP Proxy policies are required only if you configure global
correlation. They identify a server that can resolve DNS names to IP addresses. Use the HTTP Proxy
policy if your network requires the use of a proxy to make Internet connections; otherwise, use the
DNS policy. See Identifying DNS Servers, page 35-22 or Identifying an HTTP Proxy Server,
page 35-23.
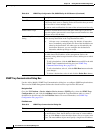
Step 7 Configure the Logging policy if you want non-default logging. See Configuring IPS Logging Policies,
page 35-26.
Step 8 Configure IPS signatures and event actions. Event action policies are easier to configure than creating
custom signatures, so try to use event action filters and overrides to modify signature behavior before
trying to edit specific signatures. For more information, see the following topics:
• Chapter 39, “Configuring Event Action Rules”
• Configuring Signatures, page 38-4