


14-6
User Guide for Cisco Security Manager 4.4
OL-28826-01
Chapter 14 Managing TrustSec Firewall Policies
Overview of TrustSec Firewall Policies
About Speaker and Listener Roles
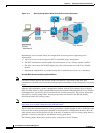
The ASA supports SXP to send and receive IP-SGT mappings to and from other network devices.
Employing SXP allows security devices and firewalls to learn identity information from access switches
without the need for hardware upgrades or changes. SXP can also be used to pass IP-SGT mappings from
upstream devices (such as datacenter devices) back to the downstream devices. The ASA can receive
information from both upstream and downstream directions.
When configuring an SXP connection on the ASA to an SXP peer, you must designate the ASA as a
Speaker or a Listener for that connection so that it can exchange identity information:
• Speaker mode—configures the ASA so that it can forward all active IP-SGT mappings collected on
the ASA to upstream devices for policy enforcement.
• Listener mode—configures the ASA so that it can receive IP-SGT mappings from downstream
devices (SGT-capable switches) and use that information in creating policy definitions.
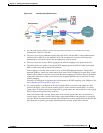
If one end of an SXP connection is configured as Speaker, then the other end must be configured as a
Listener, and vice versa. If both devices on each end of an SXP connection are configured with the same
role (either both as Speakers or both as Listeners), the SXP connection will fail and the ASA will
generate a system log message.
Configuring the ASA to be both a Speaker and a Listener for an SXP connection can cause SXP looping,
meanings that SXP data can be received by an SXP peer that originally transmitted it.
As part of configuring SXP on the ASA, you configure an SXP reconcile timer. After an SXP peer
terminates its SXP connection, the ASA starts a hold down timer. Only SXP peers designated as Listener
devices can terminate a connection. If an SXP peer connects while the hold down timer is running, the
ASA starts the reconcile timer; then, the ASA updates the IP-SGT mapping database to learn the latest
mappings.
Prerequisites for Integrating an ASA with Cisco TrustSec
Before configuring the ASA to integrate with Cisco TrustSec, you must perform the following
prerequisites:
• Register the ASA with the ISE.
• Create a security group for the ASA on the ISE.
• Generate the PAC file on the ISE to import into the ASA.
Registering the ASA with the ISE
The ASA must be configured as a recognized Cisco TrustSec network device in the ISE before the ASA
can successfully import a PAC file.
1. Log into the ISE.
2. Choose Administration > Network Devices > Network Devices.
3. Click Add.
4. Enter the IP address of the ASA.
5. When the ISE is being used for user authentication in the Cisco TrustSec solution, enter a shared
secret in the Authentication Settings area.
When you configure the AAA sever on the ASA, provide the shared secret you create here on the
ISE. The AAA server on the ASA uses this shared secret to communicate with the ISE.