


NEW
era
a heating revolution from Creda
Thermostatic Panel
Radiator
Owners Guide
Model Numbers:
85301, 85302, 85303, 85304, 85305
85311, 85312, 85313, 85314, 85315
IMPORTANT INSTRUCTIONS
Retain these instructions for future reference, read them carefully and note also the information given
on the heater.
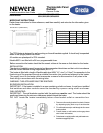
Dimensions (millimetres)
150
150
min
Model Watt A B
85301 / 85311
750 444 93
85302 / 85312
1000 614 93
85303 / 85313
1250 614 93
85304 / 85314
1500 682 93
85305 / 85315
2000 852 93
The TPR Heater is designed for wall mounting on the wall brackets supplied. It should only be operated
when in the upright position as shown.
All models are splashproof to IP24 standard.
Models 8530.. are fitted with a 24 hour programmable timer.
Before connecting the heater check that the supply voltage is the same as that stated on the heater,
INSTALLATION:
The electrical installation must be carried out by a competent electrician and be in strict accordance
with the current National Wiring Regulations (BS7671).
The heater is fitted with a length of flexible cable type H05V V-F, size 3 x 1.0mm
2
for connection to the
fixed wiring of the premises through a suitable connection box positioned adjacent to the heater.
The supply circuit to the heater must incorporate a means for disconnection in all poles in the
fixed wiring in accordance with the wiring rules.
WARNING -THIS APPLIANCE MUST BE EARTHED
BATHROOM INSTALLATION:
IMPORTANT - If the heater is installed in a room containing a bath or shower, it must be so installed
that switches and other controls cannot be touched by a person using a bath or shower.
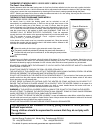
WALL MOUNTING:
IMPORTANT - The wall brackets supplied with the appliance must be used. The heater should be
positioned observing the minimum clearances stated around the heater.
DO NOT locate the heater immediately below a fixed socket outlet or connection box.
1. Remove wall mounting bracket from back of heater
by depressing spring latch at top of each bracket.
2. Fix wall bracket securely to wall through the four screw
holes provided.
3. Present heater to wall bracket, and engage lower
slots in back with bracket,
4. Raise heater to upright position and push heater onto
brackets to engage top latch.
150
min
150
min
rnin
420
200
Min.