


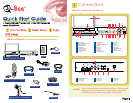

Page 7
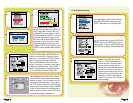
D3
D4
Click the START button to begin backup.
The Progress Bar will display. (D4).
When the backup is complete, a dialog box will appear as “Backup Completely”.
Setting Up Your DVR for Network or Internet Access:
For instructions, please refer to the Remote Access Quick Start Guide.
For additional help with port forwarding for internet access, please visit website:
www.portforward.com/qsee
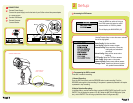
D2
(D2 continued)
NOTE:
If you stop recording while backing up the les, the backup will go faster.
Use the Down key to select a start time and hit ENTER. This will open the
CALENDAR. Select a date, and time, (the top row is hours and the bottom row
is minutes.) Areas in RED have video les. Next select end time the same way,
use the Direction Keys and ENTER button to select the Channel or Channels to
backup. Next use the Direction Keys and ENTER to select ALL les for backup
or MOTION, or SENSOR les. Once all options are selected, click on BACKUP
to display the BACK UP INFO Box (D3).
Page 8
3
Enjoy
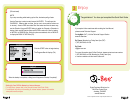
Congratulations! You have just completed the Quick Start Guide.
If you require further assistance after reading the User Manual,
please contact Technical Support:
On the Web: (24/7) Visit the Technical Support Section
www.Q-See.com
By Phone: (Monday thru Friday, 9am-5pm (PST)
1 (877) 998 3440, ext 539
By Email:
ts@dpsi-usa.com
For more information about Q-See Products, please contact customer service:
1 (877) 998 3440, ext 538 (Monday thru Friday, 9am-5pm)
or view our selection online at www.Q-See.com
Page 9
Digital Peripheral Solutions, Inc.
8015 East Crystal Drive,
Anaheim, CA 92807
www.Q-See.com
Q-See is a registered trademark of Digital Peripheral Solutions, Inc.