


Side and back
Quick Setup Guide | DX-DPF0712L 7" Digital Photo Frame
ENGLISH 11-0575
# DESCRIPTION
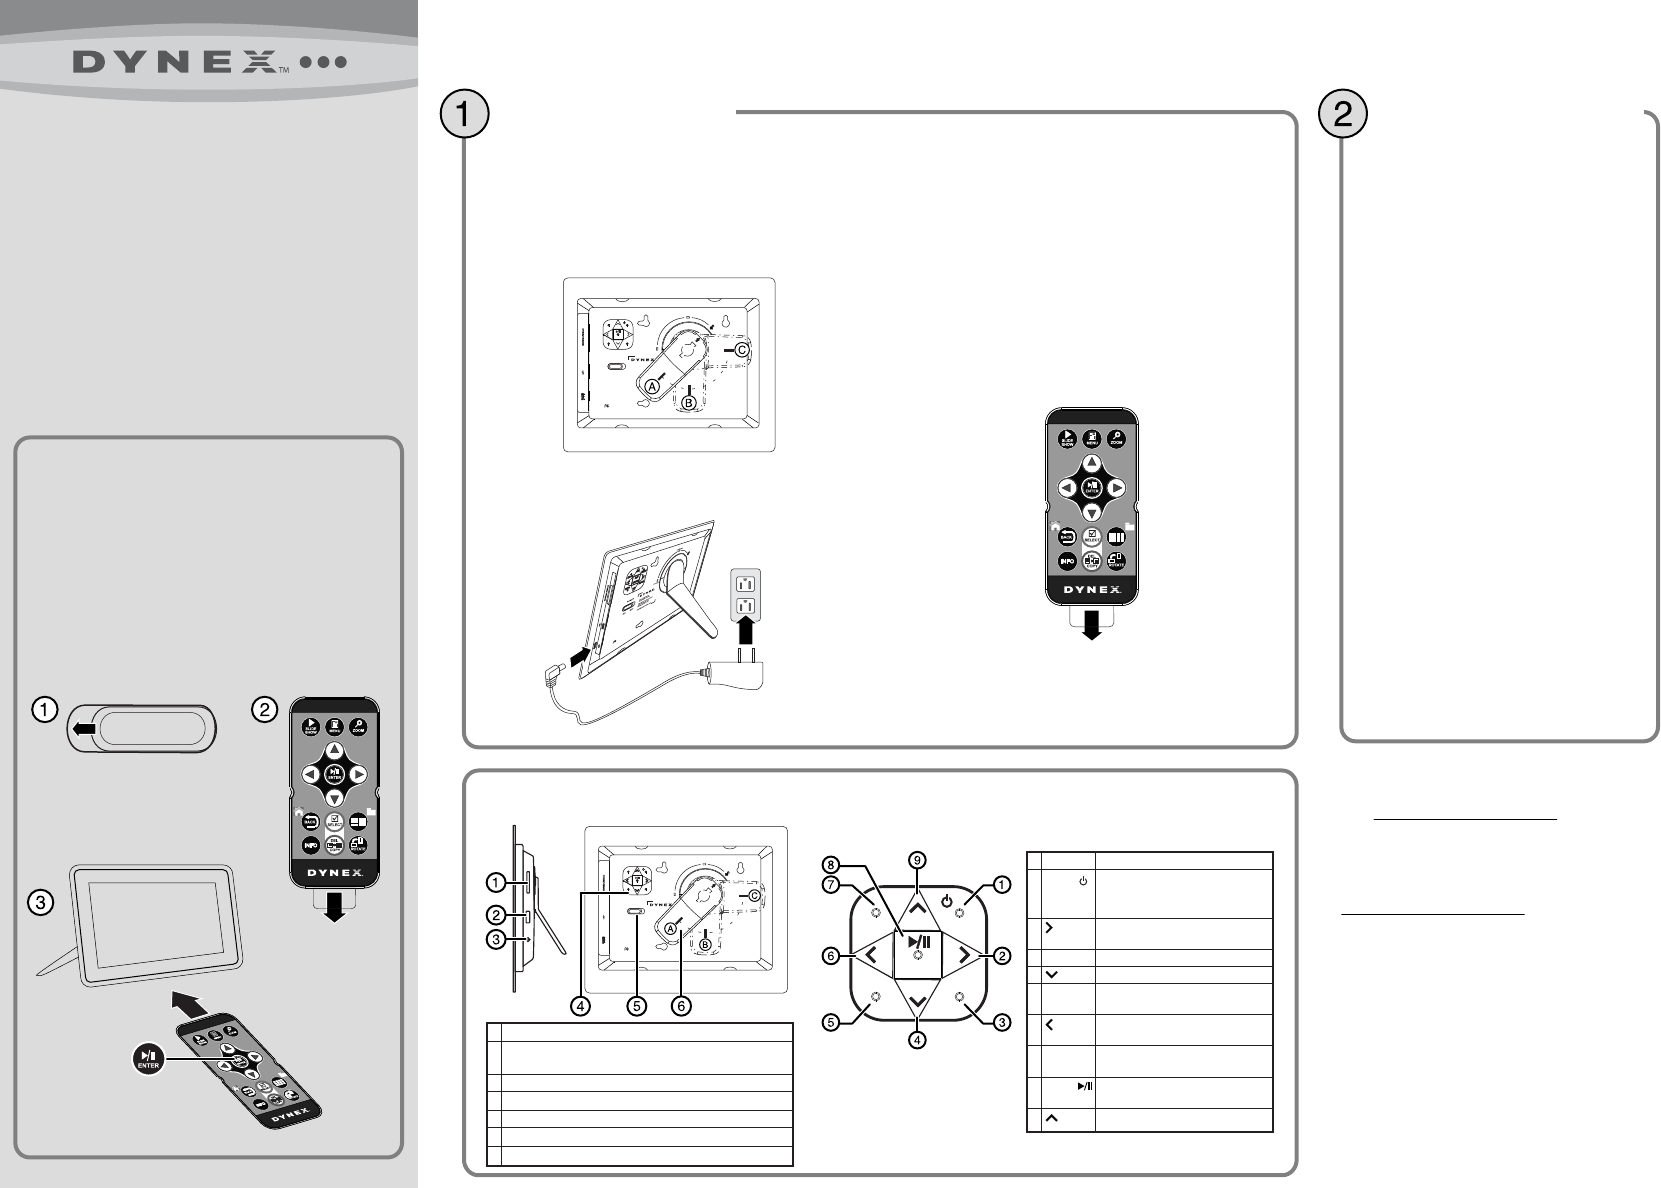
1 Memory card slot (SD/SDHC/MMC/Memory Stick/xD)
(Memory Stick Pro Duo/microSD require an adapter - not included)
2 USB port
3 DC 5 V power connector
4 Navigation / Function buttons
5 Power On/O switch
6 Rotating stand
BACK
BACK
MENU
MENU
ZOOM
ZOOM
INFO
INFO
ENTER
ENTER
Setting up the frame
1 Align and insert the stand with the arrow in the
unlocked position.
2 Rotate the stand counter clockwise to Landscape (B)
or Portrait (C) position.
3 Plug the AC power adapter into the frame’s DC power
connector and into an AC power outlet.
RM-DXDPF0712L
RM- DXDPF 0712L
POWER
Model: DX-DPF0712L
Power: 5VDC, 1.0A (5W)
Manufactured for Dynex Products
7601 Penn Avenue South
Richfield MN USA 55423
ON OFF
Portrait
Landspace
www.dynexproducts.com
BACK MENU
ZOOM
INFO
ENTER
BACK
MENU
ZOOM
INFO
ENTER
POWER
Model: DX-DPF0712L
Power: 5VDC, 1.0A (5W)
Manufactured for Dynex Products
7601 Penn Avenue South
Richfield MN USA 55423
ON OFF
Portrait
Landspace
www.dynexproducts.com
Congratulations on your purchase of a
high-quality Dynex product. Your new digital
picture frame represents the state of the art in
digital picture frame design and is designed for
reliable and trouble-free performance.
Package contents
• Digital picture frame
• AC power adapter
• Remote control with battery (CR2025)
• User Guide
• Quick Setup Guide
DESCRIPTION
Press to display the Setup menu. Press
and hold for two seconds to enter
standby mode.
Press to move left or display the next
picture.
Press to magnify the picture.
Press to move down in a list or menu.
Press to display information about the
displayed picture.
Press to move right or to display the
previous picture.
During a slideshow, stops and returns
back to thumbnail / le list.
Press to play or pause a slide show or to
conrm a setting in a menu (enter).
Press to move up in a list or menu.
# CONTROL
1 MENU /
2
3 ZOOM
4
5 INFO
6
7 BACK
8 ENTER/
9
ATTENTION: DISABLE DEMO MODE!
Your frame comes with a store demo mode
enabled by default.
To disable store mode and enable buttons:
1 Turn the frame on.
2 Remove the remote control battery tab.
3 Point the remote control at the frame and
press ENTER.
RM-DXDPF0712L
RM- DXDPF 0712L
PRESS
Viewing pictures on a memory
card or USB memory device
Insert a memory card or USB memory
device into the memory card slot or the
USB port. A slide show of pictures from
the memory card or USB memory device
automatically starts to play.
Caution: Memory cards t into the card
slot in one direction only. Do not force a
memory card into the slot.
The card should t snugly when inserted
correctly. Some cards require an adapter
to t correctly. For more information on
supported memory cards, see
“Specications” in the User Guide.
For more information about using your
digital picture frame, see your User
Guide.
90-day limited warranty
Visit www.dynexproducts.com for details.
Contact Dynex:
For customer service, call 1-800-305-2204
www.dynexproducts.com
© 2011 BBY Solutions, Inc., All Rights Reserved. Distributed
by Best Buy Purchasing, LLC
7601 Penn Avenue South, Richeld, MN USA 55423-3645
DYNEX is a trademark of BBY Solutions, Inc. All other
products and brand names are trademarks of their
respective owners.
4 Slide the power switch to the ON position. The
frame automatically turns on and starts playing a
slide show of the pictures stored in internal
memory. This slide show is called Demo mode.
5 Set up the remote control.
Remove the plastic tab that extends past the
bottom edge of the remote control. This tab
protects the battery. The remote control will not
work until the plastic tab is removed.
For more information on using the remote
control, see your User Guide.
6 To turn o Demo mode, point the remote control
at the front of the frame and press ENTER.
Set up your frame Start your slide show
ON OFF
Navigation / Function buttons
RM-DXDPF0712L
R
M
-D
X
D
P
F
0
7
1
2
L