


How to Use the Elmo (document camera)
1. Turn on Elmo – The power switch is located on the left rear side of the base.
2. Turn on Infocus Projector (ceiling mounted) – Point the Infocus remote at the
front of the projector and press the light blue power button located in the
upper left corner of the remote.
3. Put something on the Elmo base.
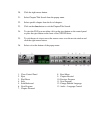
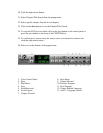
4. Press the button marked Internal located on the front of the Elmo base under
Input.
5. If there is still no image being projected point the Infocus remote at the
projector and press the VIDEO button. It is the middle button in the row of
buttons directly below the power button.
Using Slides/Transparencies with Elmo
1. Place slide/transparency on Elmo Base.
2. Turn on Base Lamp – Press the button labeled Base under Lamp on the front
of the Elmo Base.
3. Adjust Zoom – Zoom in or out using the TELE and WIDE buttons under
Zoom on the front of the Elmo Base.
4. To Adjust focus you can use the manual focus by pressing the N or F button
under Focus on the front of the Elmo Base or you can press the AUTO button
to the right of the F button and Elmo will automatically focus the image for
you.
Using Books, Notes, or 3-D Objects with Elmo
1. Place item on Elmo Base.
2. Turn on upper lamp – Press the button labeled Upper under Lamp on the front
of the Elmo Base.
3. Adjust lamps for best light.
4. Adjust Zoom and Focus as above.