


INSTALLATION INSTRUCTIONS FOR
EPSON PHOTO 1400
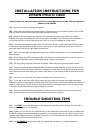
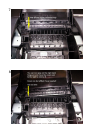
New systems do not have the donor Epson cartridge on top of the CIS cartridges as
shown in the photos
[A] - Set your printer to change cartridges.
[B] - When the cartridges are parked ready to change pull out the power lead for the printer.
You will now be able to move the cartridge carriage by hand.
[C] - Remove the cartridges and remove the cartridge carriage cover either by cutting
through the right hand hinge pin with a hot craft knife blade or by following our attached in-
structions photos 5 to 8 for removing the cover so it can be refitted at a later date.
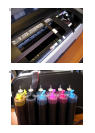
[D] - Move the cartridge carriage to the far left of the printer, then insert the CIS cartridges
in the large right hand hole of the printer, move them to the right and under the cross bar
and take them out of the right hand smaller hole.
[E] - Move the cartridge carriage back under the smaller hole and fit the CIS cartridges into
the carriage.
[F] - When fitting the CIS cartridges make sure then are well pushed down over the area of
the chips and that the 6 clear locking tabs are all clicked into position.
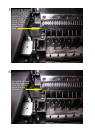
[G] - Fit the tubing clips and cross bar as shown. Make sure the clips are locked closed.
[H] - Adjust the tubing length between the cartridge carriage and the centre clip so give the
same mount of slack as shown. Move the carriage by hand over to the far left and far right of
the printer to ensure the tubing runs freely and there is just enough slack to allow free move-
ment.
[I] - You can now reconnect the power lead and switch the printer on.
[J] - If you get a red light after fitting then set the printer to change cartridges and when
they are parked in the change position press the small white manual reset button as shown in
photo 9, hold this in for few seconds and then release. Cartridges should now be recognised,
if not you do not have the cartridges locked in correctly.
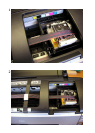
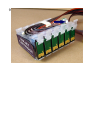
[K] - Having installed the CIS cartridges you should now stand the ink tanks on the same
level as the printer and fit the 6 clear air filters as shown in photo 4.
TROUBLE SHOOTING TIPS
[L] - You MUST place the ink tanks on the same level as the printer, higher or lower will re-
sult in ink starvation or ink flooding.
[M] - When you get an ink out light the chip on the cartridge is set back to full by setting the
printer to change cartridges and when parked in the change position you need to push in the
manual reset button as shown in photo. Hold this in for a few seconds and then release. The
cartridge chip should now be reset to full.
[N] - We STRONGLY
recommend that you stand the ink tanks in a small container!!!