6
C
C
l
l
o
o
s
s
i
i
n
n
g
g
t
t
h
h
e
e
H
H
o
o
u
u
s
s
i
i
n
n
g
g
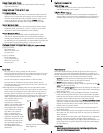
Place housing face down in your
lap
Check to see that there is an
o’ring on the housing back and
that it is clean and in its proper
location
Guide the back onto the housing
The o’ring should touch the
housing all the way around There
should be an even gap all the way
around between the housing and
the housing back
Lift the lid snaps so they are
extended and place the lid snap
into the hook on the housing
back
To close the housing push
down on the lid snaps until
they snap into place Lid
snaps on opposite sides of the
housing should be closed at the
same time Be sure they are down
far enough to engage the lock
D
D
o
o
u
u
b
b
l
l
e
e
c
c
h
h
e
e
c
c
k
k
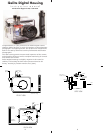
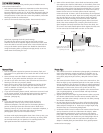
Once the housing is closed check the o’ring seal
Check the gap between the housing back and the housing it
should be even all the way around
Look through the clear plastic back at the o’ring You should see a
darkened area where the o’ring is compressed against the
housing back If you do not see an even black compression seal
all the way around the back open the lid snaps reseat the
housing back and close the lid snaps Visually check the seal again
o’ring
housing back
housing back
o’ring
ev
en gap
all 4 sides
4
O
O
p
p
e
e
n
n
i
i
n
n
g
g
t
t
h
h
e
e
H
H
o
o
u
u
s
s
i
i
n
n
g
g
Lid Snaps have a
L
L
o
o
c
c
k
k
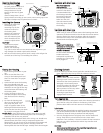
To open push Lid Snap Lock
forward and lift as shown
Keep pressure on the Lid
S
nap so it does not fly open
quickly
S
ome lid snaps have a lot of
spring tension once they go over center have a firm grip on the
lid snap Lid Snaps may be opened one at a time
I
I
n
n
s
s
t
t
a
a
l
l
l
l
i
i
n
n
g
g
t
t
h
h
e
e
C
C
a
a
m
m
e
e
r
r
a
a
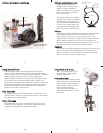
Remove the back from
the housing The
mounting tray for the
camera is secured to
t
he housing back
Position the camera on
t
he tray and secure it
with the mounting bolt
which threads into the
camera’s tripod socket
C
C
A
A
U
U
T
T
I
I
O
O
N
N
:
:
Some camera tripod
socket threads are
plastic The mounting
tray bolt is metal Do not cross thread or over tighten as you
may damage the camera tripod socket threads
Pull out on each housing control until it stops This will get the
controls out of the way for installing the camera
Lid Snap Lock
Push Forward
Lift
Mounting
Bolt
Mounting
Tray
O'Ring
OLYMPUS
5
H
H
o
o
t
t
S
S
h
h
o
o
e
e
w
w
i
i
t
t
h
h
t
t
h
h
e
e
C
C
H
H
o
o
t
t
S
S
h
h
o
o
e
e
w
w
i
i
t
t
h
h
t
t
h
h
e
e
C
C
H
H
o
o
t
t
S
S
h
h
o
o
e
e
C
C
o
o
n
n
n
n
e
e
c
c
t
t
o
o
r
r
S
S
t
t
o
o
r
r
a
a
g
g
e
e
M
M
o
o
u
u
n
n
t
t
The C camera does
not have a hot shoe it
i
s recommended that
the housings HotShoe
be secured in the Hot
Shoe Storage Mount
Make sure the cord
does not interfere with
t
he o'ring when closing
the housing
O'Ring
Hot Shoe
Connector
Hot Shoe
C
onnector
storage
Mount
OLYMPUS
Hot Shoe
Connector
Storage
Mount
(
see caution)
External Strobe Connector
W
aterproof Cap (see caution)
O'ring
H
ousing Back
Hot Shoe
Connector
C
amera
W
hen using an external strobe connect the housings Hot Shoe
Connector slide the connector into the hot shoe of the camera
from the back of the camera as shown Slide the connector
forward until it stops This can be done after the camera is
secured with the mounting bolt
C
C
a
a
u
u
t
t
i
i
o
o
n
n
:
:
D
D
o
o
n
n
o
o
t
t
p
p
u
u
t
t
t
t
h
h
e
e
H
H
o
o
t
t
S
S
h
h
o
o
e
e
C
C
o
o
n
n
n
n
e
e
c
c
t
t
o
o
r
r
i
i
n
n
t
t
h
h
e
e
H
H
o
o
t
t
S
S
h
h
o
o
e
e
S
S
t
t
o
o
r
r
a
a
g
g
e
e
M
M
o
o
u
u
n
n
t
t
w
w
h
h
e
e
n
n
a
a
s
s
t
t
r
r
o
o
b
b
e
e
i
i
s
s
c
c
o
o
n
n
n
n
e
e
c
c
t
t
e
e
d
d
Do not remove the External
Strobe Connector’s
waterproof cap unless an
external sync cord is going
to be plugged in
7
L
L
u
u
b
b
r
r
i
i
c
c
a
a
n
n
t
t
s
s
Ikelite provides silicone lubricant with the housing We recommend
you use only Ikelite lubricant on Ikelite products as some other
brands may cause the o’ring to swell and not seal properly
Use only enough lubricant to lightly cover control shafts and
o’rings Wipe off any excess lubricant with a clean cloth
Lubricant is not a sealant it is used to reduce friction Excessive
lubricant can collect sand and dirt which may interfere with
proper sealing
C
C
A
A
U
U
T
T
I
I
O
O
N
N
N
N
e
e
v
v
e
e
r
r
u
u
s
s
e
e
s
s
p
p
r
r
a
a
y
y
l
l
u
u
b
b
r
r
i
i
c
c
a
a
n
n
t
t
s
s
a
a
s
s
t
t
h
h
e
e
p
p
r
r
o
o
p
p
e
e
l
l
l
l
a
a
n
n
t
t
i
i
n
n
g
g
r
r
e
e
d
d
i
i
e
e
n
n
t
t
c
c
a
a
n
n
c
c
a
a
u
u
s
s
e
e
t
t
h
h
e
e
p
p
l
l
a
a
s
s
t
t
i
i
c
c
h
h
o
o
u
u
s
s
i
i
n
n
g
g
t
t
o
o
c
c
r
r
a
a
c
c
k
k
C
C
h
h
e
e
c
c
k
k
i
i
n
n
g
g
C
C
o
o
n
n
t
t
r
r
o
o
l
l
s
s
Once the housing has been closed push the controls back into
place Make sure they line up with the camera’s controls
Z
Z
o
o
o
o
m
m
C
C
o
o
n
n
t
t
r
r
o
o
l
l
(NOTE:) After you have used the
housing’s zoom control it must be
returned to the center position to
disengage If the housing zoom
control is pushing the zoom lever
in either direction you cannot
take a picture or access any other
function as the camera is
receiving a signal from the
engaged zoom control
T
T
u
u
r
r
n
n
C
C
a
a
m
m
e
e
r
r
a
a
O
O
n
n
Turn the camera on and operate each of the housing controls to
get a feel for using the camera in the housing Take a few
pictures above water with the camera in the housing
Zoom control
engaged
Zoom contr
ol
disengaged
(centered)


