


11
12
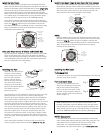
IInnssttaalllliinngg tthhee PPoorrtt ccoonntt..
TToo RReemmoovvee PPoorrtt
To remove the port, lift up on each Release Button and slide the
port lock away from the port.
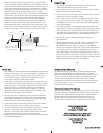
PPoorrtt SSeeaall IInnssiiddee VViieeww
If the port is installed before the
camera is inserted into the housing,
look on the inside of the housing
front at the port seal. Check to see
that the o’ring is properly sealed as
shown in figure 1 and not extruded as
shown in figure 2.
Fig. 1
Fig. 2
C
C
a
a
u
u
t
t
i
i
o
o
n
n
:
:
After installing the port, turn the Zoom Control knob on the
housing. If the Zoom Control is difficult to turn, the gear sleeve
may be warped. If so reduce or omit any rubber installed on the
Zoom Clamp. (Fig.H on pg.10).
If the Zoom Clamp is still warped,
use of the #5509.28 package may be required. (See page 7)
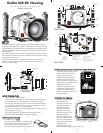
NNOOTTEE:: ((lleennss ppoorrttss))
A lens port must be secured to the housing before entering the
water. Ikelite DSLR housings DO NOT come with a lens port. You
must select the correct port for each lens you will be using
underwater. For complete lens/port information and
compatibility with your Ikelite system, go to
wwwwww..iikkeelliittee..ccoomm
IInnssttaalllliinngg tthhee PPoorrtt
There are two port locks on
the front of the housing
(See housing front). Each
port lock has a Release
Button. Lift the release
button and slide each Port
Lock away from the port
opening. In the unlocked
position, the Release Button
will remain in the up
position as shown.
To prepare the port for installation, remove the port o’ring and
lightly lubricate it. The port seal is a side-to-side seal and
requires the o’ring to be lightly lubricated for easy installation.
Put a small amount of lubricant on your fingers and pull the
o’ring through your fingers to lightly lubricate it. Do not stretch
the o’ring. Check that the lip of the port where the o’ring fits
and the sealing surface on the housing are clean. Place the port,
with o’ring, into the housing port opening. Press down on the
port firmly and evenly until you feel the port slide into place.
Continue to push down on the port and push each port lock
forward until it clicks into place. It may help to slightly rotate
the port as you push in on each port lock. When the port lock
clicks into place, the Release Button will drop down against the
port lock.
Check around the perimeter of the port seal to see that the
o’ring is properly sealed and not extruded
((PPaaggee 1122 -- FFiigg.. 22))..
Port Lock
Release
Button
Lift Release
Button to
Unlock
Pull Back to
Disengage
Port
Unlocked Position
Locked Position
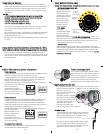
Type 2 Installation: Figure 1
T
OP OF HOUSING
IInnssttaalllliinngg tthhee ZZoooomm CCllaammpp && GGeeaarr SSlleeeevvee OOnn TTyyppee 22 LLeennsseess
Due to the larger diameter lens opening on Type 2 lenses, the
Zoom Clamp and Gear Sleeve need to be installed from the rear
(bayonet end) of the lens. Use the housing Lens Release Control
a
nd remove the camera lens from the camera body after the
camera and lens have been installed in the housing.
c
lamp
T
ype 2 lens
z
oom
ring
a
lign
zoom clamp
e
xtension
grooved
t
abs with
g
ear sleeve
ribs
10
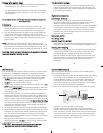
NNOOTTEE::
Before installing the lens port and checking operation, make sure
the teeth on the Gear Sleeve mesh with the teeth on the housing
Drive Gear
((FFiigg.. GG))..
When the port is installed, it will lock the
Gear Sleeve in place. After installing the port, rotate the housing
Zoom Control Knob to see that the Gear Sleeve is properly
rotating the lens Zoom ring.
IKELITE
Figure G
mesh
g
ear sleeve
with
black housing
d
rive gear
I
KELITE
Figure G
black housing
sleeve/
drive gear
mesh
gear sleeve
w
ith
black housing
d
rive gear
IInnssttaallll tthhee GGeeaarr SSlleeeevvee
After the Zoom Clamp is installed, lower the appropriate Gear
Sleeve over the Zoom Clamp aligning the Gear Sleeve ribs with the
grooves in the Zoom Clamp’s extended tabs as shown
((FFiigg..DD && EE))
.
Note that the ribs of the Gear Sleeve should slide freely in the
grooves of the Zoom Clamp. If the Gear Sleeve does not slide
freely, remove any rubber strips on the inside of the Zoom Clamp,
if no rubber strips are installed then try using the Zoom Clamp
and Gear Sleeve for Type 2 lenses in the #5509.28 package.
Lower the Gear Sleeve into the port opening of the housing so
the teeth on the Gear Sleeve mesh with the teeth on the housing
D
rive Gear
((FFiigg.. GG))..
W
hen the port is installed it will lock the
Gear Sleeve in place. After installing the port, rotate the housing
Zoom Control Knob to see that the Gear Sleeve is properly
rotating the lenses Zoom ring.
9
NNoottee:: ((ffoorr NNiikkoonn kkiitt lleennss 1188--110055mmmm 11::33..55--55..66GG EEDD DDXX))
Special zoom sleeve #5509.18 is required to zoom this lens inside
the 6” and 8” dome ports. This gear to be used with #9059.9
zoom clamp included with housing. Call Ikelite customer service
at 317-923-4523 to order this gear. See www.ikelite.com for full
lens port information and compatibility.