


Congratulations on your purchase of an Ikelite Digital Camera
Housing Ikelite has over years of experience in the underwater
photographic and lighting market Our products are designed and
built in the USA by Ikelite for both the professional and amateur
photographer
The clear housing permits instant visual inspection of the camera
and all sealing surfaces as well as complete monitoring of controls
and camera LCD screens
Ikelite Digital Housings are slightly negative in salt water for
stability This housing has been water pressure tested at the
factory Housing is pressure tested to ’ (m)
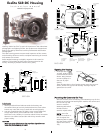
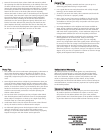
Ikelite SLR-DC Housing
instruction manual
#6855 for Olympus E-500
2
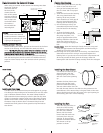
Strobe
Mount
R
ubber
H
andle
Quick-Release
Strobe
Mount
G
ear Sleeve
D
rive Gear
Zoom
Control
Lid Snap
Lens
Release
Exposure
Compensation
On/Off
Lid
Snap
Shutter
Release
Port Lock
Aluminum Tray
Port
Opening
Quick
Release
Button
External Strobe Connector
and Waterproof Cap
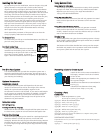
Viewfinder Po rt
[D] Info
[E] One Touch WB
[F] AF Frame
[G] Copy/Print
[H] White Balance
[I] Focus Mode
A
B
C
D
EF
G
H
I
K
L
J
Lens
Release
Zoom
Control Dial
AEL/AFL
Mode Dial
[A] Playback
[B] Erase
[C] Menu
[J] ISO
[K] Metering
[L] OK
FRONT VIEW
BACK VIEW
3
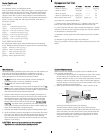
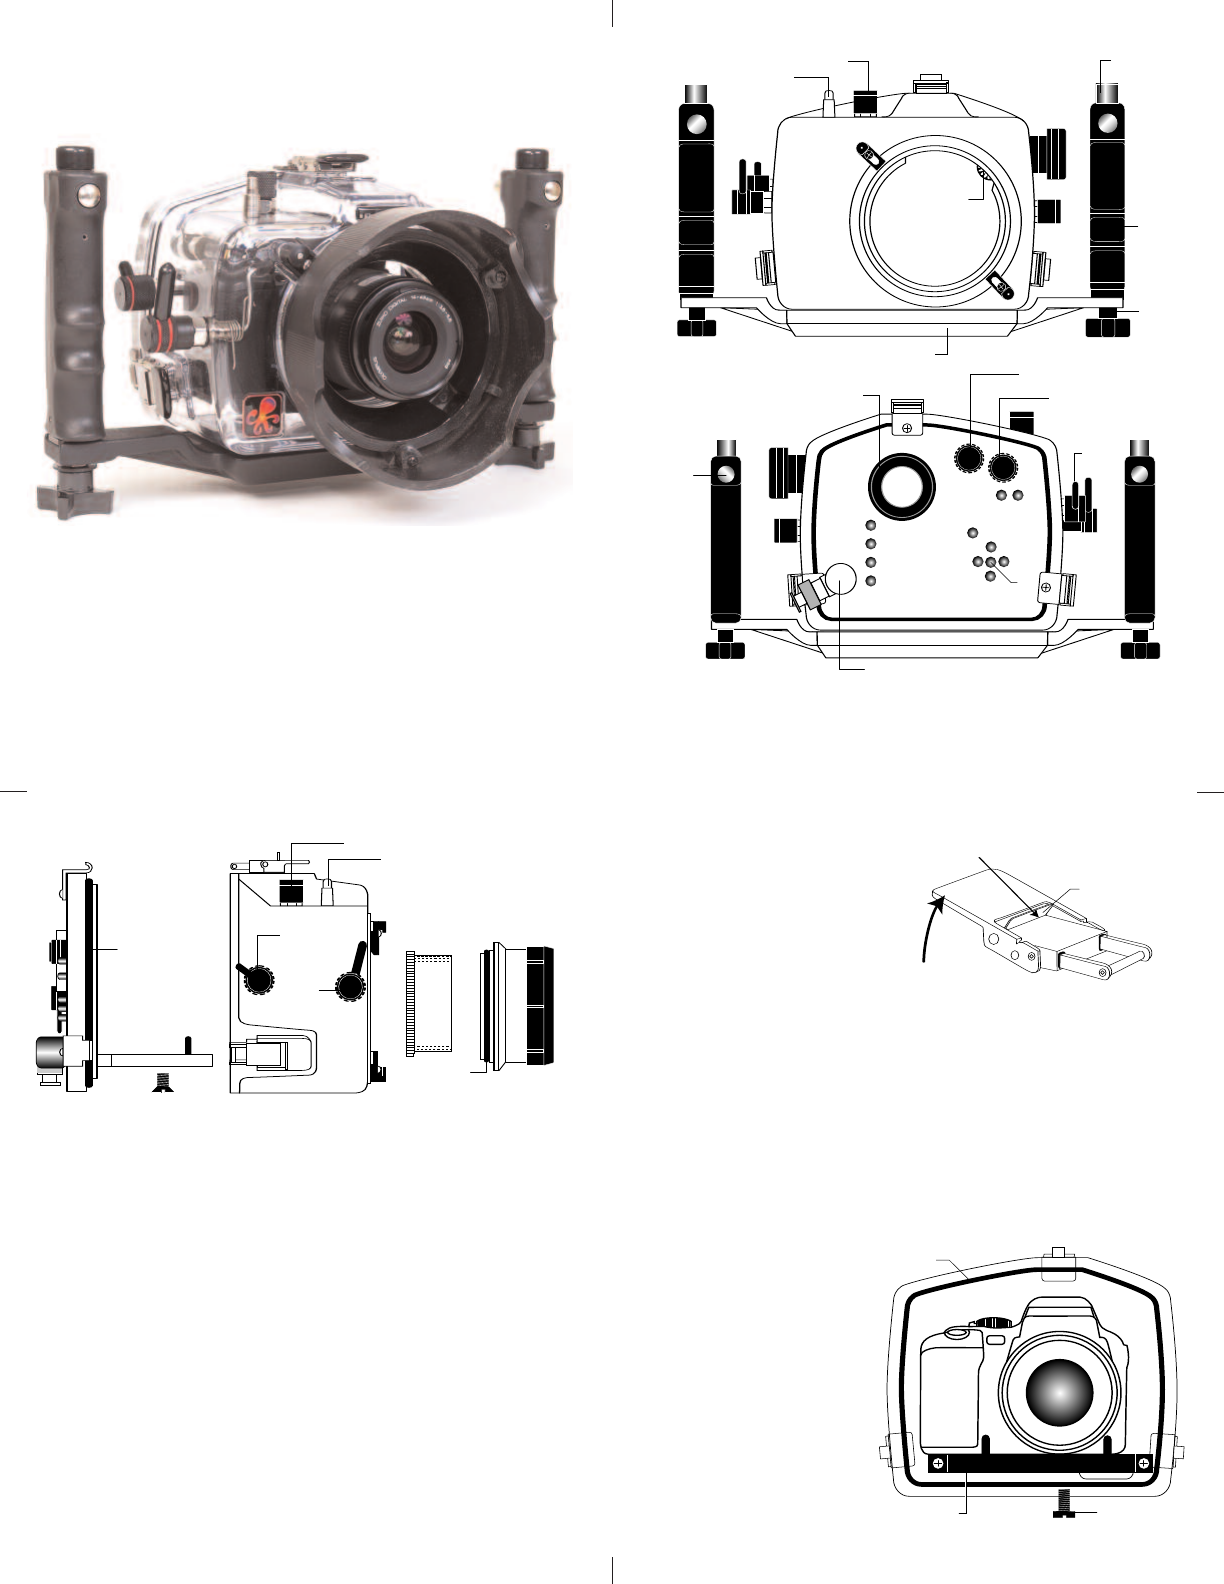
SIDE
VIEW
Camera
Tray
Camera
Mounting
Bolt
Gear
Sleeve
Port
O'ring
Optional
Port
Lid
Snap
Shutter
Release
Back O’ring
On/Off
AEL/AFL
Exposure
Compensation
L
L
u
u
b
b
r
r
i
i
c
c
a
a
n
n
t
t
s
s
Ikelite provides silicone lubricant with the housing We
recommend that you use only Ikelite lubricant as some other
brands may cause the o’ring to swell and not seal properly
Use only enough lubricant to lightly cover control shafts and
o’rings Wipe off any excess lubricant with a clean cloth
Lubricant is not a sealant it is used to reduce friction Excessive
lubricant can collect sand and dirt which may interfere with
proper sealing
C
C
A
A
U
U
T
T
I
I
O
O
N
N
N
N
e
e
v
v
e
e
r
r
u
u
s
s
e
e
s
s
p
p
r
r
a
a
y
y
l
l
u
u
b
b
r
r
i
i
c
c
a
a
n
n
t
t
s
s
a
a
s
s
t
t
h
h
e
e
p
p
r
r
o
o
p
p
e
e
l
l
l
l
a
a
n
n
t
t
i
i
n
n
g
g
r
r
e
e
d
d
i
i
e
e
n
n
t
t
c
c
a
a
n
n
c
c
a
a
u
u
s
s
e
e
t
t
h
h
e
e
p
p
l
l
a
a
s
s
t
t
i
i
c
c
h
h
o
o
u
u
s
s
i
i
n
n
g
g
t
t
o
o
c
c
r
r
a
a
c
c
k
k
4
M
M
o
o
u
u
n
n
t
t
i
i
n
n
g
g
t
t
h
h
e
e
C
C
a
a
m
m
e
e
r
r
a
a
t
t
o
o
t
t
h
h
e
e
T
T
r
r
a
a
y
y
Remove the back from the housing The Mounting Tray for the
camera is secured to the housing back Position the camera and
lens on the tray and
secure it with the
Mounting Bolt which
threads into the
camera’s tripod socket
N
N
O
O
T
T
E
E
:
:
Use a flat
bladed screwdriver or
coin to tighten the
Mounting Bolt to make
sure the camera is flush
against the Camera
Tray
O‘ring
Mounting Bolt
Camera Tray
O
O
p
p
e
e
n
n
i
i
n
n
g
g
t
t
h
h
e
e
H
H
o
o
u
u
s
s
i
i
n
n
g
g
Lid Snaps have a
L
L
o
o
c
c
k
k
To open push Lid Snap
Lock forward and lift as
shown Keep pressure
on the Lid Snap so it
does not fly open
quickly
Some lid snaps have a lot of spring tension once they go over
center have a firm grip on the lid snap Lid Snaps may be
opened one at a time
Lift
Push Forward
Lid Snap Lock