


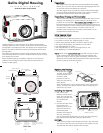

Congratulations on your purchase of an Ikelite Digital Camera
Housing. Ikelite has over 45 years of experience in the underwater
photographic and lighting market. Our products are designed and
built in the USA by Ikelite for both the professional and amateur
photographer.
The clear housing permits instant visual inspection of the camera
and all sealing surfaces as well as complete monitoring of controls
and camera LCD screens.
Ikelite Digital Housings are slightly negative in salt water for
stability. This housing has been water pressure tested at the
factory to 200’ (60m).
Ikelite Digital Housing
i n s t r u c t i o n m a n u a l
#6182.60 for Nikon Coolpix P6000
2
3
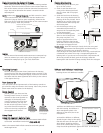
Front View
Shutter
Release
Lid
Snap
Lens
Port
Back View
Command Dial
Mode Dial
[E] Menu
[F] Monitor
[G] Flash Mode
[H] Self-timer
[I] Apply
[J] Exposure Compensation
[K] Macro/MF (Focus Mode)
[L] Delete
[A] Fn (FUNC)
[B] My Menu
[C] Manual Focus
[D] Playback
B
C
D
E
F
G
H
I
J
K
L
H
A
TTL Connector
Zoom
Power Switch
Flash
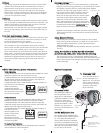
OOppeenniinngg tthhee HHoouussiinngg
1. Lid Snaps have a
LLoocckk
.
To open, push Lid Snap
Lock forward and lift
as shown. Keep
pressure on the Lid
Snap so it does not fly
open quickly.
Some lid snaps have a lot of spring tension once they go over
center, so keep a firm grip on the lid snap. Lid Snaps may be
opened one at a time.
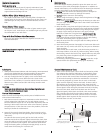
IInnssttaalllliinngg tthhee CCaammeerraa
1. Pull out on each
housing control until it
stops. This will get the
controls out of the way
for installing the
camera.
2. Remove the back from
the housing. The
mounting tray for the
camera is secured to
the housing back.
Position the camera on
the tray, and using a
coin or screwdriver (preferred), secure it with the mounting
bolt which threads into the camera’s tripod socket.
CCAAUUTTIIOONN::
Some camera tripod socket threads are plastic. The mounting
tray bolt is metal. Do not cross thread or over tighten as you
may damage the camera tripod socket threads.
CAMERA / MOUNT
Lid
Hook
O' Ring
Mounting Bolt
Mounting
Tray
Nikon
Lift
Push Forward
Lid Snap Lock
4
P
P
l
l
e
e
a
a
s
s
e
e
R
R
e
e
a
a
d
d
We suggest that you read this instruction booklet thoroughly
before use. If you are new to underwater photography, be sure
to read the General and Photo Tips sections.
We also suggest that you read the camera manual thoroughly
to have a full understanding of where each camera control is
located and what function each control provides.
PPlleeaassee RReeaadd IIff UUssiinngg aann EEVV--CCoonnttrroolllleerr
The EV-Controller used with Ikelite DS Substrobes has two user
settings. One setting is for strobe selection, the other is for
pre-flash or non pre-flash.
TThhiiss ccaammeerraa uusseess pprree--ffllaasshh
, thus the
EV-Controller should be set to the pre-flash position when used
w
ith this camera as a slave. If hard-wired to the housing, set the
EV-Controller to Non pre-flash. TTL flash control is not
available when using an EV-Controller, and therefore is not
recommended with this housing.
IInniittiiaall CCaammeerraa SSeettuupp
1. Set ISO to 64 or 100.
2. Set camera to “A” Aperture priority or “M” Manual mode.
3. Set Flash to forced “On” (lightning bolt in LCD).
4. When using external strobes, set built-in flash to “Off”.
5. For Macro photography, set aperture to f7.6 or 8.0.
6. Set White Balance to “Auto”.
7. Set Image Quality to “Fine” and Image Size to “3:2”.
8. Set Metering to “Center-Weighted”.
NNOOTTEE::
When using
iinntteerrnnaall ffllaasshh oonnllyy
, set flash control to “Auto”
in the camera menu. Also make sure that the hotshoe wire
allows the “pop-up” flash to open completely, otherwise the
flash may not fire. Slide the hotshoe back on the camera mount
until the “pop-up” flash fully extends.