Congratulations on your purchase of an Ikelite Digital Camera
Housing. Ikelite has over 45 years of experience in the underwater
photographic and lighting market. Our products are designed and
built in the USA by Ikelite for both the professional and amateur
photographer.
The clear housing permits instant visual inspection of the camera
and all sealing surfaces as well as complete monitoring of controls
and camera LCD screens.
Ikelite Digital Housings are slightly negative in salt water for
stability. This housing has been water pressure tested at the
factory to 200’ (60m).
Ikelite Digital Housing
i n s t r u c t i o n m a n u a l
#6148.01 for Canon SX10 IS
2
3
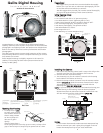
Back View
[D] +/- Exposure
[E] Frame Selector/Erase
[F] Manual Focus
[G] Macro
[H] FUNC./SET
[I] ISO
[A] Shortcut
[B] Movie
[C] Playback
B
C
D
E
F
G
H
I
K
L
H
A
TTL Connector
M
J
[J] Control Dial
[K] Self-Timer
[L] Display
[M] Menu
Flash
Button
OOppeenniinngg tthhee HHoouussiinngg
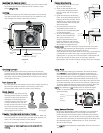
1. Lid Snaps have a
LLoocckk
.
To open, push Lid Snap
Lock forward and lift as
shown. Keep pressure
on the Lid Snap so it
does not fly open
quickly.
Some lid snaps have a
lot of spring tension once they go over center, so keep a firm
grip on the lid snap. Lid Snaps may be opened one at a time.
Lift
Push Forward
Lid Snap Lock
4
P
P
l
l
e
e
a
a
s
s
e
e
R
R
e
e
a
a
d
d
We suggest that you read this instruction booklet thoroughly
before use. If you are new to underwater photography, be sure
to read the General and Photo Tips sections.
We also suggest that you read your camera manual thoroughly
to have a full understanding of each camera function.
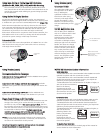
IInniittiiaall CCaammeerraa SSeettuupp
1. Set ISO to 80.
2. Set camera mode dial to “A” Aperture priority.
3
. Set Flash Mode to “Auto” (lightning bolt in LCD).
4. When using external strobes, set built-in flash to “Off”.
5. For General photography, set aperture to f4.0.
6. For Macro photography, set aperture to f8.0.
7. Set White Balance to “Auto”.
8. Set Image Size to “L”.
9. Set Metering to “Center-Weighted Avg.”.
IInnssttaalllliinngg tthhee CCaammeerraa
1. Pull out on each housing control until it stops. This will get the
controls out of the way for installation of the camera.
2. Remove the back from the housing.
3. The mounting tray for the camera is secured to the housing
back. Position the camera on the tray.
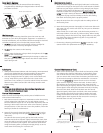
4 Slide the housing Hotshoe Connector into the Camera Hothoe
Mount
((DDiiaaggrraamm AA))
.
Slide the connector forward until it stops.
This must be done before the camera is secured with the
mounting bolt
(
(
P
P
a
a
g
g
e
e
#
#
5
5
-
-
D
D
i
i
a
a
g
g
r
r
a
a
m
m
B
B
)
)
.
N
N
O
O
T
T
E
E
:
:
If your are using an EV Controller and NOT hard-wiring your
strobes directly to the housing, leave the housing hotshoe
disconnected from the camera and raise the camera flash. You
will also need to install the Flash Deflector
(
(
P
P
a
a
g
g
e
e
#
#
8
8
)
)
.
External Strobe Connector
Waterproof Cap
(Do not remove underwater)
O-ring
Housing Back
Hot Shoe Connector
Mounting
Tray
C
C
a
a
u
u
t
t
i
i
o
o
n
n
:
:
Do not remove the External Strobe Connector Waterproof Cap
unless an external sync cord is going to be plugged in. Do not
remove the Waterproof C ap or Sync Cord underwater.
Front View
Lid
Snap
Mode Dial
P
ower Button
F
lash Pop-Up
Control
S
hutter
Button
Zoom
Lever
Lid
Snap
Lens
Port
Internal
Housing
F
lash
Deflector
Diagram A


