


EN 71
Master Page: Right
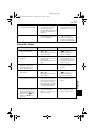
Video and D.S.C. Playback
7. The LCD monitor or
viewfinder indications blink.
7. •Certain Wipe/Fader effects,
certain modes of Program
AE, “OIS” and other
functions that cannot be used
together are selected at the
same time.
7. •Re-read the sections covering
Wipe/Fader effects, Program
AE and “OIS”. (੬ pg. 37, 50)
8. Digital Zoom does not work. 8. •10X optical zoom is selected.
•The Recording Mode Switch
is set to “MEMORY”.
8. •Set “ZOOM” to “40X” or
“200X”. (੬ pg. 36)
•Set the Recording Mode
Switch to an appropriate
position except “MEMORY”.
SYMPTOM POSSIBLE CAUSES CORRECTIVE ACTION
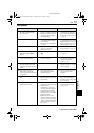
9. Play, Rewind and Fast-Forward
functions do not work.
9. •The Power Switch is set to
“A” or “M”.
•The Playback Mode Switch is
set to “MEMORY”.
9. •Set the Power Switch to
“P”. (੬ pg. 24)
•Set the Playback Mode
Switch to “VIDEO”.
10. The tape is moving, but there is
no picture.
10. •Your TV has AV input
terminals, but is not set to its
VIDEO mode.
•The cassette holder cover is
open.
10. •Set the TV to the mode or
channel appropriate for
video playback. (੬ pg. 26)
•Close the cassette holder
cover. (੬ pg. 18)
11. Blocks of noise appear during
playback, or there is no
playback picture and the
screen becomes blue.
11.
—
11. •Clean the video heads with
an optional cleaning
cassette.
12. A memory card cannot be
played back.
12. •The Power Switch is set to
“A” or “M”.
•The Playback Mode Switch is
set to “VIDEO”.
12. •Set the Power Switch to
“P”. (੬ pg. 29)
•Set the Playback Mode
Switch to “MEMORY”.
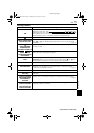
13. The image on the 4:3 TV is
elongated vertically (squeeze).
13. •This occurs during recording
in HD or SD mode when a
tape (its erase protection tab
is set to “REC”) is loaded.
•The component video cable
and S/AV/Editing cable are
connected simultaneously.
13. •This is not a malfunction.
•Disconnect either of two
cables.
14. The screen of the LCD monitor
or viewfinder is blackened or
blocks of noise appear on its
right side when the Power
Switch is set to “P” for
dubbing (but 4·9 is not
pressed).
14. •The S/AV/Editing cable is
connected and “S/AV
INPUT” (੬ pg. 41) is set to
“A/V IN” or “S IN”.
14. •This is not a malfunction.
After dubbing, set “S/AV
INPUT” back to “OFF”.
REFERENCES
GR-HD1US_08Trouble.fm Page 71 Monday, April 21, 2003 1:56 PM