


EN 19
Basic Recording
You should already have performed the necessary preparations (੬ pgs. 8 – 16). Set the Power Dial to “
A
”
and try recording that way before attempting to use more advanced features.
NOTE:
Before starting recording, make sure you set the date and time (
੬
pg. 11). Even if they don’t appear during
recording, you can display them during playback (
੬
pg. 53).
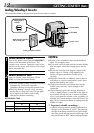
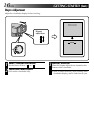
1
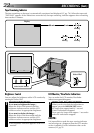
SELECT OPERATION MODE
Set the Power Dial to “
A
” while pressing down
the lock button located on the dial.
2
PULL OUT VIEWFINDER OR OPEN
LCD MONITOR
Pull out the viewfinder fully or open the LCD
monitor to approx. 90° degrees.
•The lens cover opens, the power lamp comes
on and the scene you're aimed at appears.
•The Record-Standby mode is engaged.
3
START RECORDING
When “PAUSE” appears, press START/STOP. A
beep signals the start of recording.
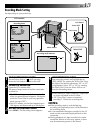
4
STOP RECORDING
Press START/STOP again to stop recording.
•The camcorder re-enters Record-Standby mode.
5
END RECORDING
When you’re finished recording, push back the
viewfinder or close the LCD monitor until it
clicks; the lens cover closes and the power
lamp goes out.
•When transporting, make sure the viewfinder
is pushed back and the LCD monitor is
closed and locked.
•To turn power on again, pull out the
viewfinder or open the LCD monitor.
OR
Set the Power Dial to “OFF”.
•When turning to “OFF”, it is not necessary to
press down the lock button.
NOTES:
●
The image will not appear simultaneously in the
LCD monitor and the viewfinder. No image
appears on the LCD monitor when the viewfinder
is pulled out. It is not possible to shoot using both
LCD monitor and viewfinder.
●
If 5 minutes elapse in the Record-Standby mode,
power shuts off automatically to conserve energy
and protect the heads. To turn the camcorder on
again, push back and pull out the viewfinder
again or close and re-open the LCD monitor. As
long as you don’t take out the tape you were
using or play it back, you can continue from
where you left off with no noticeable break on the
recorded video.
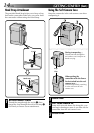
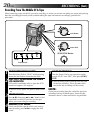
●
When a blank portion is left between recorded
scenes on the tape, the time code is interrupted
and errors may occur when editing the tape.
Continue recording from where you stop so there
are no gaps by following "Recording from the
middle of a tape" (
੬
pg. 20).
●
Recored-Standby means that a tape is loaded and
the camcorder is ready to record.
●
During recording, sound is not heard from the
speaker. If you want to hear the sound, connect
optional headphones to the headphones jack. The
sound volume at this point is the same as the level
it was adjusted during playback.
●
To make the indications disappear, press and hold
the IND.ON/OFF button for more than approx. 1
second. However, it is impossible to remove the
tape running indicator “
444
” and warning
indications and so on (
੬
pg. 76).
●
Use the viewfinder when under direct sunlight or
when reflections make it difficult to see the LCD
monitor.
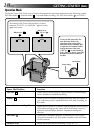
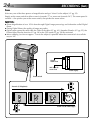
PAUSE
OFF
P
L
A
Y
A
M
5S
444
REC
Lock button
Power Dial
Display
Display
Record-Standby
During recording
Power lamp
START/STOP button
RECORDING
IND. ON/OFF