


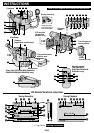

25
Playback Zoom
To magnify the recorded image up to 10X at any
time during playback. Make sure that the TBC
mode is activated.
1)Press PLAY
to find the scene of interest.
2)Press ZOOM (T/W)
. Pressing T zooms in. To
end zoom press and hold W until magnification
returns to normal. Or, press STOP
and then
press PLAY
.
•Due to digital image processing, the quality of the
image may suffer.
Animation And Time-Lapse
The remote control lets you set/release interval
time and recording time without setting REC TIME/
INT. TIME (
੬ pg. 21) in SYSTEM MENU.
Animation
Each time ANIM.
is pressed, the recording time
changes in the following order: 1/4S, 1/2S, 1S, 5S
and no indication (off).
Time-Lapse
Each time REC TIME
is pressed, the recording
time changes in the following order: 1/4S, 1/2S,
1S, 5S and no indication (off). Each time INT. TIME
is pressed, the interval time changes in the
following order: 15S, 30S, 1MIN, 5MIN and no
indication (off).
Insert Editing
You can record a new scene onto a previously
recorded tape. Only the video signal is recorded in
this mode.
1)Set the Power Switch
to “ ”.
2)Play back the tape, locate the edit-out point and
press PAUSE
.
Press and hold COUNTER R/M
for more than 1 second to reset the tape
counter, then press it again for less than 1
second so that “M” appears.
3)Press REW
to go a little beyond the beginning
of the scene you want to replace, press PLAY
to view the recorded tape, and press PAUSE
exactly at the edit-in point where the new scene
should start.
4)While holding down INSERT
, press and
release PAUSE
. w appears.
5)To begin Insert Editing, press START/STOP
.
When the counter reaches “0:00:00”, editing
stops automatically and the camcorder enters
the Insert-Pause mode. To end Insert Editing,
press STOP
.
•During Insert Editing, the original audio will be
heard from the speaker.
•After step 4), “Retake” (
੬ pg. 13) can be
performed.
•The tape may stop slightly before or after the
designated end point, and noise bars may appear.
Neither indicates a defect in the unit.
Audio Dubbing
You can record a new soundtrack on a prere-
corded tape (normal audio only). The sound is
recorded from the built-in microphone.
Perform steps 1) and 2) of the Insert Editing
procedure.
3)Press REW
to go a little beyond the beginning
of the scene onto which you want to dub the new
audio, press PLAY
to view the recorded tape,
then press PAUSE
at exactly the point where
dubbing should start.
4)While holding down A. DUB
, press and
release PAUSE
.
5)To begin Audio Dubbing, press PLAY
. When
the counter reaches “0:00:00”, Audio Dubbing
stops automatically and the camcorder enters
the Audio Dub-Standby mode. To end Audio
Dubbing, press STOP
.
•Do not press REW
or FF during Audio Dub-
Standby, or the edit points will not be accurate.
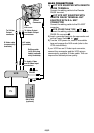
•If the microphone is too close to the TV, or if the
TV’s volume is too high, whistling or howling may
occur.
For Insert Editing/Audio Dubbing
•Insert Editing and Audio Dubbing may not work
correctly if the tape contains blank segments, or if
the recording speed was changed during the
original recording.
•To edit/dub onto a tape, make sure the erase
protection tab is in the position that allows
recording.
•Do not press STOP
during Insert Editing or
Audio Dubbing, or the edit points will not be
accurate.