


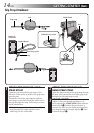
8 EN
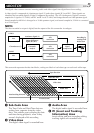
Charging The Battery Pack
The battery pack has not been charged at the factory. Before using it, be sure to charge it with the AC
Charger Station.
GETTING STARTED
NOTES:
●
If you connect the camcorder’s DC cord to the AC
Charger Station during battery charging, power is
supplied to the camcorder and charging stops
(
੬
pg. 10).
●
When using the AC Charger Station, be sure to
use the supplied power cord only.
●
When charging the Battery Pack for the first time
or after a long storage period, the Charger
Indicator may not light. In this case, remove the
Battery Pack from the AC Charger Station, then try
charging again.
●
Since the AC Charger Station processes electricity
internally, it becomes warm during use. Be sure to
use it only in well-ventilated areas.
●
If the battery operation time remains extremely
short even after having been fully charged, the
battery is worn out and needs to be replaced.
Please purchase a new one.
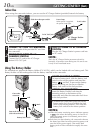
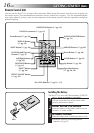
1
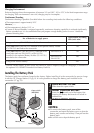
SUPPLY POWER TO CHARGER
Plug the AC Charger Station’s power cord in to
an AC outlet. The power lamp comes on.
2
ATTACH BATTERY
Attach while making sure the marks are
facing down and aligned with the correspond-
ing marks on the AC Charger Station.
•The Charger Indicator begins blinking to
indicate charging has started.
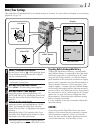
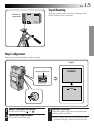
3
CONFIRM STATUS
When the charger indicator stops blinking but
stays lit, charging is finished.
4
DETACH BATTERY
Slide the battery in the direction of the arrow
and lift off.
•Remember to unplug the AC Charger
Station’s power cord from an AC outlet.
ATTACH
To AC outlet
Power cord
Charger indicator
Power lamp
DETACH
Battery pack BN-V607U
AC Charger Station
AA-V60EK
DC OUT jack
Power cord
INFORMATION:
The AC Charger Station (provided) enables you
to charge not only one battery pack but also
one battery pack installed in the camcorder
(੬ pg. 53).
Battery Approximate charging time
BN-V607U 90 min.
BN-V615U
180 min.
(optional)