


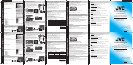

REPRODUCCIÓN EN UN TELEVISOR
PLAYBACK ON A TV
AV
Press halfway to focus
Press fully to take still image
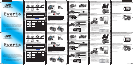
STILL IMAGE RECORDING
VIDEO RECORDING
Q Open the Lens Cover
R Insert SD Card
INSERTING THE SD CARD
Q Close the LCD to turn Off the Power
R Attach battery
T Connect the AC adapter to outlet
R Install an SD Card
SUPPLIED ACCESSORIES FOR THE CAMERA
AVAILABLE ACCESSORIES FOR THE CAMERA
TYPES OF USABLE SD CARDS
Memory Cards Capacity
!
Video
(ULTRA FINE)
#
Still images
(FINE)
SDHC Cards
<SD High-
capacity>
Supports
4GB to 32GB
32GB 7hr.30min.
9999
16GB 3hr.45min.
8GB 1hr.50min.
4GB 56min.
SD Cards
Supports
256MB to 2GB
SD Cards
2GB 28min. 7590
1GB 14min. 3950
512MB 6min. 1950
256MB 3min. 970
Note: Operations are confirmed on the following SD cards.
Manufacturer Panasonic, TOSHIBA, SanDisk, ATP
Video Class 4 or higher compatible SDHC card (4 GB to 32GB)
Still image SD card (256 MB to 2 GB), SDHC card (4 GB to 32 GB)
•
Using cards other than those specified above may result in recording failure or data
loss.
CHARGING THE BATTERY
Battery Type Charging Time Recording Time
BN-VG107US (Supplied) 1hr.50min. 50min.
BN-VG114US 2hr.30min. 1hr.40min.
BN-VG121US 3hr.30min. 2hr.35min.
Note: The battery pack is not charged at the time of purchase
CAUTION
•
Be sure to use JVC battery packs. If you use any other battery packs besides JVC
battery packs, safety and performance cannot be guaranteed.
Product Name Description
Battery Pack
•
BN-VG107US
•
BN-VG114US
•
BN-VG121US
•
Provides a longer recording time than the battery
pack that comes with this unit or it can also be used
as a spare battery pack.
Battery Charger
•
AA-VF8
•
Enables the battery pack to be charged without using
this unit.
To order any of these accessory please visit www.JVC.com or call 1-800-858-6442
S Connect AC adapter into DC Terminal
Bottom
Open
Label
RECORDING FILES
S Open LCD to Turn on the power
A
V
Press
The Mode will be displayed in the LCD
T Set Recording Mode.
A
V
Press to Start Recording.
The information below will be
displayed on the LCD during
recording.
832
Battery pack
Cover
Charging in progress:
Blinks
Charge finished:
Goes out
Image Size
Shutter Speed
Image Quality
Remaining Number of Shots
Focus
Recording in Progress
Recording Media
Battery Indicator
Video Quality
Remaining Recording Time
Zooming
Recording Media
Battery Indicator
:Record-Standby
:Recording in Progress
(Wide
angle)
(Telephoto)
•
Press again to Stop Recording.
Scene Counter
Lights up in green
when focused
Lights up during still
image recording
PLAYBACK VIDEOS
Q Open the card slot cover
Preparation:
•
Turn off both camera and TV.
A
V
AV
Q Plug in the supplied A/V cable to the camera. Then push the single plug into the A/V input.
R Turn on the camera and the TV.
S Press the L button to select the playback mode.
T Press the A/B button to select the video or still image mode.
U Slide your finger up and down on the Laser Sensor to select the desired thumbnail
for video or still image playback. Then press C button.
TV
AV Cable
(Provided)
To AV Terminal
Video Input
Yellow
White
Red
Video Input
Audio Input (L)
Audio Input (R)
Easy Start Guide
This easy start guide is designed to navigate you to
using your new Everio quickly. Please refer to the
owner’s manual for a detailed listing of features.
For our online tutorials please visit:
http://camcorder.jvc.com/tutorials.jsp
LYT2115-002A-M
AC Adapter
AP-V30U*
Battery Pack
BN-VG107US
USB Cable
(Type A - Mini Type B)
AV Cable
CD-ROM Basic User Guide Core Filter
Q Open the LCD monitor to turn on the unit.
R Press L button to select the playback mode.
S Press A/B button to select the video or still
image mode.
A
V
Press
Press
T Select from the index screen (highlight
thumbnails) using the Slider.
U Touch the C button.
NOV. 01.2009 04:55P MNOV.0 1.2010 PM 04:55
VIDEO PLAYBACK
5
Select
Touch
4
•
If the aspect ratio of the image is not
correct as shown on the right. Change
the settings in [VIDEO OUTPUT] from
the menu.
•
To display the camera’s on-screen
display on TV Set [DISPLAY ON TV]
to [ON] from the menu.
16:9 TV
4:3 TV
CHANGING MENU SETTINGS
A To select an Operation icon appearing on the left side, touch the portion of the
Slider next to Operation button.
B To select an Operation icon appearing at the bottom of the screen. Touch the
buttons underneath them.
USING THE OPERATION BUTTONS
MENU
OK
A
B
Select an item from the menu screen.
Q Touch the D button.
R Slide your finger up and down on the
Slider.
?
VIDEO
REGISTER EVENT
ZOOM
GAIN UP
TIME-LAPSE RECORDING
SET QUIT
VIDEO QUALITY
3
Select
Touch
1
Touch
2
S Touch the C button.
GRABACIÓN DE IMÁGENES FIJAS
GRABACIÓN DE VIDEO
Q Abra la cubierta de la lente
R Introducción de una tarjeta SD
INTRODUCCIÓN DE LA TARJETA SD
Q Cierre el LCD para apagar la alimentación
R Coloque la batería
T Conecte el adaptador de CA en el
tomacorriente
R Insertar una tarjeta SD
ACCESORIOS SUMINISTRADOS CON LA CÁMARA
ACCESORIOS DISPONIBLES PARA LA CÁMARA
TIPOS DE TARJETAS SD UTILIZABLES
Tarjetas de memoria Capacidad
!
Vídeo
(ULTRA FINA)
#
Imágenes fijas
(FINA)
Tarjetas
SDHC
<SD de gran
capacidad>
Admite
4GB a 32GB
32GB 7 h. 30 min.
9999
16GB 3h. 45min.
8GB 1h. 50min.
4GB 56min.
Tarjetas SD
Admite
256MB a 2GB
Tarjetas SD
2GB 28min. 7590
1GB 14min. 3950
512MB 6min. 1950
256MB 3min. 970
Nota: Se ha confirmado el funcionamiento con las siguientes tarjetas SD.
Fabricante Panasonic, TOSHIBA, SanDisk, ATP
Vídeo Tarjeta SDHC compatible de clase 4 o superior (de 4 GB a 32GB)
Imagen fija Tarjeta SD (de 256 MB a 2 GB), tarjeta SDHC (de 4 GB a 32 GB)
•
El uso de otras tarjetas que no sean las indicadas anteriormente puede provocar
una falla en la grabación o la pérdida de datos.
CARGA DE LA BATERÍA
Tipo de batería Tiempo de carga Tiempo de grabación
BN-VG107US
(suministrado)
1h. 50min. 50min.
BN-VG114US 2h. 30min. 1h. 40min.
BN-VG121US 3h. 30min. 2h. 35min.
Nota: La cámara se suministra con la batería descargada
PRECAUCIÓN
•
Asegúrese de utilizar baterías JVC. Si utiliza alguna otra batería que no sea de JVC,
no se puede garantizar la seguridad ni el rendimiento.
Nombre del producto Descripción
Batería
•
BN-VG107US
•
BN-VG114US
•
BN-VG121US
•
Proporciona un tiempo de grabación más prolongado
que la batería que viene con esta unidad o también
se puede utilizar como batería adicional.
Cargador de batería
•
AA-VF8
•
Permite que la batería se cargue sin usar esta
unidad.
Para solicitar algunos de estos accesorios, visite www.JVC.com o llame al
1-800-858-6442
S Conecte el adaptador de CA al
terminal de CC.
Parte de abajo
Abierto
Etiqueta
GRABACIÓN DE ARCHIVOS
S Abra el LCD para encender la
alimentación
A
V
Pulse
En el LCD aparecerá el modo.
T Ajuste el modo de grabación.
A
V
Presione este botón para
iniciar la grabación.
La información a continuación se
visualizará en el LCD durante la
grabación.
AV
Presione hasta la mitad para
realizar el enfoque
Presione completamente para
tomar una imagen fija
832
Batería
Cubierta
Carga en curso:
Parpadea
Carga terminada:
Se apaga
Tamaño de imagen
Velocidad del
obturador
Calidad de imagen
Número restante de tomas
Enfoque
Grabación en curso
Grabación de soportes
Indicador de batería
Calidad de vídeo
Tiempo restante de grabación
Zoom
Grabación de soportes
Indicador de batería
: Espera de grabación
: Grabación en curso
(gran angular)
(telefoto)
•
Presione nuevamente para detener
la grabación.
Contador de escenas
Se ilumina en verde
cuando se ha centrado
Se enciende durante la
grabación de imágenes fijas
REPRODUCCIÓN DE VÍDEO
Q Abra la tapa de la ranura para tarjetas
Preparativos:
•
Apague la cámara y el televisor.
A
V
AV
Q Enchufe el cable A/V suministrado en la cámara. A continuación, inserte cada
conector en la entrada de A/V.
R Encienda la cámara y el televisor.
S Pulse el botón L para seleccionar el modo de reproducción.
T Presione el botón A/B para seleccionar el modo video o imagen fija.
U Deslice su dedo hacia arriba y hacia abajo en el sensor láser para seleccionar la
miniatura deseada para la reproducción de vídeo o imágenes fijas. A continuación,
pulse el botón C.
TV
Cable AV
(proporcionado)
Al terminal AV
Entrada de vídeo
Amarillo
Blanco
Rojo
Entrada de vídeo
Entrada de audio (L)
Entrada de audio (R)
Guía de inicio rápido
Esta guía de inicio rápido está diseñada para
indicarle cómo utilizar rápidamente su nueva Everio.
Consulte el manual de usuario para obtener una lista
detallada de funciones.
Para consultar nuestros tutoriales en línea, visite:
http://camcorder.jvc.com/tutorials.jsp
LYT2115-002A-M
Adaptador de CA
AP-V30U*
Batería
BN-VG107US
Cable USB
(tipo A - mini tipo B)
Cable AV
CD-ROM Guía básica para el
usuario
Filtro central
Q Abra la pantalla LCD para encender la unidad.
R Pulse el botón L para seleccionar el modo de
reproducción.
S Presione el botón A/B para seleccionar el
modo video o imagen fija.
A
V
Pulse
Pulse
T Seleccione la opción en la pantalla de índice
(vistas en miniatura) utilizando el control
deslizante.
U Presione el botón C.
NOV. 01.2009 04:55P MNOV.0 1.2010 PM 04:55
REPRODUCCIÓN VÍDEO
5
Seleccione
Pulse
4
•
Si la proporción de aspecto de la imagen
no es la correcta, según la imagen de la
derecha. Cambie los ajustes en [SALIDA
DE VÍDEO] del menú.
•
Para visualizar la pantalla de
visualización de la cámara en el televisor,
ajuste [VER EN TV] en [ON] del menú.
16:9 TV
4:3 TV
CAMBIO DE AJUSTES DEL MENÚ
A Para seleccionar que aparezca un icono de funcionamiento en el lateral izquierdo,
presione el área del control deslizante cercana al botón de funcionamiento.
B Para seleccionar que aparezca un icono de funcionamiento en la parte inferior de
la pantalla. Presione los botones ubicados en la parte inferior.
USO DE LOS BOTONES DE FUNCIONAMIENTO
MENU
OK
A
B
Seleccione una opción de la pantalla de
menú.
Q Presione el botón D.
R Deslice su dedo hacia arriba y hacia
abajo del control deslizante.
?
VÍDEO
REGISTRAR EVENTO
ZOOM
GANANCIA
GRAB. POR INTERVALO
AJUSTE
SALIR
CALIDAD DE VÍDEO
3
Seleccione
Pulse
1
Pulse
2
S Presione el botón C.
Getting Started
Recording Files
Playing Back Files
Accessories
Using the Slider and Operation Buttons
Introducción
Grabación de archivos
Reproducción de archivos
Accesorios
Uso del control deslizante y de los botones de funcionamiento
110V - 240V
110V a 240V
C0S3_EasyStartup_B_EN_ES.indd 1 10/27/2009 7:56:36 PM