


Page - 12
STEP 3: DETERMINING THE ACTUAL POSITION
If you were using a SLR camera in the previous steps you could have looked through
the viewfinder in order to determine the nodal point. However, with the Coolpix
900 series, the viewfinder is not viewing the exact same image as what the CCD
(imaging chip) is seeing. Therefore, in order to accurately determine at what posi-
tion along the slot does the nodal point lay, you’ll need to take a series of test
shots.
The best way to do this is to start with the camera at the front most position of
the Vertical bracket. Using the object-alignment technique mentioned previously,
take a sequence of left-right pairs of test shots. Each pair will have the vertically
aligned objects in the left and then the right side of the viewfinder. After each
pair of photos, slide the bracket rearward a small amount and repeat the pro-
cess. Slide the bracket the same increment each time (i.e. 10mm). Placing a tem-
porary strip of tape in order to measure and mark the increments should make
it easier to record your results. Be sure to record the scale setting for each pair of
images.
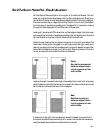
When you’re done, you should have a pair of left-right images for each position of
the camera along the slot. Transfer the images to your computer and inspect
each left-right pair. You’re looking for the pair of images that has the least relative
movement between the near and far objects. Go back to your recorded markings
and determine which location on the tape corresponds to the best pair of im-
ages.
In some cases you might find that no pair of images is optimum. In that case, you
should look for the two pairs that are closest and reshoot a test pair between
those pairs. With a little trial and error you will be able to accurately determine
the nodal point for any lens.
Once you’ve found the position, you can mark that location with the Camera Ad-
justment Shoe or leave a piece of tape as a marker for future reference.