


Page - 14
surface, then you can use a bubble level. You should be able to
locate a small level at a hardware store. If your there are no
level surfaces, then you may have to resort to “eyeballing”.
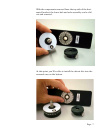
STEP 4: RECORD YOUR RESULTS
After you’ve discovered the two location dimensions, be sure to
record the settings. The KiWi has convenient indicator scales
for this purpose. These numbers represent the nodal point for
this given camera and lens combination. If you change cam-
eras or lenses, this procedure may have to be repeated.
STEP 5: HOW ABOUT RANGEFINDER CAMERAS?
A rangefinder camera is a camera where you look through a
separate viewfinder and not through the actual lens. The pro-
cess is basically the same. Locate the Side-to-Side adjustment
as discussed in Step 1. When it comes to the Fore-Aft adjust-
ment, you won’t be able to look through the viewfinder to de-
termine the proper setting since the viewfinder is a separate
optical path that doesn’t really “see” the same image as the
film.
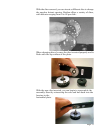
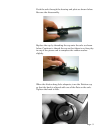
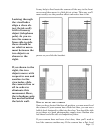
Instead, you’ll have to start with the bracket all the way to the
front and take pairs of test shots. Each pair will have the verti-
cally aligned objects in the left and then the right side of the
viewfinder. After each pair of photos, slide the bracket rear-
ward and repeat the process. Slide the bracket the same incre-
ment each time (i.e. 10mm). Be sure to record the scale setting
for each pair of images. Process the film, or in the case of digi-
tal cameras, download the images to your computer.
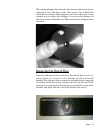
At the end of this process you will be able locate the pair of
images with the least relative movement. If no single image is
optimum, you may need to interpolate between two images to
find the closest value.