


8
SETTING THE DATE AND TIME
With this camera, you can record the date and time of each exposure directly onto the film.
The information appears on the back of your prints when processed. It features a clock and
automatic calendar that includes leap years.
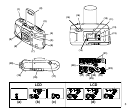
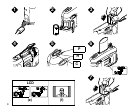
1. Press the menu button (11) to choose date. You must press this button to activate the
date and time function.
2. Press the hold the select/flash button (12) to view and change the “blinking” month (d).
3. Press the enter/self-timer button (13) to store the selected month and move to the next
blinking date option (follow steps 2 and 3 to complete your selection.)
4. Repeat steps 1-3 to choose and set time.
NOTE: If you don’t press the select/flash button within a minute, the camera turns off
and returns to the picture-taking mode.
Choosing Optional Date and Time Formats
(mm, dd, yy / dd, mm, yy, / yy, mm, dd and 12/24 hour)
1. Press the menu button (11) to choose date. You must press this button to activate the
date and time function.
2. Press and hold for 3 seconds the enter/self-timer button (13) until desired date format
appears. (See SETTING THE DATE AND TIME, steps 2–3 above to set date.)
3. Press the menu button (11) to choose time.
4. Press and hold the enter/self-timer button (13) until desired time format appears. (See
SETTING THE DATE AND TIME, steps 2–3 above to set time.)
NOTE: If you don’t press the select/flash button within a minute, the camera turns off
and returns to the picture-taking mode.