


Assembly\Disassembly 5-42
NovaJet 800 Series Service Manual
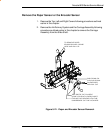
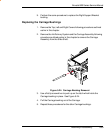
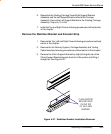
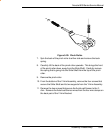
7. The Trailing Cable Assembly is secured to the Stabilizer Bracket by
two pieces of double sided tape. Remove the Trailing Cable Assembly
from the Stabilizer Bracket.
8. Mark the position of the double sided tape on the Stabilizer Bracket
before removing. It is important that the new tape is placed in the
exact position as the older pieces were. Remove any remnants of tape
still on the Stabilizer Bracket.
Install the Trailing Cable Assembly
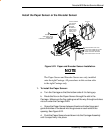
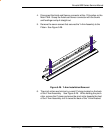
1. Apply two new pieces of double sided tape to the Stabilizer Bracket.
Ensure that the tape is in the same location as the original tape was.
CAUTION
The right side of the Trailing Cable (the side connected to
the Main PWA) must extend beyond the Stabilizer Bracket
by 5” (4 7/8” - 5 1/8”) or 128mm (125mm - 131mm.)
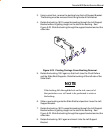
2. Slip the ferrite around the Trailing Cable Assembly and insert the right
side of the Trailing Cable Assembly through the access hole provided
in the Right Side plate.
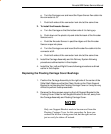
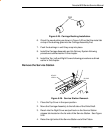
3. Slide the Carriage Assembly and Floating Carriage Cover Assembly to
the far left side of the Slide Shaft. While ensuring a 5” (125mm)
overhang on the right side, position the Trailing Cable Assembly over
the Stabilizer Bracket and slowly lower it onto the bracket. Ensure
that the Trailing Cable Assembly goes on straight and that there are no
buckles in the cables. Firmly press the Trailing Cable Assembly onto
the tape to secure it into position.
4. Connect the right end to the Main PWA, the right Carriage cable
(longer cable) to the J1 connector and the left Carriage cable (shorter
cable) to the J2 connector.
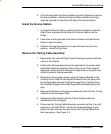
5. Move the Carriage Assembly and Floating Carriage Cover Assembly to
the right. Insert the Strain Reliefs (with Trailing Cables and ferrite) onto
the Carriage Assembly by sliding it onto the Strain Relief Supports
until it snaps firmly into place.