


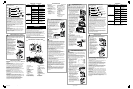
LOADING THE FILM
For excellent all-around results for indoor and outdoor picture-
taking, use ISO 400-speed film. For use in bright daylight, you
can use ISO 100- or ISO 200-speed film. If in sunlight, turn your
back to the sun and load the film in the
shade of your body.
1. Slide the on/off button (6) to
uncover the lens (7) and to turn
on the camera.
• You can load film into the camera
with the camera on or off.
2. Push up on the film-door latch (14)
to open the film door (20).
3. Insert the flat end of the film cartridge
over the film spindle (16). Push the
other end of the film cartridge down
into the film chamber (13) until it fits
securely into place.
• Do not force it into the film chamber.
4. Pull out the film leader until the film
tip reaches the film-load mark (19).
• If the end of the film extends past
the film-load mark, gently push the
excess back into the cartridge.
5. Lay the film flat between the film-
guide rails rotating the film
cartridge in the direction of
the film-load mark.
• Make sure the film-sprocket
teeth (12) show through
the holes on the film.
6. Close the film door.
• The film information
appears in the film
window (21).
NOTE: Do not open the film
door after you start taking
pictures or you will ruin the film.
7. Press the shutter button (1)
and turn the film-advance
wheel (8) until it locks; repeat
the steps until the picture
counter (2) shows frame 1.
• The picture counter starts
at zero and each mark
within the increments of
5 represents one picture.
GA24 100/21"
Beyond
9 ft
Picture
will be dark
4–9 ft
(1.2–2.8 m)
Safe Range
100-speed film
Safe Range
200-speed film
Safe Range
400-speed film
4–17 ft
(1.2–5.2 m)
4–12 ft
(1.2–3.7 m)
Beyond
12 ft
Beyond
17 ft
Picture
will be dark
Picture
will be dark
ESPAÑOL
KB22
ENGLISH/ESPAÑOL/FRANÇAIS
NEED HELP WITH YOUR CAMERA?
Visit our Web sites at http://www.kodak.com (for US) or
http://www.kodak.ca (for Canada) or call:
Kodak (USA only) from 9:00 a.m. to 7:00 p.m. (Eastern time)
Monday through Friday at 1-800-242-2424.
Kodak (Canada only) from 8:00 a.m. to 5:00 p.m. (Eastern time)
Monday through Friday at 1-800-465-6325, ext. 36100; for the
Toronto area, call 416-766-8233, ext. 36100.
Have your camera available when you call.
For warranty purposes, keep your sales receipt as
proof of the date of purchase.
CAMERA IDENTIFICATION
1 shutter button
2 picture counter
3 viewfinder
4 flash
5 battery door
6 on/off button
7 lens
8 film-advance wheel
9 flash-ready light
10 viewfinder eyepiece
11 film-rewind button
12 film-sprocket teeth
13 film chamber
14 film-door latch
15 camera strap
16 film spindle
17 film-rewind handle
18 film take-up spool
19 film-load mark
20 film door
21 film window
SPECIFICATIONS
Viewfinder: Reverse Galilean
Flash unit: Built-in,
flash every time
Flash-recycle time: 5 seconds
with fresh batteries
Power source:
2-AAA alkaline batteries
Dimensions:
4.6 x 2.6 x 1.6 in.
(117 x 67 x 40 mm)
Weight: 5.9 oz (169 g) with
batteries and film
© Eastman Kodak Company, 2002
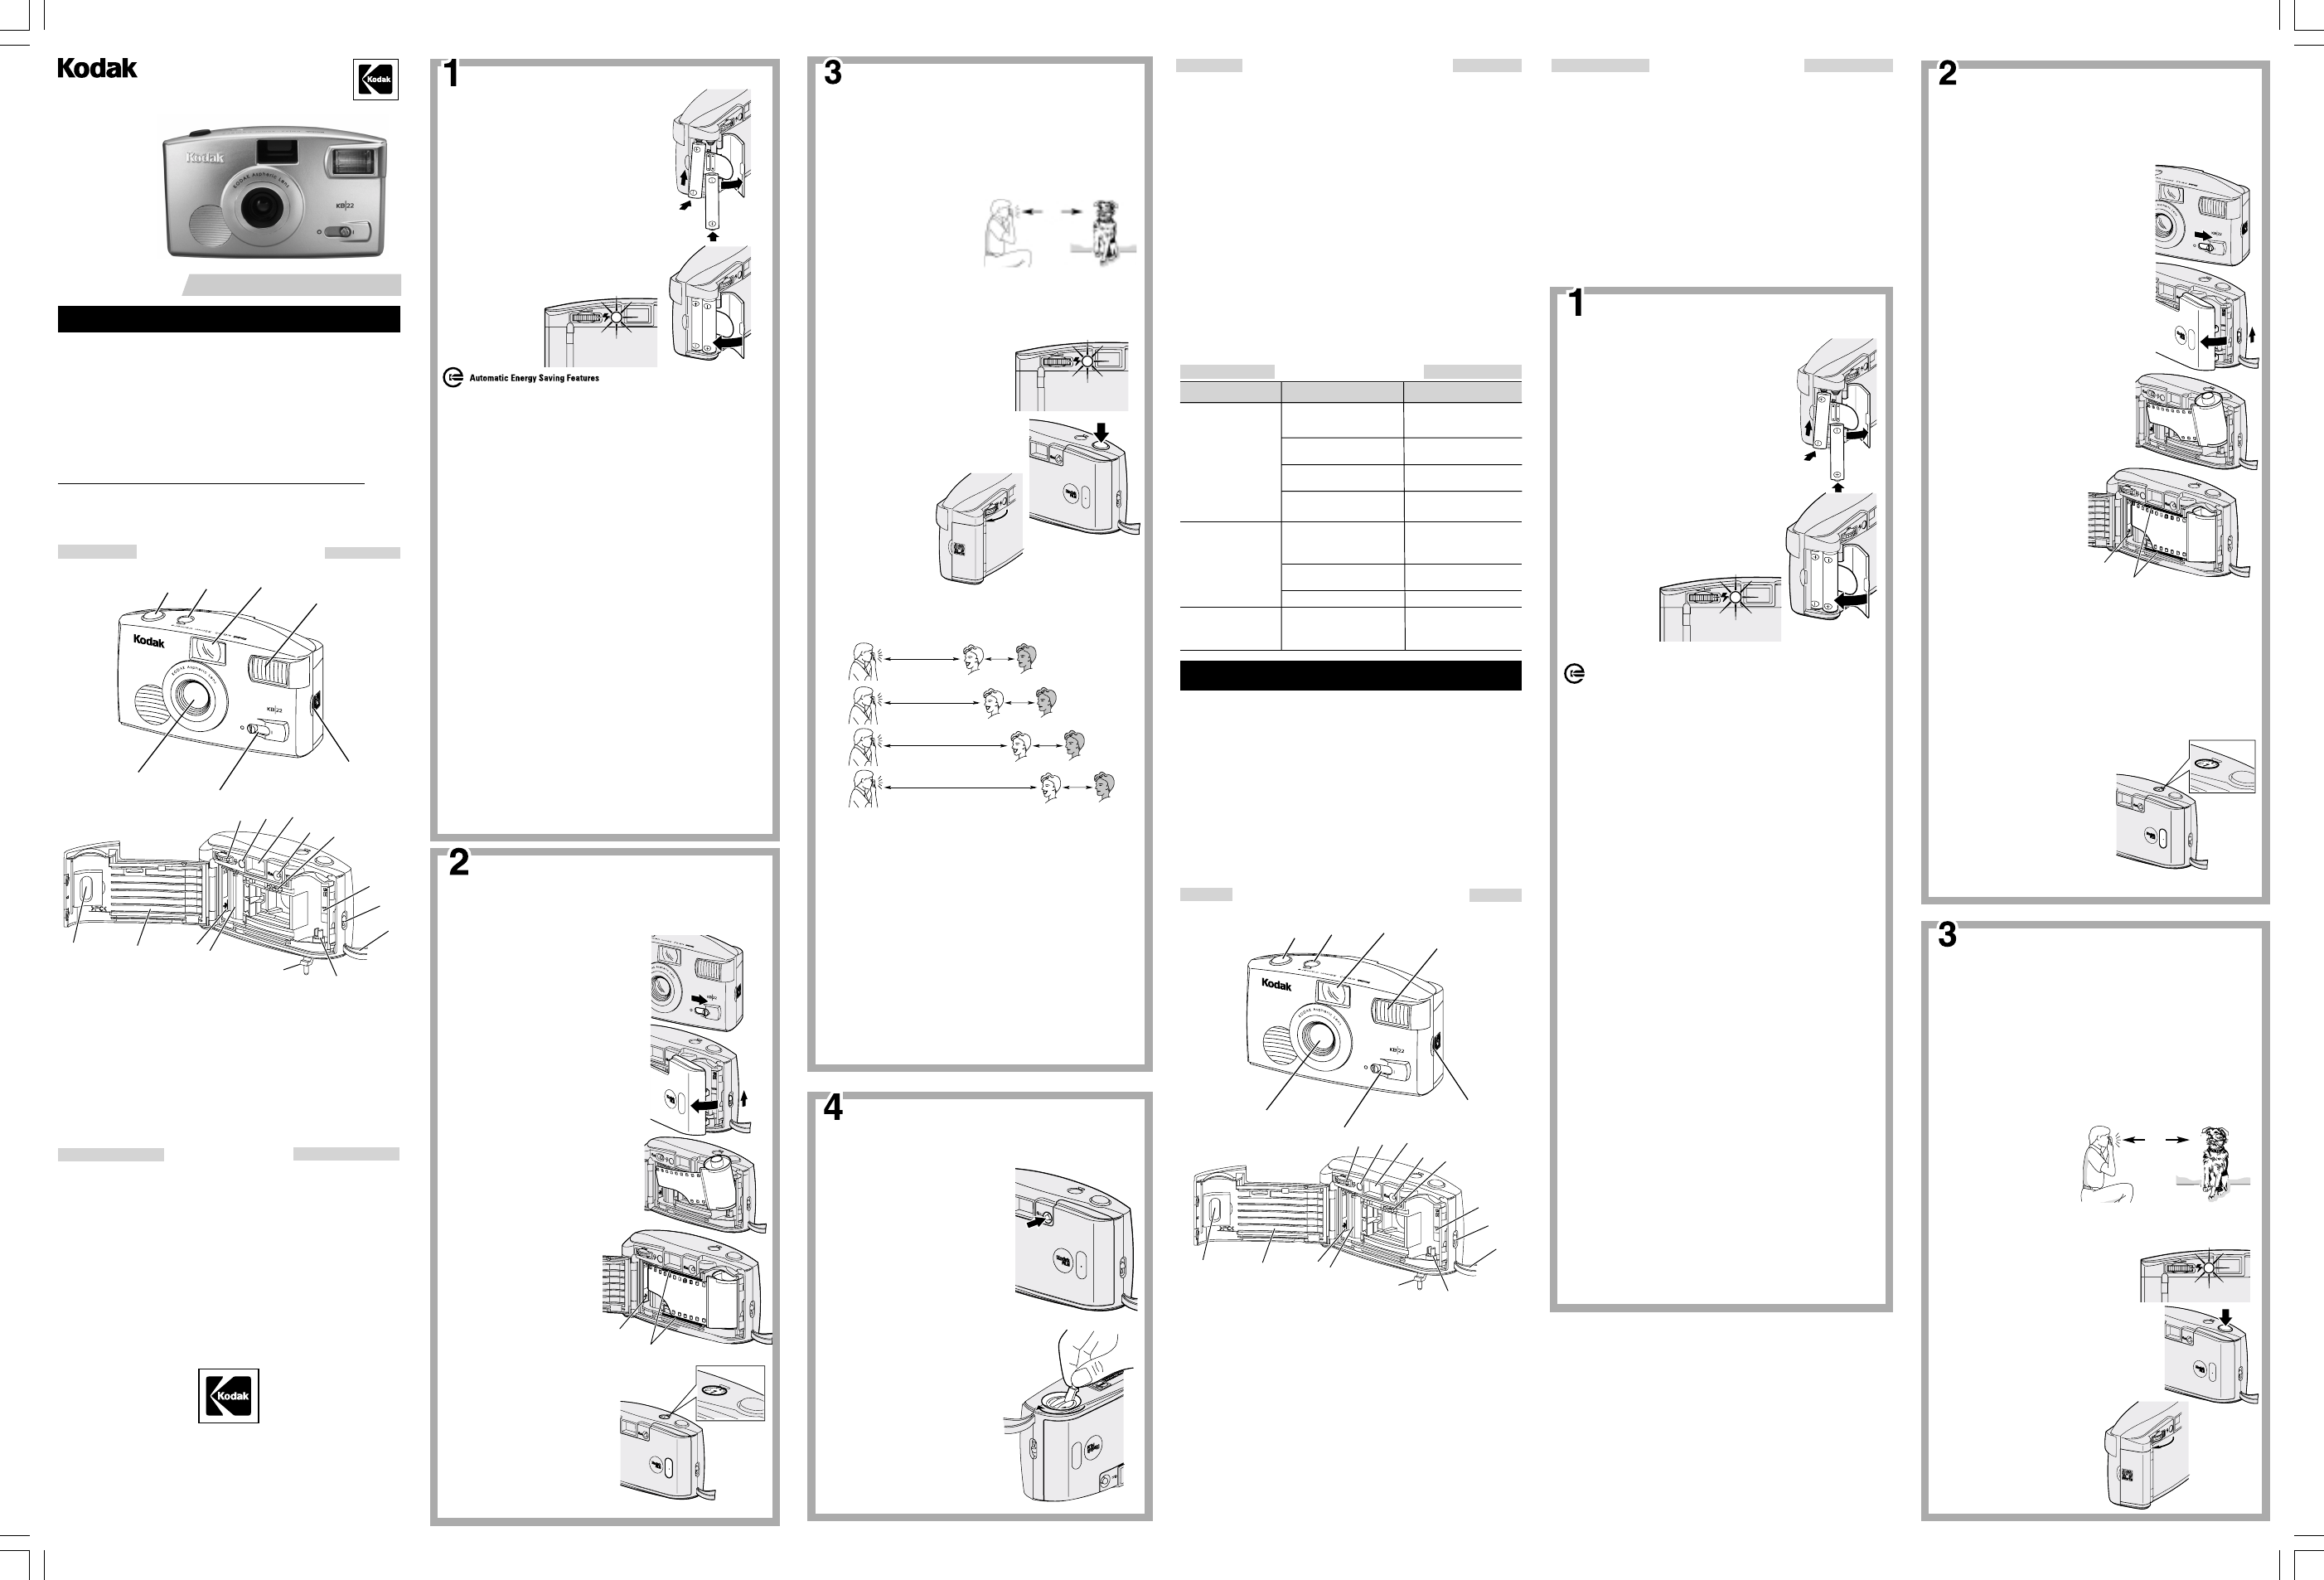
TAKING PICTURES
Flash Every Time
This camera features a flash that fires every time you take a
picture—for better, brighter pictures, both indoors and outdoors.
Examples include backlit scenes where the subject is in front of a
bright background, or outdoors on a sunny day, when bright sun
can cause shadows that obscure eyes or facial expressions.
NOTE: The flash-recycle time is approximately 5 seconds
with fresh batteries.
1. Slide the on/off button (6)
to uncover the lens (7) and
to turn on the camera.
2. For a sharp picture, stand
at least 4 ft (1.2 m) from
your subject.
NOTE: When taking pictures in dim light or on dark overcast
days, keep the subject within the distance range for the speed
of film in your camera (see Flash-to-subject distance below).
3. Wait for the flash-ready light (9)
to glow.
4. Look through the viewfinder
eyepiece (10) to compose
your picture.
5. Hold the camera steady and gently
press the shutter button (1) to take
the picture.
6. Wind the film-advance wheel (8)
until it stops.
• Your camera is
ready to take the
next picture when
the flash-ready
light is lit.
7. Slide the on/off
button to off when
you are done
taking pictures.
UNLOADING THE FILM
The film will not advance when you reach the end of the roll.
You must rewind the film before you open the film door or you will
ruin the film.
1. Push the film-rewind button (11)
until it latches.
2. Unfold the film-rewind handle (17)
on the bottom of the camera and
slowly turn it in the direction of
the arrow.
NOTE: There is tension when you
turn the film-rewind handle and less
tension when the film is fully
rewound.
CAUTION: Do not pull on the film-
rewind hand or it may break.
3. Open the film door (20) and remove
the film.
• The picture counter displays “0.”
4. Reload with fresh KODAK Film.
TROUBLESHOOTING
ENGLISH
Lens: 30 mm, 2-elements
aspheric lens
Shutter speed: Fixed at
1
/100 second
Aperture:
f
/8.0
Film size/type:
35 mm color or
black-and-white print film
Film speed: ISO 100, 200, 400
or 800 (ISO 400 recommended
for best results)
Focus range: Daylight: 4 ft (1.2 m)
to infinity
What happened Probable cause Solution
Camera will Lens cover closed; Slide on/off button
not operate camera off to uncover lens and
turn on camera
Film not properly See LOADING
loaded in camera THE FILM
Batteries weak, dead, See LOADING THE
or improperly loaded BATTERIES
Film must be See UNLOADING
rewound/removed THE FILM
Flash-ready light Lens cover closed; Slide on/off button
fails to glow within camera off to uncover lens and
30 seconds turn on camera
Batteries weak, dead, See LOADING THE
or improperly loaded BATTERIES
Camera in sleep mode See Power shutdown
Shutter button Lens cover closed; Slide on/off button
cannot be released camera off to uncover lens and
turn on camera
35 mm Camera
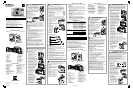
LOADING THE BATTERIES
Consumer Imaging
EASTMAN KODAK COMPANY
Rochester, NY 14650
This camera uses 2 AAA-size alkaline batteries.
1. Place your thumbnail along the battery-door
latch and lift to open the battery door (5).
• Tuck the battery-pull strap into the battery
chamber before you insert the batteries.
2. Insert the batteries with the (+) and (-) ends
in the correct positions and close the door.
NOTE: When you turn on the camera, with
the batteries properly loaded, the flash-ready
light (9) glows.
Power shutdown
To conserve battery power, the camera automatically goes to sleep
after a few minutes of nonuse; the flash-ready light (9) turns off
shortly thereafter. You can still take a picture while the flash-ready
light is on. When the light turns off, slide the on/off button (6) to off
and then on to wake up the camera.
NOTE: Turn off the camera when it is not in use to further extend
the battery life.
Battery tips
• Dispose of batteries according to local and national regulations.
• Keep spare batteries with you at all times.
• Keep batteries away from metal objects to prevent possible short
circuit, discharge energy, leakage, etc., to the batteries.
• Keep batteries away from children.
• Do not try to take apart, recharge or short circuit the batteries, or
subject them to high temperature or fire.
• Store the batteries in their original packaging prior to use.
• Remove batteries from the camera when you are not going to
use the camera for an extended length of time.
• Do not use rechargeable batteries.
• Replace both batteries at the same time with the same brand
and alkaline type.
WARNING: In the unlikely event that battery fluid leaks onto your
skin, rinse immediately with plenty of water. For additional
information, contact Kodak Health, Safety and Environment
Information in the U.S. at 1-585-722-5151. Customers outside the
U.S. can contact their local health care provider.
WARNING: In the unlikely event that battery fluid leaks inside the
camera, U.S. customers can contact the Kodak Information Center
(KIC) at 1-800-242-2424. Customers outside the U.S. can contact
their local Kodak Customer Service representative.
film-guide rails
film-load mark
4 ft
(1.2 m)
Tips for better pictures
• To avoid blurry pictures, hold your camera steady by keeping
your elbows close to your body when you press the
shutter button.
• Stand close enough to your subject so that it fills the viewfinder
but not closer than 4 ft (1.2 m).
• Take pictures at the subject’s level. Kneel down to take pictures
of children and pets.
• Hold your camera vertically with the flash up to capture tall,
narrow subjects, such as a waterfall, skyscraper, or a person.
• Add interest to your picture by framing it with a tree branch, a
window, or even the rails of a fence.
• Keep the sun behind you to provide the best subject illumination.
• Keep your hand, fingers, or objects away from the flash and
picture-taking lens.
• Stand at an angle to shiny surfaces like windows or mirrors to
avoid flash reflection and bright spots in your pictures.
• Protect the camera from dust, moisture, sudden impact, and
excessive heat.
CAUTION: Do not use solvents or harsh cleansers on the
camera body.
• If the lens appears dirty, breathe on it to form a mist and wipe the
surface gently with a soft, lintless cloth or camera lens-cleaning
tissue. Never wipe a dry lens.
CAUTION: Use solvents or solutions designed for cleaning
camera lenses. Do not use chemically treated tissues intended for
cleaning eyeglasses.
• Remove the batteries when you store the camera for an
extended time.
WARNING: To prevent possible damage and electrical shock,
do not attempt to disassemble or repair the camera or flash
unit by yourself.
CAUTION: The camera contains lead in the circuit board.
Disposal of lead may be regulated due to environmental
considerations. For disposal or recycling information, contact
your local authorities. In the US, you can also contact Electronics
Industry Alliance at
www.eiae.org
.
CARING FOR YOUR CAMERA
Low-batteries indicator
Replace the batteries when the flash-
ready light (9) takes longer than
30 seconds to turn on.
NOTE: Before you
remove the batteries,
turn off the camera.
1
23
4
5
6
7
8
9
10
11
13
14
15
16
18
19
20
21
Safe Range
800-speed film
4–24 ft
(1.2–7.3 m)
Beyond
24 ft
Picture
will be dark
User’s Manual
12
17
GA24 100/21"
Flash-to-subject distance
GA24 100/21"
¿NECESITA AYUDA CON SU CÁMARA?
Visite nuestros sitios en la red mundial electrónica (worldwide web) a la
dirección http://www.kodak.com (en los Estados Unidos) o http://
www.kodak.ca (en el Canadá) o llame a:
Kodak (en los Estados Unidos solamente), al 1-800-242-2424, de lunes
a viernes de 9:00 a.m. a 7:00 p.m. (hora del este).
Kodak (solamente en el Canadá), al 1-800-465-6325, extensión 36100,
de lunes a viernes de 8:00 a.m. a 5:00 p.m. (hora del este); para el área
de Toronto, llame al 416-766-8233 extensión 36100.
Cuando llame, favor de tener su cámara disponible
Para hacer válida la garantía, sírvase guardar el recibo de venta
como prueba de la fecha de compra.
1
IDENTIFICACIÓN DE LA CÁMARA
23
4
5
6
7
8
9
10
11
12
13
14
15
16
17
18
19
20
21
1 disparador
2 contador de fotografías
3 visor
4 flash
5 puerta del compartimiento
de las pilas
6 botón de encender/apagar
7 lente
8 rueda de avance de la película
9 indicador luminoso de
flash listo
10 ocular del visor
11 botón del rebobinado de
la película
12 dientes de engranaje
de la película
13 compartimiento de la película
14 cerrojo de la puerta del
compartimiento de la película
15 correa de la cámara
17 manigueta de rebobinado
de la película
18 carrete receptor de la película
19 marca del borde de la película
20 puerta del compartimiento
de la película
21 ventana de la película
ESPECIFICACIONES
Lente: Lente esférico de 30 mm,
2 elementos
Velocidad del disparador:
Fija en 1/100 segundos
Abertura de diafragma:
ƒ/8
,0
Tamaño / clase de película:
Película de impresión de 35 mm
a color o blanco y negro
Sensibilidad de la película:
ISO de 100, 200, 400 ó 800
(Para mejor resultado, se
recomienda ISO 400)
Enfoque: Luz del día: 1,2 m
(4 pies) a infinito
Visor: Reverso Galileo
Unidad del flash: Integrado con
disparo de flash cada vez
Tiempo de reciclaje del flash:
5 segundos con pilas nuevas
Fuente de energía:
2 pilas alcalinas AAA
Dimensiones: 117 x 67 x 40 mm
(4.6 x 2.6 x 1.6 in.)
Peso: 169 g (5.9 onzas) con pilas
y película
CÓMO CARGAR LAS PILAS
Esta cámara utiliza 2 pilas alcalinas tamaño AAA.
1. Abra la puerta del compartimiento de las
pilas (5) usando la uña del pulgar para
levantar el cerrojo de la puerta del
compartimiento de las pilas.
• Asegúrese de poner la correa de sacar las
pilas dentro del compartimiento de las pilas
antes de introducirlas.
2. Coloque las pilas en su compartimiento con
los signos (+) y (-) en la posición correcta y
cierre la puerta.
NOTA: Cuando encienda la cámara, con las
pilas cargadas correctamente, el indicador
luminoso de flash listo (9) debe brillar.
Indicador de pilas débiles
Reemplace las pilas cuando el indicador
luminoso de flash listo (9) demora más
de 30 segundos
en encenderse.
NOTA: Antes de
remover las pilas
apague la cámara.
Características de la Conservación Automática de Energía
Apagado automático
Para conservar la energía de las pilas, esta cámara entra al modo
de apagado automático cuando no se usa por unos minutos; el
indicador luminoso de flash listo (9) se apagará unos minutos
después. Aunque la cámara esté en el modo de apagado
automático, puede tomar fotografías siempre que el indicador
luminoso de flash listo esté encendido. Cuando el indicador
luminoso de flash listo se apague, para encender la cámara,
deslice el botón de encender/apagar (6) a apagado e
inmediatamente a encendido.
NOTA: Cuando no use la cámara por un período de tiempo
prolongado, apáguela para de esta forma conservar, aun más,
la energía de las pilas.
Consejos para usar las pilas
• Deseche las pilas usadas según las regulaciones locales
y nacionales.
• Acuérdese de llevar pilas de repuesto con usted en todo
momento.
• Para prevenir cortocircuito, descarga eléctrica, derrames,
etc., mantenga las pilas lejos de objetos de metal
• Mantenga las pilas fuera del alcance de los niños.
• No intente desarmar, recargar o cortocircuito las pilas o
exponerlas a altas temperaturas o fuego.
• Antes de usarlas, guarde las pilas en su empaque original.
• Cuando no vaya a usar la cámara por un período prolongado,
quite las pilas de la cámara.
• No use pilas recargables.
• Reponga ambas pilas al mismo tiempo con pilas de la misma
marca comercial y tipo alcalino.
ADVERTENCIA: Si sucediera que el líquido de las pilas tocase su
piel, enjuáguese inmediatamente con bastante agua. Para más
información comuníquese, en los Estados Unidos, con el
departamento de Salud, Seguridad, e Información
Medioambiental de Kodak llamando al 1-585-722-5151. Los
clientes que se encuentren fuera de los Estados Unidos, pueden
ponerse en contacto con su proveedor local de salud.
ADVERTENCIA: Si sucediera que el líquido de las pilas se
derramase dentro de la cámara, los clientes de Kodak en los
Estados Unidos pueden comunicarse con el Centro de
Información de Kodak (KIC) llamando al 1-800-242-2424. Los
clientes que se encuentren fuera de Estados Unidos, pueden
ponerse en contacto con el representante local de Kodak.
CÓMO CARGAR LA PELÍCULA
Para obtener excelentes resultados al tomar fotografías lo mismo
en exteriores como en interiores, use película con la sensibilidad
de ISO de 400. Para la toma de fotografías en días que haya un
sol brillante, se recomienda usar película con la sensibilidad de
ISO de 100 ó 200. Bajo luz solar, colóquese de espalda al sol y
cargue la película a la sombra de su cuerpo.
1. Deslice el botón encender/apagar (6)
para destapar el lente (7) y encender
la cámara.
• En esta cámara puede cargar la película
con la cámara encendida o apagada.
2. Empuje el cerrojo de la puerta del
compartimiento de la película (14)
hacia arriba para abrir la puerta del
compartimiento de la película (20).
3. Introduzca la punta plana del cartucho
de la película sobre la bobina de la
película (16). Empuje el otro lado del
cartucho de la película hacia dentro del
compartimiento de la película (13) hasta
que encaje seguramente en su lugar.
• No fuerce la película para que entre
en su compartimiento.
4. Saque suficiente película hasta que
la punta alcance la marca del borde
de la película (19).
• Si la punta de la película sobrepasa
la marca del borde de la
película, empuje
cuidadosamente la
película sobrante hacia
dentro del cartucho.
5. Es necesario rotar el
cartucho de la película
en la dirección de la
marca del borde de la
película para asegurarse
que la película quede
plana entre los carriles de guía de la película.
• Asegúrese de poder ver los dientes de engranaje
de la película (12).
6. Cierre la puerta del compartimiento de la película.
• La ventana de la película (21) muestra la información
sobre la película.
NOTA: Una vez que haya cerrado la puerta del compartimiento
de la película y empiece a tomar fotografías, no podrá abrirla
porque, de lo contrario, arruinará la película.
7. Oprima el disparador (1) y gire la
rueda de avance de la película (8)
hasta que trabe. Repita este paso
hasta que el contador de
fotografías (2) muestre el
cuadro 1.
• El contador de fotografías
comienza con el cero y
cada marca en los incrementos
de 5 representan
una fotografía.
marca del
borde de
la película
carriles de guía
de la película
GA24 100/21"
CÓMO TOMAR FOTOGRAFÍAS
El flash que se dispara cada vez
Esta cámara incluye la característica de un flash automático el cual
se dispara cada vez que toma una fotografía para de esta forma
ofrecerle fotografías nítidas en interiores y exteriores.
Ejemplos de ocasiones en que el flash se dispara
automáticamente incluyen: escenas a contraluz en que el sujeto se
encuentra al frente de un fondo con mucha luz o escenas
exteriores con un sol brillante el cual puede causar sombras que
obscurezcan los ojos o expresiones faciales.
NOTA: El tiempo de reciclaje del flash es aproximadamente
5 segundos con pilas nuevas.
1. Deslice el botón encender/apagar (6) para destapar el lente (7)
y encender la cámara.
2. Para obtener una
fotografía nítida,
manténgase a una
distancia mínima de
1,2 m (4 pies) del sujeto.
NOTA: Al tomar fotografías en días nublados o a poca luz,
mantenga el sujeto a fotografiar dentro del alcance indicado
para la sensibilidad de la película en su cámara (vea la
información sobre la Distancia del
sujeto al flash a continuación).
3. Espere hasta que el indicador
luminoso de flash listo (9) brille.
4. Para componer su fotografía, mire a
través del ocular del visor (10).
5. Sostenga la cámara estable y oprima
suavemente el disparador (1) para
tomar la fotografía.
6. Gire la rueda de avance de la película (8)
hasta que trabe.
• Su cámara está lista para
tomar la próxima fotografía
una vez que brille el indicador
luminoso de flash listo.
7. Deslice el botón de encender/
apagar a apagado cuando
termine de tomar fotografías.
GA24 100/21"
Pt. No. 20230020
Kodak is a trademark.
New 10/02
1,2 m
(4 pies)
KB 22 front.p65 10/8/02, 12:39 PM1