Copyright © 2006 Linear LLC 221383 C
CCM-1
Color
Camera
Module
Installation Instructions
PRODUCT DESCRIPTION
Linear’s Model CCM-1 (P/N ACP00904) CCTV camera can be installed inside the
AE-100, AE-500, AE-1000 or AE-2000 access control systems. The camera provides
a video signal for viewing the area in front of the system.
The camera is continuously powered by the access system. Focus has been factory
adjusted to a range of three to four feet.
The AE-1000 and AE-2000 provide a video jack for connection to a video cable with a
Type “BNC” connector. Up to 400 feet of 75-ohm RG-59 video cable can be used. Longer
cable runs may require the use of a video amplifi er.
NOTE: If camera is being installed on an existing installation, system power should
be off prior to installing the camera.
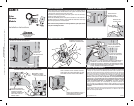
1. REMOVE THE COVER PLATE
2. INSTALL THE WINDOW 3. REMOVE THE LENS CAP 4. INSTALL THE CAMERA
5. CONNECT THE CAMERA AND VIDEO CABLE 6. TEST CAMERA LINEAR LIMITED WARRANTY
This Linear product is warranted against defects in material and workmanship
for twenty four (24) months. The Warranty Expiration Date is labeled on the
product. This warranty extends only to wholesale customers who buy direct from
Linear or through Linear’s normal distribution channels. Linear does not warrant
this product to consumers. Consumers should inquire from their selling dealer
as to the nature of the dealer’s warranty, if any. There are no obligations or
liabilities on the part of Linear Corporation for consequential damages
arising out of or in connection with use or performance of this product or
other indirect damages with respect to loss of property, revenue, or profi t,
or cost of removal, installation, or reinstallation. All implied warranties,
including implied warranties for merchantability and implied warranties for
fi tness, are valid only until Warranty Expiration Date as labeled on the product.
This Linear Corporation Warranty is in lieu of all other warranties express
or implied.
All products returned for warranty service require a Return Product Authorization
Number (RPA#). Contact Linear Technical Services at 1-800-421-1587 for an
RPA# and other important details.
(760) 438-7000 • FAX (760) 438-7043
USA & Canada (800) 421-1587 & (800) 392-0123
Toll Free FAX (800) 468-1340
www.linearcorp.com
REMOVE BOTH
COVER PLATE
RETAINING NUTS
REMOVE THE
COVER PLATE
POSITION THE
GASKET ON
THE TWO STUDS
GASKET
AE-500, AE-1000 AND AE-2000 ONLY
REMOVE THE LENS CAP
FROM THE CAMERA LENS
PLUG THE CAMERA'S
WIRING HARNESS INTO
ACCESS SYSTEM'S
CAMERA CONNECTOR
USE CABLE TIES TO
DRESS CABLE
CONNECT VIDEO
CABLE TO VIDEO
OUTPUT CONNECTOR
1
2
CAUTION! BE SURE THE SYSTEM POWER IS OFF
APPLY POWER TO THE ACCESS SYSTEM
THEN VIEW THE VIDEO MONITOR TO TEST
THE VIDEO OUTPUT FROM THE CAMERA
SMALL ADJUSTMENTS FOR TILT
CAN BE MADE BY ADJUSTING
THE CAMERA'S BRACKET
AE-100 ONLY - IF THE ORIGINAL PROTECTIVE WINDOW IS
DAMAGED, IT MAY BE REPLACED BY PRESSING IT OUT
FROM THE OUTSIDE IN. REMOVE THE ADHESIVE BACKING
FROM THE NEW WINDOW (INCLUDED) AND PRESS IT INTO
PLACE, ADHESIVE TOWARDS THE FRONT.
ATTACH THE CAMERA
USING THE TWO NUTS
HOLE IN THE CAMERA
FRAME IDENTIFIES THE
TOP OF THE CAMERA
PRINTER’S INSTRUCTIONS:
INSTR,INSTL,CCM-1 - LINEAR P/N: 221383 C - INK: BLACK - MATERIAL: 20 LB. MEAD BOND - SIZE: 8.500” X 11.000” - SCALE: 1-1