


.
Meade Instruments Corporation
6001 OAK CANYON, IRVINE, CALIFORNIA 92620-4205 n (949) 451-l 450
FAX: (949) 451-1460
n
www.meade.com
Operating Instructions
Meade@
ETX Field Tripod
For Use With the ETX Astro Telescope
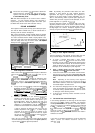
Fig. 1: ETX Field Tripod. (1) Mounting Slots; (2) Mounting Plate; (3)
Latijude
Scale; (4) Fine Latitude Adjustment Knob; (5) Height
Adjustment Knob; (6) Accessory Tray; (7) Extension Strut System;
(6)
North-Pointing Tripod Leg (marked
“N”
at position of arrow);
19)
Fine Azimuth Adjustment Knobs; (10) Latitude Lock Knob:
(11)
Latitude Lock Lever
(opposite side).
L
PARTS LISTING AND ASSEMBLY
When opening the packing box for the first time, note carefully
the following parts included with the ETX Field Tripod:
-
Tripod
-
2 Attachment Knobs
-
Accessory
Tray
1. Preparing the Tripod For Use
The ETX Field Tripod (Fig. 1) is simple to set up and easy to
use. Users need only attach the accessory tray and adjust the
tripod to the
desrred
observtng
hetght.
a.
Extending the Tripod:
Remove the tripod from the
shtpptng
box and stand it
upright. Grasp two of the tripod legs, leaving the full
weight of the tripod on the third leg. Gently pull the legs
apart to a full open
posltion.
b.
Attaching the Accessory Tray:
Remove the round accessory tray
(6),
Fig. 1, from the
shipping box. Remove the black, star-shaped lock knob
from the threaded rod on the bottom of the accessory tray.
Attach the tray to the tripod by inserting the threaded rod
through the central hub of the extension strut
(7)
Fig.
1.
Rethread the lock knob onto the accessory tray.
Varying the Tripod Height:
Loosen the black, star-shaped height adjustment knob
(5)
Fig.
1,
at the base of each tripod leg.
Slide
the three top tripod leg sections to the desired height.
Tighten the three height adjustment knobs,
(5)
Fig. 1, to a
“firm
feel”. Do not overtighten.
Collapsing the Tripod for Storage:
Remove the accessory tray
(6),
Fig. 1, from the tripod.
Grasp the top of the tripod
wrth
one hand, and with the
other hand, pull up on the central hub of the extension
strut
(7)
Fig.
1,
where the accessory tray was attached.
This action will cause the tripod legs to move inward to a
collapsed position.
Important Notes on using ETX Field Tripod:
.
.
.
2.
a.
b.
.
C.
Remove the accessory tray before attempting to collapse
the tripod.
If the tripod does not extend or collapse easily, do not
force the tripod legs in or out. By following the above
instructions the tripod
will
function properly. Forcing the
tripod into an incorrect position may damage the extension
strut system.
Do not overtighten the three star-shaped height adjustment
knobs on the tripod legs.
“Firm feel” tightening is sufficient.
Attaching the ETX Astro Telescope to the Tripod
Confirm that the latitude lock lever
(11) Fig.
1,
is in the
locked posltlon by rotating the lever clockwlse
untrl
trght.
Also
confrrm
that the N/S
swatch
on the base of the ETX
Astro Telescope IS set for the correct hemsphere
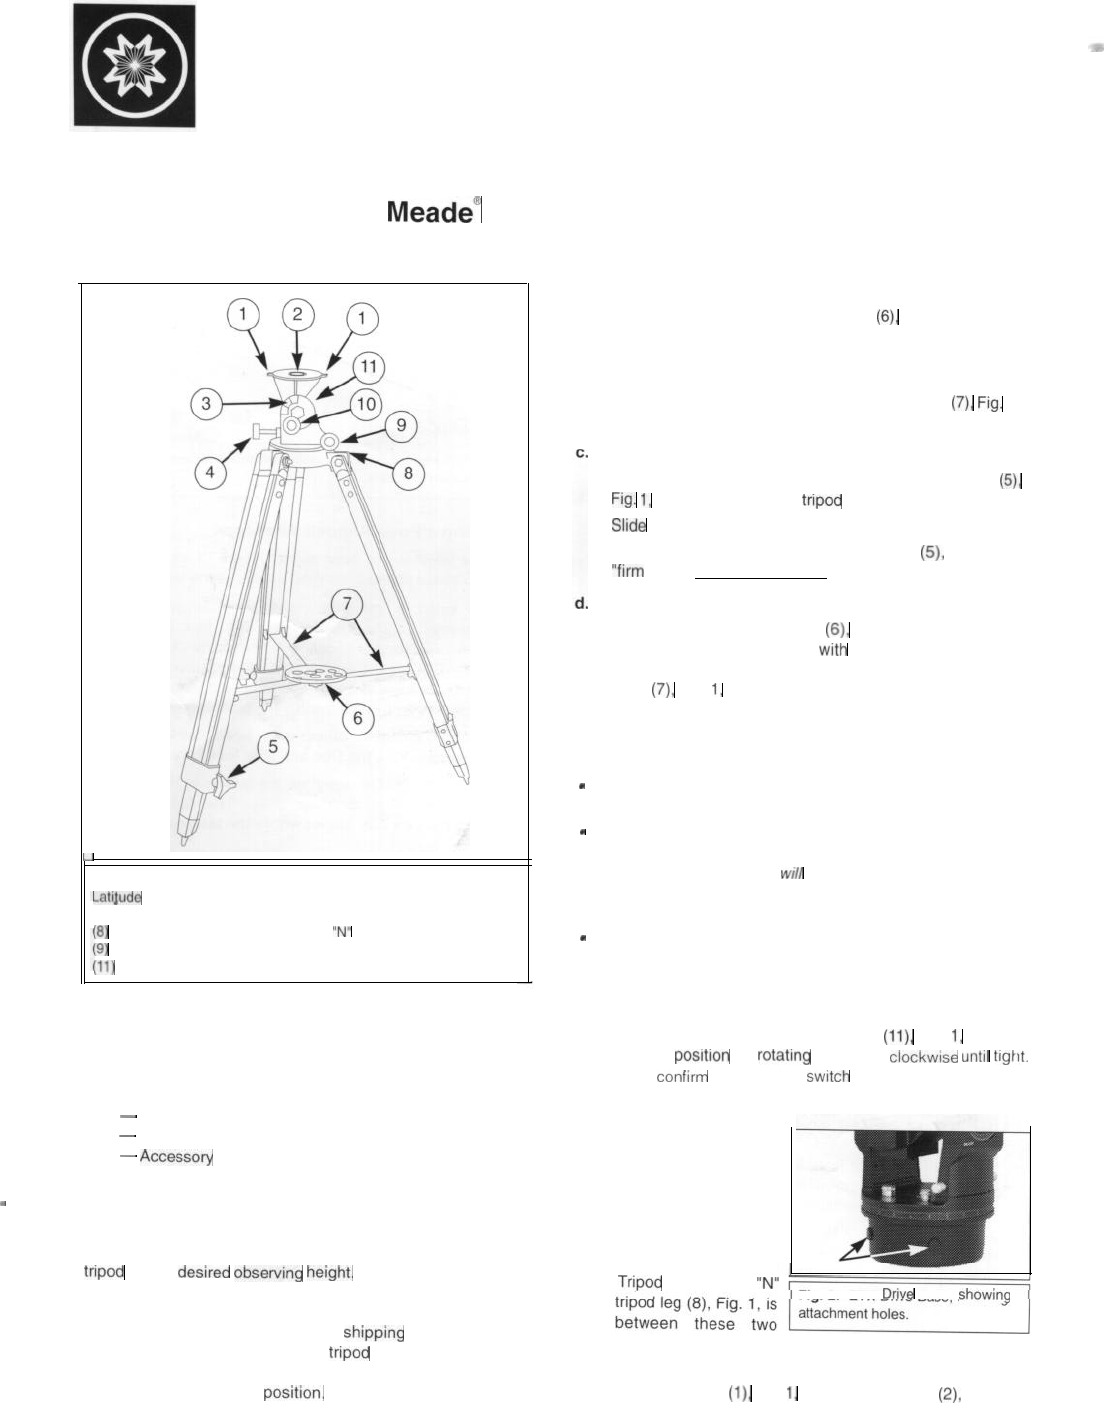
In the side of the ETX
drive base, locate the
two attachment holes,
Fig. 2. (These holes
are normally used with
the fixed legs of the
table tripod.) Position
the ETX on the Field
Tripod
so that the
“N”
Fig. 2: ETX
Drove
Base,
showmg
attachment holes.
Then, align the two holes in the base of the ETX with the
mounting slots
(1)
Fig.
1,
on the mount plate
(2)
Fig. 1.