


• With the +/− polarities aligned correctly, insert the battery packs into the battery, taking care
not to reverse the +/− polarity.
• Load the case in the camera. Push down lightly on the compartment case, and then move
the battery compartment knob to the close position .
Note:
Your camera can also use the following types of batteries: AA (R6) Ni-MH (x4), AA (R6)
Alkaline (x4), AA (R6) Ni-Cd (x4), and lithium polymer (requires optional holder mounted on
the camera). For details, refer to the Reference Manual.
Caution:
Never use AA (R6) Zinc-carbon or AA (R6) lithium batteries with this camera. These batteries
could overheat and seriously damage the camera.
3 Insert the memory cards.
• The camera can hold one SmartMedia
®
and one CompactFlash
®
(Type I or II) memory card.
Either card can be installed alone or both can be installed together, but at least one memory
card of either type must be installed in the camera before you take pictures.
• Hold the camera with the lens facing away from you. On the back of the camera, move the
card cover lock button J up to open the card cover.
• To install a SmartMedia card, hold it with its notched corner down, and insert it into the
thinner slot closest to the back of the camera. Gently push the card completely into the slot.
(Insert the SmartMedia card until you can see about 2 mm of the card above the edge of
the slot.)
• To remove the SmartMedia card, push it in gently to release and then pull it out of the slot.
• To install the CompactFlash card, hold it with the arrow on the card toward you and insert it
into the wider slot closest to the front of the camera. Gently push the card completely into
the slot.
• To remove the CompactFlash card, gently press the eject button below the slot.
Caution:
Careful! If you press the eject button too hard, the CompactFlash card could pop out of the
slot.
4 Switch the camera on.
• The power switch is located on top of the camera by the mode dial (marked P, A, S, M).
Move the power switch toward you to the ON position. The control panel on top of the
camera comes on.
• The batttery check mark in the control panel on top of the camera tells you that the batteries
are fully charged. When this mark begins to blink, the batteries are low and you should
replace them as soon as possible. If this mark goes off, the batteries are dead and the
camera cannot be used until you have replaced the batteries.
• The large number to the right of the battery check tells you the approximate capacity of the
selected card. As each picture is taken, this number will decrease until it reaches 0 and the
card is full.
• To switch the camera off, move the power switch forward to the OFF position.
5 Set the date and time.
• On the top right corner of the camera, set the mode dial to the setup/connection mode mark
.
• On the back of the camera above the arrow pad, press the menu button . The menu
appears in the monitor.
• On the arrow pad, press once to move the green highlight to the time setting mark .
• With the time setting mark highlighted, press once to move the green highlight to the
mark. Below the date, the date format, -Y-M-D for example, where Y, M, D stand for the Year,
Month, Day, is displayed.
• Press or to select the date format (-Y-M-D, -M-D-Y, etc.), and then press . Two
pointers appear above and below the first setting.
• Now you can set the date. On the arrow pad, press or to increase or decrease the 2-
digit number. With the desired number displayed (12 for example) press the OK button to
select the number and move the pointers to the next position. (The OK button is on the
lower right side of the arrow pad on the back of the camera.)
• For each position, press or to select the desired number and press the OK button to
save the setting and move the pointers to the next position. Be sure to set the time using
using the 24-hour settings. (00: 00~23: 59)
• After setting the minute, the green highlight returns to the time setting mark . Press the
OK button to save the settings and close the menu.
Get Set!
1 If the lens cover is on the lens, remove it.
2 Select the shooting mode.
• Move the mode dial to the P (Program mode) setting. With the mode dial set to P, the
camera automatically selects the correct aperture and shutter speed for the best exposure.
This is the best setting if you are just getting started.
1
2
3
4
5
6
7
8
9
0
A
B
C
V
U
T
S
R
Q
P
O
N
M
L
K
J
I
H
G
F
E
D
W
X
b
a
`
]
\
[
Z
Y
c
d
e
f
g
j
h
i
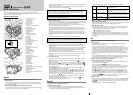
Important Parts and Names
1 Metering mode button
2 Drive button
3 Remote cable jack
4 Built-in flash
5 Flash button
6 Manual focus ring
7 Zoom ring
8 Exposure compensation button
9 Macro button
0 Flash synchro socket
A Focus mode switch
B Strap eyelet
C DC IN jack cap
D Monitor
E Eyepiece shutter lever
F Diopter adjustment ring
G Viewfinder
H Main dial
I Card cover
J Card cover lock
K SM/CF memory card button
L Card access lamp
M Light button
N AE lock button
O Power switch
P Mode dial
Q White balance mode button
R Sub dial
S Control panel
T Record mode button
U Flash mode button
V Hot shoe
W Video OUT jack
X USB connector
Y Monitor lock/release button
Z INFO button
[ Protect button
\ Erase button
] Arrow pad
^ OK button
a Menu button
b Monitor button
c Shutter button
d Remote control receiver/self-timer lamp
e Strap eyelet
f Battery compartment
g Tripod socket
h Lens
i Quick reference white balance button
j AF port
Digital Camera
Quick Start Guide
Follow these simple instructions to start using your camera in minutes. Read the other
instructions provided with the camera for detailed descriptions of all the exciting features that the
Olympus E-10 packs into its compact design.
Ready!
You have to complete several important tasks before you can use the camera.
1 Attach the strap.
• Thread the ends of the strap through the eyelets on both sides of the camera. Slide the
ends of the straps through the sleeve and frame, and then pull them tight. Slide the sleeve
up the eyelets on both sides.
2 Load the lithium battery packs provided with the camera.
• On the bottom of the camera, turn the battery compartment knob to the open position ,
open the compartment, and then remove the battery case.
Four shooting modes are available. For details, refer to the Reference Manual.
P Program mode Camera selects the correct aperture and shutter
speed automatically.
A Aperture priority mode Camera sets the correct shutter speed for the
aperture that you select by moving the sub dial
left or right.
S Shutter priority mode Camera sets the correct aperture for the shutter
speed that you select by moving the sub dial left or
right.
M Manual mode You select the aperture with the main dial and the
shutter speed with the sub dial.
3 Adjust the viewfinder for your eyes. If you wear eyeglasses, you may need to
sharpen the viewfinder display.
• If the AF target mark in the center of the viewfinder is not sharp, turn the diopter adjustment
ring around the viewfinder left or right until the AF target mark is sharp.
4 Select the memory card.
• If only one memory card is installed in the camera, the card is selected automatically for
storing pictures that you take. If both cards are installed, the control panel display will tell
you which card is currently selected for storing pictures.
SmartMedia memory card selected.
CompactFlash memory card selected.
• If you want to switch the selection, press and hold down the SM/CF memory card button
below the control panel, and then turn the main dial (below the SM/CF memory card button
on the back of the camera) until you feel a click. In the control panel you should see SM or
CF displayed.
Go!
1 Make sure that the lens cover has been removed.
2 Take a picture.
• Point the camera at the subject that you want to take a picture, and look through the
viewfinder to compose the picture.
• Turn the zoom ring to enlarge or reduce the size of the subject in the viewfinder.
• The shutter button is near the top, front edge of the grip. With the picture composed in the
viewfinder, use the flat of your index finger to half-press the shutter button and wait for the
AF correct mark light in the lower left corner of the viewfinder to light. When you see the AF
correct mark light, the picture is correctly focused and exposure is calculated.
• Full-press the shutter button to take the picture. After the shutter releases, the monitor on
the back of the camera briefly displays the image of the picture you have just taken and
then goes off.
• If you see the mark blinking in the viewfinder, this means that you should use the flash.
• On the left side of the camera, near the top, press the flash button to raise the built-in flash
unit. The flash will fire automatically to ensure correct exposure of the picture.
3 Repeat from Step 2 to take a few more pictures.
4 View the pictures that you have just taken.
• Set the mode dial to playback . The monitor on the back of the camera switches on and
you will see the the last picture taken.
• On the arrow pad, press or to display the other shots one by one.
• If you want to display several images at once so you can quickly locate a picture, turn the
main dial to the left. Every time you move the dial left you will see 4, 9, then 16 frames in
the monitor. This is called the index display where each set of 4, 9, or 16 frames are
displayed as an index.
• Press or to display the next index. On the arrow pad, press or to move the
green highlight within the displayed index to select the picture that you want to display.
• If you want to enlarge the display so you can check the focus of the picture, turn the main
dial clockwise to enlarge the display in steps. As you enlarge the display, the view becomes
smaller. Press on the arrow pad to scroll around the enlarged image. Turn the
main dial counterclockwise until the original display is restored.
5 Delete a picture.
• With the frame that you want to delete displayed in the monitor, press the erase button
on the back of the camera near the bottom edge. If you are using the index display, use
on the arrow pad to select the picture that you want to erase, and press the
erase button.
• To switch off playback, set the mode dial to P, A, S, or M.