


44
EN
Getting to know your camera better
There are several factors that can cause the picture to appear grainy.
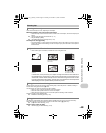
Using the digital zoom to take close-up pictures
• With the digital zoom, part of the image is cropped and enlarged. The greater the magnification, the
grainier the picture appears.
Increasing the ISO sensitivity
• When you increase the [ISO] setting, “noise”, which appears as spots of unwanted color or
unevenness in the color, can be introduced and give the picture a grainy appearance. This camera
is equipped with a function to allow shooting at high sensitivity while suppressing noise; however,
increasing the ISO sensitivity can result in some noise, depending on the shooting conditions.
g “ISO Changing the ISO sensitivity” (P. 23)
• The reason why there are sometimes differences between the actual colors and the colors recorded
in a picture is related to the light source illuminating the subject. [WB] is the function that helps the
camera determine the true colors. Normally, the [AUTO] setting provides the optimal white balance,
but depending on the subject, results may be better if you manually adjust the [WB] setting.
• When the subject is in the shade on a sunny day
• When the subject is illuminated by both natural light and indoor lighting, such as when
near a window
• When there is no white in the center of the frame
g “WB Adjusting the color of a picture” (P. 22)
• Often, bright subjects (such as snow) turn out darker than their natural colors. Adjusting OF
toward [+] makes the subject closer to their real shades. Conversely, when you are shooting dark
subjects, it can be effective to adjust toward [–]. Sometimes, using the flash may not produce the
brightness (exposure) that was intended.
g “OF/< button Changing picture brightness (Exposure compensation)/Printing pictures” (P. 15)
• Set the flash to [#] (fill-in) to activate fill-in-flash. You can shoot a subject against backlight without
the face of the subject appearing dark. [#] is effective not only for shooting against backlight, but
also for shooting under fluorescent and other artificial lightening.
g “Y# button Flash shooting” (P. 15)
• Selecting a [+] exposure value with OF is useful in shooting a subject against backlight.
g “OF/< button Changing picture brightness (Exposure compensation)/Printing pictures” (P. 15)
• When [AF MODE] is set to [FACE DETECT], the camera determines the exposure by metering a
face and the face in the picture taken will appear brighter even in backlight conditions.
g “AF MODE Changing the focusing area” (P. 24)
There are two ways to record the pictures you take with this camera.
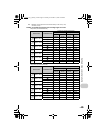
Recording pictures to the internal memory
• Pictures are recorded to the internal memory, and when the number of storable still pictures
reaches 0, you connect the camera to a computer to download the pictures; and then erase the
pictures from the internal memory.
Using a card (xD-Picture Card) (optional)
• Pictures are recorded to the card when inserted in the camera. When the card is full, you can
download the pictures to a computer and then either erase the pictures from the card or use a new
card.
• Pictures are not recorded to the internal memory when a card is inserted in the camera. Pictures in
the internal memory can be copied to the card using the [BACKUP] function.
The picture is too grainy
Taking pictures with the correct color
Taking pictures of a white beach or snow scene
Taking pictures of a subject against backlight
Additional shooting tips and information
Increasing the number of pictures that can be taken
d4362_63_e_0000_7.book Page 44 Tuesday, November 13, 2007 8:43 PM