


93
EN
PRE-CAPTURE g ............................34
PRESET (WB) ......................................32
Press fully .............................................15
Press halfway .......................................14
PRINT ORDER < .......................... 54, 65
Print reservations < .............................67
Program mode P .................................. 17
Protect 0 ........................................... 52
PW ON SETUP .....................................56
R
RAW .........................................31, 49, 79
RAW DATA EDIT ..................................49
REC VIEW ............................................57
Recording length of movies ..................79
Recording sound with movies R ...........42
Recording sound with still pictures R ...39
Red-eye fi ll-in fl ash !# .................... 23
REDEYE FIX ........................................48
Red-eye reduction fl ash ! ................ 23
RESET .................................................. 47
RESET (MY MODE SETUP) ................62
Resizing Q ......................................... 49
Rotating images y ...............................53
S
SATURATION T ................................. 40
SEL. IMAGE .........................................54
Selecting a language W ............ 13, 55
Self-timer Y .........................................24
Sequential playback .............................29
Sequential shooting j .......................34
Shadow adjustment technology f ......22
SHARPNESS N...................................39
Shooting guide g ........................27
Shooting mode........................................4
Shooting movies n ..............................20
Shutter priority mode S ........................18
SHUTTER SOUND ...............................56
Shutter speed .......................................18
SILENT MODE j .................................63
Single image erase ...............................16
Single-frame reservation < .................67
Single-frame shooting o ....................34
SLAVE ..................................................38
SLEEP ..................................................63
Sleep mode.....................................63, 72
SLIDESHOW ........................................48
Slow synchronization L, M .............23
Slow synchronization/Red-eye
reduction fl ash N.............................23
SOUND SETTINGS ..............................56
SPOT (AF MODE) ................................36
Spot metering 5 ................................. 35
STANDARD ..........................................64
Strap .....................................................10
Sunny day 5 ....................................... 32
Super macro mode % .........................24
T
TIMELAPSE L ....................................41
Top menu ............................................4, 5
Total recording time ..............................16
Tungsten light 1 ..................................32
TYPE (SLIDESHOW) ...........................48
U
USB cable .................................10, 64, 70
V
VIDEO OUT ..........................................60
VIVID h ...............................................39
W
Warning sound 8 ................................56
WB ........................................................ 32
White balance compensation > ......39
X
xD-Picture Card ........................11, 45, 78
Z
Zoom...............................................21, 35
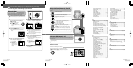
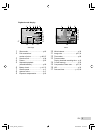
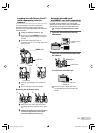
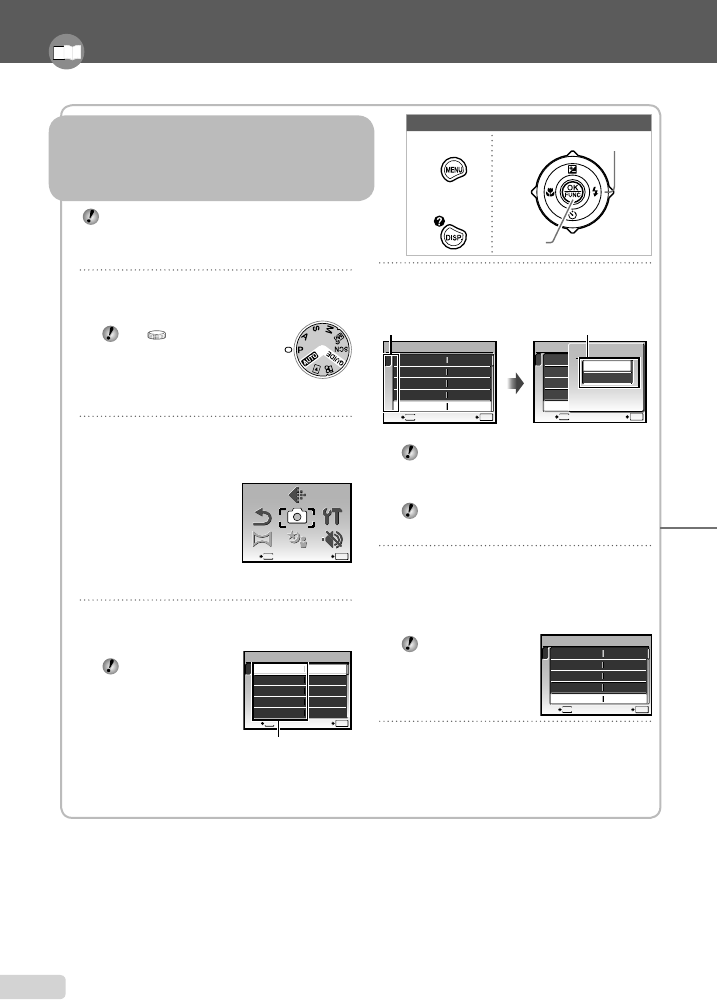
Please read “Menu Settings” (p. 31 to 63) while referring to this page.
1
Set the mode dial to P, A, S, M, r,
s, A or q.
The symbol in “Menu
Settings” (p. 31 to 63)
indicates available shooting
modes.
2
Press the m button.
This example shows how to set the [DIGITAL
ZOOM].
SCN
SCN
RESET
RESET
PANORAMA
PANORAMA
CAMERA
MENU
CAMERA
MENU
SILENT
MODE
SILENT
MODE
MENU
EXIT SET
OK
IMAGE
QUALITY
IMAGE
QUALITY
SETUP
SETUP
Shooting mode top menu
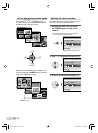
3
Use 789: to select the desired
menu, and press the o button.
Pressing and
holding the
E
button displays an
explanation (menu
guide) of the option
selected.
ISO
OFF
OFF
1
2
3
4
5
CAMERA MENU
SET
OK
AUTO
o
FINE ZOOM
DIGITAL ZOOM
DRIVE
AUTOWB
MENU
EXIT
Submenu 1
●
m button
Arrow pad
o button
Buttons in use
4
Use 78 to select the desired
submenu 1, and press the o button.
1
2
3
4
5
ISO
OFF
OFF
CAMERA MENU
AUTO
o
FINE ZOOM
DIGITAL ZOOM
DRIVE
AUTOWB
MENU
EXIT SET
OK
1
2
3
4
5
ISO
OFF
OFF
CAMERA MENU
AUTO
o
FINE ZOOM
DIGITAL ZOOM
DRIVE
AUTOWB
MENU
SET
OK
BACK
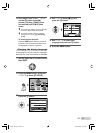
DIGITAL ZOOM
OFF
ON
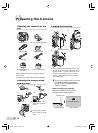
Page tab Submenu 2
To quickly jump to the desired submenu,
press 9 to highlight the page tab, and then
use 78 to move the page tab. Press : to
return to the submenu 1.
Some menus include submenus that appear
by pressing the o button.
5
Use 78 to select the submenu 2,
and press the o button.
Once a setting is made, the display returns to
the previous screen.
There may be
additional operations.
“Menu Settings” (p. 31
to 63)
6
Press the m button to complete
the setting.
●
Three Types of Setting Operations
E button
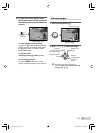
Using the MenuUsing the Menu
Various camera settings can be accessed through the
menus, including functions used during shooting and
playback and the date/time and screen display.
There may be unavailable menus depending on the
other related settings or the position of the mode dial.
1
2
3
4
5
ISO
OFF
ON
CAMERA MENU
AUTO
o
FINE ZOOM
DIGITAL ZOOM
DRIVE
AUTOWB
MENU
EXIT SET
OK
EN
3
4
EN
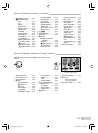
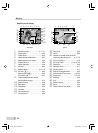
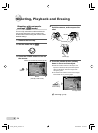
Menu Index
Menus for Shooting Functions
When the mode dial is set to a shooting mode position
(h
P A S M r
s n), settings can be adjusted.
SCN
SCN
RESET
RESET
PANORAMA
PANORAMA
CAMERA
MENU
CAMERA
MENU
SILENT
MODE
SILENT
MODE
MENU
EXIT SET
OK
IMAGE
QUALITY
IMAGE
QUALITY
SETUP
SETUP
5
1
2
3 7
6
4
Shooting mode top menu
Using the FUNC menu (p. 26)
Using the FUNC menu (p. 26)
Frequently used shooting menu functions can be set with less steps using
the FUNC menu.
o
button (p. 26)
Arrow pad
o button
Buttons in use
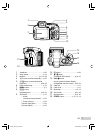
Using the Direct Buttons (p. 14 to 26)
Using the Direct Buttons (p. 14 to 26)
Frequently used shooting functions can be accessed using the direct
buttons.
Shutter button (p. 14)
u button (monitor/viewfi nder) (p. 25)
z
/
m
button (custom) (p. 26)
7 button (exposure compensation) (p. 23)
9 button (macro) (p. 24)
: button (fl ash) (p. 22)
8 button (self-timer) (p. 24)
q
/
P
button (playback/print) (p. 15, p. 64)
g/
E
button (menu guide/information display
change/date and time check) (p. 3, p. 25, p. 60)
f/D button (SHADOW ADJ/erase) (p. 16, p. 22)