


Pelco Manual C1971M-D (1/03) [ 3 ]
Color Camera
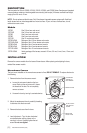
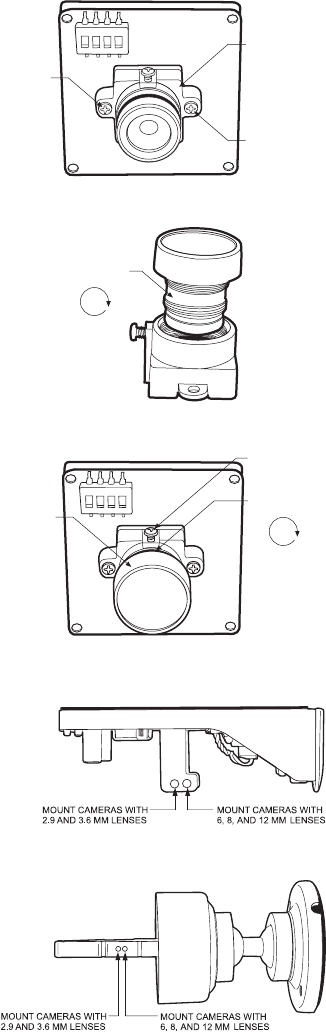
When replacing a lens on a color camera, change
the lens mount and lens.
1. Unscrew the two Phillips screws on the
sides of the lens mount. Do not discard
the screws as you will need them to
secure the new mount. Lift and remove
the lens mount and lens.
2. The new lens mount and lens are shipped
unassembled. Mount the lens onto the lens
mount by carefully threading it clockwise.
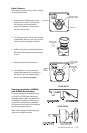
3. Install the new lens mount assembly. Secure it
with the two Phillips screws previously removed
in step 1.
4. Remove the dust cover from the lens.
5. Lens Adjustment – Turn the lens clock-
wise/counterclockwise until the picture on
the monitor is in focus. Carefully tighten
the set screw. Do not over-tighten.
UNSCREW
UNSCREW
REMOVE LENS
MOUNT & LENS
REMOVE
DUST
COVER
ADJUST LENS
(CLOCKWISE)
DO NOT OVER-
TIGHTEN SET
SCREW
MOUNT LENS
(CLOCKWISE)
Camera Installation (ICS200
and ICS300 Series Only)
To prevent damage to the camera or lens of
an ICS200 or ICS300 Series Camclosure
integrated camera system, the camera must
be installed in the proper hole of the mount-
ing bracket. If the camera is not installed in
the correct hole, the window of the enclosure
may be forced against the lens.
Refer to the illustrations for which mounting
hole to use to install the camera.
ICS200 SERIES
ICS300 SERIES