C1457M-C (1/01)
LD5 Series
Spectra
®
Lower Domes
®
The LD5 Series of lower domes is part of the SD5 Series of Spectra
®
dome systems.
IN-CEILING MODELS
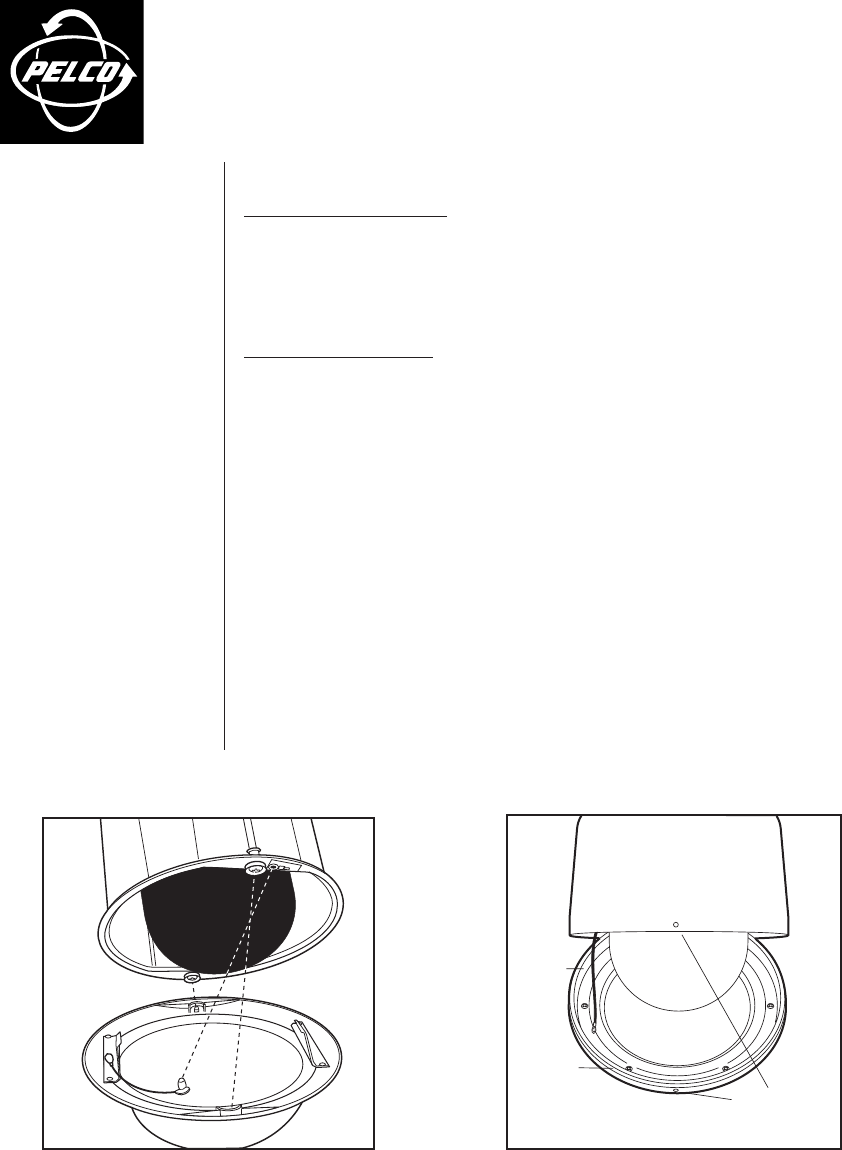
1. Refer to Figure 1. Snap the clip on the end of the trim ring leash into the hole on the lip of
the back box next to one of the mounting screws.
2. Line up the snaps on the trim ring with the mounting screws on the back box. Snap the
trim ring into place on the plastic snap washers on the mounting screws.
PENDANT MODELS
1. Remove the O-ring and O-ring lubricant from the parts bag. Apply lubricant to the O-ring.
Install the O-ring in the groove on the trim ring of the lower dome.
2. Refer to Figure 2. Hanging down from the back box is a short cable (the trim ring leash).
Hold up the lower dome near the back box so that the trim ring leash touches the lower
dome. Line up the two screw holes in the trim ring of the lower dome with the two screw
holes in the back box. Place a finger on the edge of the trim ring where the leash touches
the lower dome.
3. Look inside the lower dome and note which of the six retainer screws is closest to your
finger. Remove this screw and attach the trim ring leash to the screw. Reinstall the screw
securely and make sure the leash will hold the lower dome.
4. If you are installing an outdoor model, plug the two-pin heater connection in the lower
dome into the mating connector in the back box.
5. Remove the two mounting screws from the lower dome. Apply a drop of Loctite
®
(sup-
plied) to each screw.
6. Push the lower dome inside the back box, line up the screw holes, and install the two screws.
Figure 1. Lower Dome Installation, In-Ceiling Models Figure 2. Lower Dome Installation, Pendant Models
3500 Pelco Way
Clovis, CA 93612-5699
USA
In North America & Canada:
Tel (800) 289-9100
FAX (800) 289-9150
International Customers:
Tel +1(559) 292-1981
FAX +1(559) 348-1120
www.pelco.com
00242
MOUNTING
SCREW HOLES
FRONT & BACK
LEASH
ATTACH
LEASH TO
NEAREST
RETAINER
SCREW
00243


