


You can transfer images and movies captured with your digital camera to your computer and
then display and manage them by installing the software included on the provided CD-ROM
to your computer and connecting your digital camera to your computer with the USB cable.
This section explains how to install the provided software “ACDSee for PENTAX” and the
other necessary preparations for enjoying your digital camera pictures and movies on your
computer.
PENTAX and Optio are trademarks of PENTAX Corporation.
© 2007 ACD Systems Ltd. All rights reserved. ACDSee and the ACDSee logo are trademarks
of ACD Systems Ltd. in Canada, the U.S., Europe, Japan and other countries.
Microsoft and Windows are registered trademarks of Microsoft Corporation in the United
States and other countries.
Windows Vista is either a registered trademark or trademark of Microsoft Corporation in the
United States and/or other countries.
Mac OS and Macintosh are registered trademarks of Apple Computer, Inc.
All other brands or product names are trademarks or registered trademarks of their respective
companies.
PC Connection
Manual
Software Provided
Windows
• ACDSee for PENTAX 3.0 (Image viewing/managing/editing software)
Macintosh
• ACDSee for PENTAX (Image viewing/managing software)
You are recommended to use an AC adapter connected to a power outlet when
connecting the camera to a computer. If the battery runs out of power while images are
being transmitted to the computer, the image data may be lost or damaged. When using
an AC adapter, make sure that the AC plug cord is properly connected to the camera.
Macintosh UsersWindows Users
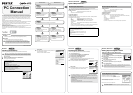
Step 1
First, check the system requirements for the provided software.
Step 2
Install the image viewing/managing/
editing software (ACDSee for
PENTAX 3.0) on your PC.
Step 5 *on reverse side
Use the supplied software to view
and manage images transferred to
your Macintosh.
Step 3
Set up your digital camera for connecting with your computer.
Step 4 *on reverse side
Connect the camera and your PC,
and transfer images.
Step 4 *on reverse side
Connect the camera and your
Macintosh, and transfer images.
Step 5 *on reverse side
Use the supplied software to view,
manage or edit images transferred to
your PC. You can also enjoy laying
out and printing images or creating
slide shows.
Step 2
Install the image viewing/managing
software (ACDSee for PENTAX) on
your Macintosh.
System Requirements
USB connection
• OS : Windows 2000, Windows XP, Windows Vista
• USB port must be standard equipment
Application Software
<ACDSee for PENTAX 3.0>
(Nine languages: English, French, German, Spanish, Italian, Russian, Chinese [traditional
and simplified], Korean, Japanese)
• OS : Windows 2000, Windows XP or Windows Vista
• CPU : Pentium III or higher
• Memory : 256 MB minimum (512 MB or more recommended)
• Hard Disk space : 100 MB minimum (1 GB or more recommended)
• CD-ROM drive
• Monitor : Display adapter capable of displaying a minimum of 256 colors
• Internet Explorer 5.0 or later
∗ DirectX 9.0 or later and Windows Media Player 9.0 or later are required to play the movies.
∗ Operation is not guaranteed on all PCs meeting the system requirements.
USB connection
• OS : Mac OS 9.2, Mac OS X (10.1.2 or later)
• USB port must be standard equipment
∗ Installation of the driver is not necessary.
Application Software
<ACDSee for PENTAX>
(Six languages: English, French, German, Spanish, Italian, Japanese)
• OS : Mac OS 9.2 or later (requires the latest version of CarbonLib)
• CPU : PowerPC 266 MHz or higher
• Memory : 8 MB minimum
• Hard Disk space : 6 MB minimum
• CD-ROM drive
∗ Operation is not guaranteed on all PCs meeting the system requirements.
Windows System Requirements
USB connection and the included application software do not support Windows 95,
Windows 98, Windows 98SE, Windows Me and Windows NT.
The versions of Internet Explorer, Windows Media Player and DirectX required for use of ACDSee for
PENTAX 3.0 are not included in the provided CD-ROM (S-SW70). Visit the following sites to download
necessary items and install/update them on your PC.
• Internet Explorer
http://www.microsoft.com/windows/downloads/ie/getitnow.mspx
• Windows Media Player
http://www.microsoft.com/windows/windowsmedia/default.mspx
• DirectX
http://www.microsoft.com/windows/directx/default.mspx
Macintosh System Requirements
Installing the Software
Install the image viewing/managing/editing software (ACDSee for PENTAX 3.0).
1 Turn your PC on.
2 Insert the CD-ROM (S-SW70) into the CD-ROM drive.
The language selection screen appears.
3 Choose a language from the displayed screen.
The ACDSee for PENTAX 3.0 installation screen appears.
4 Click [Install].
Setup screen appears. Follow the on-screen guidance and
enter the registration information.
Reboot your PC after installation is finished.
• Make sure your PC meets the system requirements before installing the software.
• When multiple accounts have been setup in Windows 2000, Windows XP or Windows
Vista, log on with an account that has administrative rights before installing the software.
If you are using Windows Vista
When the [AutoPlay] screen appears, display the language selection screen following the
steps below.
1) Click [Run setup.exe].
2) Click [Allow].
The language selection screen appears.
If the language selection screen does not appear
Display the language selection screen following the steps below.
1) Double-click [My Computer] on the desktop.
2) Double-click the [CD-ROM drive (S-SW70)] icon.
3) Double-click the [Setup.exe] icon.
Installing the Software
Install the image viewing/managing software (ACDSee for PENTAX).
1 Turn your Macintosh on.
2 Insert the CD-ROM (S-SW70) in the CD-ROM drive.
3 Double-click the CD-ROM (S-SW70) icon.
4 Double-click the [Install ACDSee] icon.
The language selection screen appears.
Double-click the [Master Installer] icon to display the language selection screen.
5 Choose a language from the displayed screen.
The ACDSee for PENTAX installer screen appears.
6 Click [Install].
The setup screen appears. Follow the on-screen guidance to
input registration information and install the software.
Setting Up Your Digital Camera
1 Press the 3 button.
2 Press the four-way controller (5) to display the [u
Setting] menu.
3 Use the four-way controller (23) to select [USB
Connection].
4 Press the four-way controller (5).
A pull-down menu appears.
5 Use the four-way controller (23) to select [PC].
6 Press the 4 button.
If your PC is connected to the Internet, please click [Product
Registration] on the setup screen in .
A world map for Internet Product Registration is displayed.
Click the displayed country or region and then follow the
instructions to register your product.
Thank you very much for your cooperation.
If the message [CarbonLib-xxxxx could not be found] appears during installation:
You must add the extension file “CarbonLib” to the Extension folder in the System folder
in order to install the provided software in Mac OS 9.2.
This message appears when this extension file does not exist or when an older version of
the file exists.
The latest version of the CarbonLib file is available on the Apple website. Download the
file and then install it.
Apple website: http://www.apple.com/
∗Contact Apple for detailed information on how to use the CarbonLib file.
Setting the USB Connection Mode to [PC]
If the digital camera is connected to your PC in [PictBridge] USB Connection mode, the
images cannot be transferred. Disconnect the USB cable from your camera and PC to set
the USB Connection mode to [PC], and then reconnect the USB cable.
Product Registration on the Internet
Only customers in displayed countries and regions can register their products on the
Internet Product Registration.
Setting
Folder Name
USB Connection
Video Out
Date
PC
PictBridge
2/3
MENU
Cancel
Brightness Level
Power Saving
5sec
OK
OK
Step 2
Windows Step 2 Macintosh Step 2
Windows, Macintosh Step 1
57975 01-200709 Printed in Vietnam
Windows, Macintosh Step 3