


4
PREPARATION AND BASICS
Unpacking and Setup:
Unpack all units carefully to remove all parts from the carton(s). Do
not discard or destroy the packing material until the equipment has
been inspected, assembled, and all parts accounted for. After
unpacking, all parts should be examined for any damage, which
may have been caused by rough handling during shipment. If any
damage is detected, contact the delivering carrier at once. Claim for
damage should be made to the delivering carrier before destroying
packing cartons.
To set up the unit, first mount and secure it on a suitable stand. The
StudioMax III stand adapter allows the unit to be mounted on a
stand with a 3/8” to 5/8” post. Be sure to use a stand that is stable
and will not tip easily.
The unit may be shipped with the modeling lamp and flashtube not
installed. While installing the modeling lamp and flashtube (with
glove or clean cloth to protect the hand) be sure they are properly
inserted and tight to avoid arcing and failure of the socket contacts
during operation. Do not touch the glass tubes with bare hands, as
normal body oils will shorten the bulb’s life. Always use a clean
cloth or wear gloves to protect your hand from glass breakage and
heat. If flashtube and modeling lamp are installed when received,
there will be spacers between the glass to prevent damage during
shipping. REMOVE THE SPACERS.
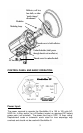
The 7-½ inch reflector is attached by the “quick-change”
mechanism. A solid tab and a thumb screw on the unit grip the ring
on the reflector. To mount the reflector, loosen the thumbscrew so it
does not show inside the circle and tilt the reflector past the
stationary top-tab, then past the thumbscrew. Tighten the
thumbscrew, securing the reflector (see illustration below.) All
accessory reflectors and soft boxes are designed for use with this
“quick-change” system or onto this 7-½ inch reflector.
After mounting the light on your stand and with power switch OFF,
attach the line AC line cord to the power-input connector, located on
the bottom of the StudioMax III, and then connect the other end of
the cable to a grounded wall outlet. Turn the power switch ON. The
READY light will light only when the unit has charged to the selected
setting.