


6
Circuit Protection:
Circuit protection (fuse) automatically protects this appliance from
excessive damage due to circuit or component failure. Operation
exceeding the rated cycle of the appliance may cause the fuse to open.
[Always replace fuse with same rating of fuse.]
To replace a blown fuse (power cord must be disconnected), simply
unscrew the fuse holder cap (side front of unit) and replace the exposed
fuse with a new fuse. If fuses continue to blow, contact your dealer or
qualified service person.
(See specification section for fuses replacements)
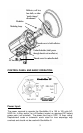
Power Switch:
The three-position power switch controls the AC power to both the modeling
and flash circuits. The lower position is OFF. Center position is flash only.
Top position is flash and modeling light.
If using a battery model (B) with a battery pack, turn ON the AKC unit
before turning the battery pack power ON.
Flash Power:
All settings and controls of the StudioMax III are extremely stable and
repeatable due to the use of an internal microcomputer. The AK320 and
AK320B are adjustable from 10-watt seconds to 320-watt seconds. The
AK160 and AK160B are adjustable from 5-watt seconds to 160-watt
seconds.
To adjust the StudioMax III to its lowest flash power setting (5 or 10 watt
seconds), rotate the FLASH POWER control knob fully counter clock-wise.
To adjust the StudioMax III to its greatest flash power setting (160 or 320
watt seconds), rotate the FLASH POWER control knob fully clock-wise.
Ready Light:
The StudioMax III is charged when the READY lamp is on. Lowest power
(10 ws) charge time is a maximum of .1 seconds and at full power charge
(320 ws) time is a maximum of 3 seconds. The unit may be flashed before
fully charged.