OWNER’S MANUAL —
Please read before using this equipment.
www.radioshack.com
™
49-2516
©
2002 RadioShack Corporation.
All Rights Reserved.
RadioShack and RadioShack.com are trademarks
used by RadioShack Corporation.
Thanks for purchasing a RadioShack
1
/
3
-Inch
Color Indoor/Outdoor Camera. Your
camera is super-small and compact. It is
designed for use with a RadioShack
10-Inch
Single Channel Security Monitor (Cat. No.
49-2514)
to provide a safe and secure
environment.
Built-in Speaker and Microphone
— allow
2-way communication with compatible
equipment.
Color-B&W Auto Switching
— enables
better night vision by automatically turning to
B&W when illumination falls below 2 Lux.
CMOS (Complementary Metal-Oxide
Semiconductor) Sensor
— provides
superior-resolution color and B&W images.
Passive Infrared (PIR) Sensor
— detects
motion up to 16.5 feet away from an angle of
up to 100°.
Weatherproof
— so you can mount the
camera indoors or outdoors.
%#/'4#"/1706+0)")7+&'.+0'5
Carefully plan where and how you will
position the camera and where you will route
the cable that connects the camera to the
monitor. When planning the installation:
• Select a location for the camera that
provides a clear view of the area you
want to monitor, is free from dust, and is
not in direct sunlight or in line-of-sight of
a strong light source.
• Do not install the camera in a location
where it will be exposed to high humidity
or rain.
• Plan the cable’s route so it is not close to
power or telephone lines, transformers,
microwave ovens, or other electrical
equipment that could interfere with (or
accept interference from) the system.
•
Select a location for the camera that has
an ambient temperature between –4
°
F
(–20
°
C) and 122
°
F (50
°
C).
• If you plan to install the camera in a
location that has conditions not
recommended in this manual, consult
with a professional installer and consider
use of a separate camera cover or
housing.
/1706+0)"#0&"+056#..+0)"6*'"%#/'4#
You can mount the camera indoors or
outdoors in a permanent location such as a
wall or on a movable platform (such as a
tripod) for mounting on a desk, shelf, or table.
1. Use the base of the camera as a guide,
mark the locations for the screw holes on
the mounting surface.
2. Drill a starter hole at each marked
location. If necessary, drill a third hole (at
least 14 mm in diameter) below the
mounting holes to permit the camera’s
cable to be inserted through the
mounting surface.
3. If necessary, insert the supplied drywall
anchors into the screw holes.
4. Insert one of the two supplied screws
through each of the screw holes in the
bracket and into the mounting surface,
then tighten each screw until the base is
secure.
5. Loosen the screw from the camera’s
arm-sleeve and fully insert the base’s
arm into the sleeve. Then secure the
arm and sleeve together by tightening
the screw.
5'66+0)"72"6*'"%#/'4#
%100'%6+0)"&+4'%6.;"61"6*'"
/10+614
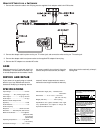
1. Connect the camera’s mini-DIN plug into
the supplied 59-foot cable’s mini-DIN
socket.
2. Connect the 59-foot cable to the
monitor’s mini-DIN port.
±
"016'"±"
Though the camera is highly sensitive, it
cannot “see” over a wide area in total
darkness. To assist the camera’s night
vision, install a 100-watt incandescent
lamp (rich in infrared radiation) to
illuminate the camera’s viewing area.
You can also use a small incandescent
flood lamp. Halogen lamps, other high
pressure outdoor lamps, and fluorescent
lighting are infrared-poor and not
recommended.
3
15/+PEJ"%QNQT"+PFQQT11WVFQQT"%COGTC
#
"+/2146#06"
#
If an icon appears at the end of a paragraph, go to the box on that page with the corresponding icon for
pertinent information.
R
RR
Rý
— Warning
#
— Important
±
±±
±
— Note
.
— Caution
°
°°
°
— Hint


