


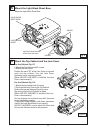

Set up the projector in the place where it is to be used, turn on the power and project a picture.
Adjust the position of the projector to suit the projection position.
1. Turn the focus ring to adjust the focus at the center of the screen. The focus at the edges of the
screen may not be as sharp as at the center of the screen.
2. If the focus cannot be set correctly at the center of the screen, it will be necessary to move the
lens unit forward or back relative to the flange in order to adjust the back focus. Carry out this
adjustment according to the procedure given below.
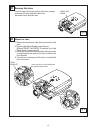
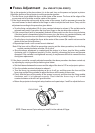
Focus Adjustment
{For LNS-W11 (AH-23631)}
-6-
FOCUS RING
ROULETTE
PIN
NOTE: Please remove 3 pins when you install it in the cabinet of B type.
a. Turn the fixing roulette about 1/4 of a turn counterclockwise to release it. The roulette can be
released more easily if you place the tip of your finger on the pin where the roulette is.
b. If the current focal point is somewhere forward of the screen, turn the focus ring clockwise;
if the focal point is somewhere behind the screen, turn the focus ring counterclockwise, and
then turn the precision lens unit (the focus ring and the fixing roulette) 5 degrees.
c. Turn the focus ring to adjust the focus at the center of the screen. (Be careful not to move the
whole of the lens unit at this time.)
d. Repeat steps b and c until correct focus is obtained.
Note: If the lens unit is difficult to move when carrying out the above procedure, turn the fixing
roulette counterclockwise a further 1/4 of a turn.
e. Once the above adjustment is complete and the picture is in focus, turn the fixing roulette
clockwise until it is tightened securely. Do this carefully, otherwise the focus may become
disrupted. If the roulette is not tightened securely, it may become difficult to remove the lens
during lens replacement.
3. If the focus cannot be correctly adjusted even after the above procedure has been carried out,
try adjusting by carrying out the procedure given below.
a. Set the distance between the screen and the edge of the lens to 0.77 m and project a picture.
b. Turn the roulette counterclockwise to release it.
c. Turn the focus ring counterclockwise as far as it will go, and then move the lens unit (the
focus ring and the fixing roulette) to adjust the focus at the center of the screen.
d. Check that the focus at the center of the screen is correct, and then turn the fixing roulette
clockwise until it is tightened securely. Check that the focus ring is still turned
counterclockwise as far as it will go at this time.
e. Return the projector to its original setup location and repeat steps 1 and 2 to adjust the focus.
FLANGE