


INSTRUCTION MANUAL
Color CCD Camera
THIS INSTALLATION SHOULD BE MADE BY A QUALIFIED
SERVICE PERSON AND SHOULD CONFORM TO ALL LOCAL
CODES.
About this manual
• Before installing and using the camera, please read this manual carefully.
Be sure to keep it handy for later reference.
• This manual covers two models. Any difference between the two models is indicated when
necessary.
ATTACHING THE LENS
PRECAUTIONS
■ In case of a problem
Do not use the unit if smoke or a strange odor comes
from the unit, or if it seems not to function correctly. Turn
off the power immediately and disconnect the power
cord, and then consult your dealer or an Authorized
Sanyo Service Center.
■ Do not open or modify
Do not open the cabinet, as it may be dangerous and
cause damage to the unit. For repairs, consult your
dealer or an Authorized Sanyo Service Center.
■ Do not put objects inside the unit
Make sure that no metal objects or flammable
substance get inside the unit. If used with a foreign
object inside, it could cause a fire, a short-circuit or
damage. Be careful to protect the unit from rain, sea
water, etc. If water or liquid gets inside the unit, turn off
the power immediately and disconnect the power cord,
and then consult your dealer or an Authorized Sanyo
Service Center.
■ Be careful when handling the unit
To prevent damage, do not drop the unit or subject it to
strong shock or vibration.
■ Do not install this unit close to magnetic fields
The magnetic fields may result in unstable operation.
■ Protect from humidity and dust
To prevent damage, do not install the unit where there
is greasy smoke or steam, where the humidity may get
too high, or where there is a lot of dust.
■ Protect from high temperatures
Do not install close to stoves, or other heat sources,
such as spotlights, etc., or where it could be subject to
direct sunlight, as this could cause deformation,
discoloration or other damage.
Be careful when installing close to the ceiling, in a
kitchen or boiler room, as the temperature may rise to
high levels.
■ Cleaning
• Dirt can be removed from the cabinet by wiping it with
a soft cloth. To remove stains, wipe with a soft cloth
moistened with a soft detergent solution and wrung
dry, then dry by wiping with a soft cloth.
• Do not use benzine, thinner or other chemical
products on the cabinet, as this may cause
deformation and paint peeling. Before using a
chemical cloth, make sure to read all accompanying
instructions. Make sure that no plastic or rubber
material comes into contact with the cabinet for a
long period of time, as this may cause damage or
paint peeling.
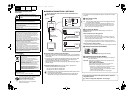
To prevent damaging the camera
5 mm/0.2 in. max.
LENS terminal for auto iris lens
Depending on the type of the lens, the shape of the lens plug may differ.
In this case, consult your dealer or an Authorized Sanyo Service Center.
Drive coil (+)
Drive coil (–)
Brake coil (–)
Brake coil (+)
Apply adapter ring (sold separately) when you use any
C mount lens.
VCC-5995P
VCC-5884EA
1AC6P1P3343--
L5CR2/XE, US (0808KP-HS)
SANYO Electric Co., Ltd.
Printed in China
SPECIFICATIONS
Scanning system : VCC-5995P: PAL standard 625 lines, 50 fields/sec.
VCC-5884EA: NTSC standard 525 lines, 60 fields/sec.
Image sensor : 1/3" interline transfer method CCD
Number of effective pixels : 752 (H) x 582 (V)
Horizontal resolution : 540 TV lines, typical
Minimum illumination : 0.5 lx (F1.2, AGC ON)
Video output : 1.0 V(p-p)/75 Ω, composite, BNC
Video S/N ratio : More than 48 dB (AGC OFF: More than 50 dB)
Light control : Optical auto iris lens (DC type)/Electronic iris (indoor use)
Lens mount : CS mount
Flange back : 12.5 mm ±0.5 mm/0.5 in. ±0.02 in.
Backlight compensation : ON (Center zone metering)/OFF
Gain control : AGC ON/OFF
Sync system : Internal sync/Line lock
Operating Environment : Temperature: -10°C – +50°C (14°F – 122°F)
Humidity: less than 90 % RH (no condensation)
Power supply : VCC-5995P: 24 V AC ±10%, 50 Hz/ 12 – 15 V DC
VCC-5884EA: 24 V AC ±10%, 60 Hz/ 12 – 15 V DC
Power consumption : Approx. 3.6 W (with auto-iris lens)
Weight : Approx. 160 g/5.6 oz. (without lens)
Appearance and specifications are subject to change without prior notice or obligations.
If the flange-back lock screws are loose, the CS mount ring will not be secured and it will not be possible to
adjust the flange-back.
Remove the lens and check that the two flange-back lock screws have been tightened, then fully install the lens
again.
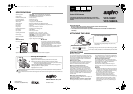
51(2.0)
49(1.9)
1(0.04)
63(2.5)
68(2.7)
● Dimensions
Unit: mm (inch)
● Service
The camera is a precision instrument. Handle it
carefully and always follow the safety precautions.
If the camera requires service, never try to repair it
yourself or open the casing.
For servicing, maintenance, or repairs, consult your
dealer or an Authorized Sanyo Service Center.
1, 4
2
3
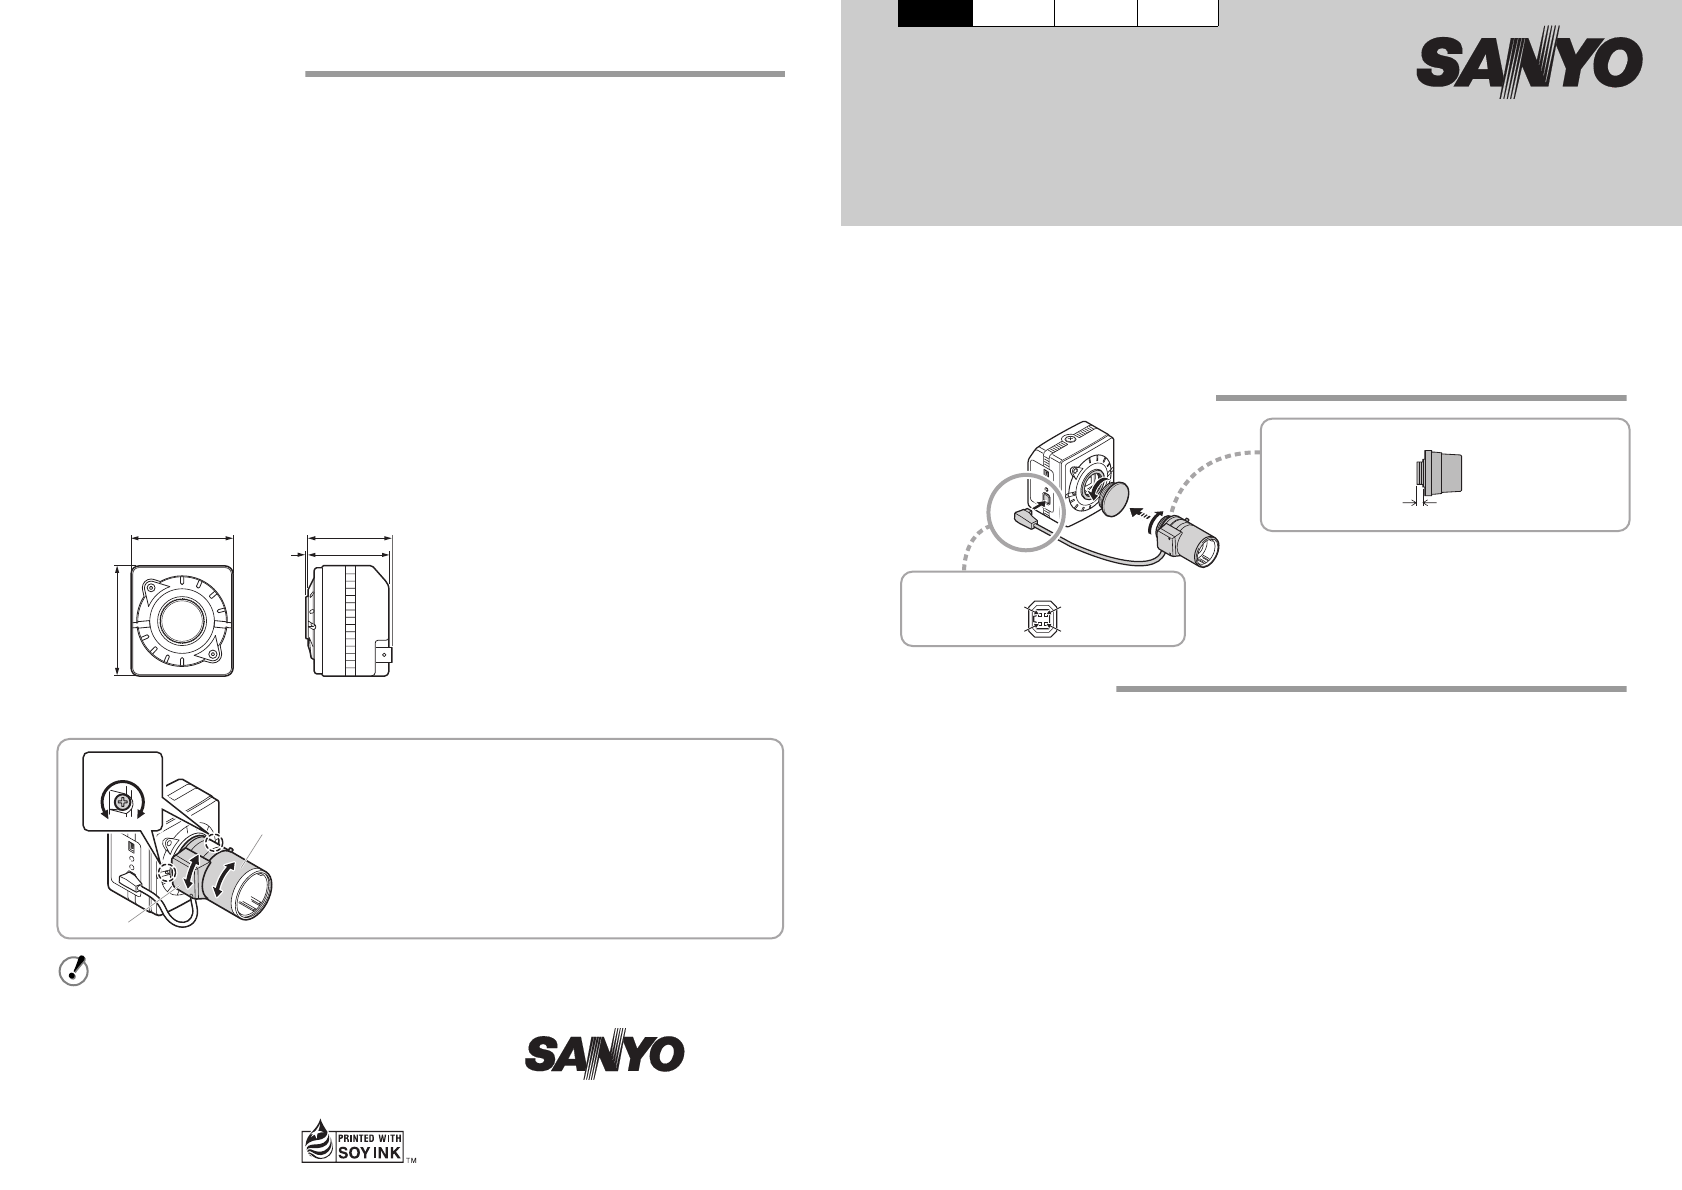
■ Flange-back adjustment
1)
Loosen the two screws.
2)
Set to the maximum telephoto position and focus the picture.
3)
Set to the maximum wide-angle position and focus the picture.
• When the lens barrel is turned, the CS mount ring also turns causing
it to act as the flange-back adjustment dial.
Repeat steps
2
and
3
until the image stays in-focus when changing from a
wide-angle position to a telephoto position.
4)
Tighten the two screws.
English Français Deutsch 中文简体
L5CR2_XE(VCC-5995P_5884EA)(GB).fm 0 ページ 2008年8月6日 水曜日 午後5時6分