


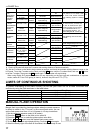
22
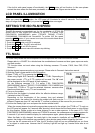
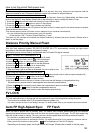
Setting the Flash Mode on the slave flash unit
The following has to be programmed into the master unit. This will set the
mode for the slave unit.
10. Press the
+ or – button and select a slave group number.
11. Press the SEL button so the flash symbol blinks and press the + or –
button to select icon.
12. Continue from step 7 above.
If you wish to fire two or more sets of slaves in different flash modes, use desired settings for each group number.
If you set the Master or Slave to MULTI, all groups must be set to MULTI. Combinations with other flash
modes are not possible.
If the Master or Slave is changed from MULTI to TTL or M, other groups will be changed to TTL or M. However, if the
exposure compensation or flash output level returns to the initial value, it will be necessary to set them up again.
13. Check that all flashguns are fully charged.
Confirm that the Master unit’s “Ready Light” is on and the Slave unit’s “AF Auxiliary Light” is blinking.
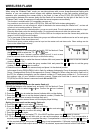
Standard TTL will be displayed regardless of the selected flash mode.
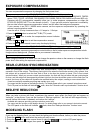
Modeling flash when Wireless flash is used
If master unit is used for modeling flash
After wireless flash has been set, modeling flash can be used by pressing the TEST button.
If slave unit is used for modeling flash
1. When Wireless Flash setup is complete, press the + or – button on the master to select icon.
2. Press the SEL button several times to display (blinking) on the LCD display.
3. Press the + or – button to select and press the SEL button to confirm.
4. By pressing the TEST button only the selected flashgun will fire in modeling mode.
If you wish to select the master unit as the modeling flash, follow the above steps, but in step 3 select
and erase from display
.
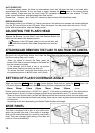
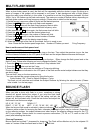
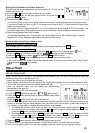
Slave Flash
Normal Slave Flash
Even if the EF-530 DG SUPER is not attached to the camera body, you can fire the flash by using the
camera’s built-in flash or another flash unit.
1. Attach the flash unit to the camera’s hot shoe.
2.
Set the camera’s exposure mode to the desired mode. If you use A or M mode, also set the desired aperture value.
3. Turn on the flash unit and press the shutter button half way.
Now, the aperture value and film speed are automatically
transmitted to the flash unit.
4. Remove the flash unit from the camera.
5.
Press the MODE button and select the /
(Slave) mode.
6. Press the SEL button several times to make the flash output value
indicator blink.
7. Press the + or – button to set the flash output amount.
Determine the appropriate flash output by setting the distance indicator on the LCD panel to coincide as
closely as possible with the actual distance from the slave flash to the subject. If the actual distance is
out of range, you will need to change the aperture value or film speed.
1. To change the aperture value: When the flash unit is set to the Slave mode, press the SEL button
until the aperture value blinks, then press the + or – button to set the desired aperture value. Then
press the SEL button to stop the display blinking.
2. To change the film speed: Press
MODE
to select ISO, then press SEL to make the aperture value
blink. Press the + or – button and set the desired film speed, then press the SEL button once
again. You will need to press the
MODE
button several times to return to the slave mode.
8. Press the SEL button several times to make the display stop blinking.
9. Place the slave unit in the desired location. Do not place the slave unit within the picture area.
10. After confirming that all flash units are fully charged, press the shutter button to take the picture.